Can a $35 bottle of head gasket sealer keep a car running when a proper repair costs several times what the car is worth? I put one to the test in my dad’s daily-driven Jaguar, then took the engine apart to see exactly what happened.
This was not a quick test around the block. The Jaguar went through two years, about 10,000 miles, freezing winters, hot summers, stop-and-go traffic, and long highway drives.
The sealer worked, but it was not a permanent repair, and there were some important downsides. The initial application nearly caused an overheating problem, the leak eventually returned, and the oil analysis gave me one big lesson for next time.
Key Takeaways
- The tested sealer kept the Jaguar running for two years and about 10,000 additional miles.
- Confirm the leak and compare repair costs before choosing a head gasket sealer.
- The teardown revealed a warped head, visible sealer deposits, and no blocked radiator tubes.
- Change the engine oil and filter promptly after the leak is sealed.
Table of Contents
- What a Head Gasket Does and How It Leaks
- Confirm the Leak Before Adding Anything
- Should You Use Sealer or Replace the Head Gasket?
- How Head Gasket Sealer Works
- Choosing a Head Gasket Sealer for This Engine
- How I Applied the Head Gasket Sealer
- The First Drive: A Temperature Spike and Continued Coolant Loss
- The Long-Term Results: Two Years and 10,000 Miles
- Engine Teardown: What Actually Failed?
- Checking the Cylinder Head for Warpage
- Did the Sealer Clog the Radiator or Heater Core?
- Oil Analysis Revealed the Biggest Lesson
- What I Would Do Differently Next Time
- The Verdict: A Useful Compromise, Not a Replacement for Repair
What a Head Gasket Does and How It Leaks
The head gasket sits between the engine block and cylinder head. Both parts have machined mating surfaces, and the gasket seals the joint between them.
Coolant travels through passages in the block and head to carry heat away from the engine. The head gasket helps keep that coolant where it belongs while sealing the combustion chambers. It has to prevent coolant from entering the cylinders and combustion gases from entering the cooling system.
If that seal fails between a cylinder and a coolant passage, leakage can happen in both directions:
- Coolant can enter the combustion chamber and disappear through the exhaust.
- Combustion gases can push into the cooling system, creating bubbles and contributing to overheating.
A damaged gasket can cause that connection, but so can a cylinder head that is no longer flat. That distinction turned out to be especially important on this Jaguar.
Confirm the Leak Before Adding Anything
Before pouring sealer into the cooling system or taking the engine apart, make sure you are treating the right problem. Low coolant and overheating are reasons to investigate, not automatic proof of a bad head gasket.
Never remove a radiator cap or pressurized reservoir cap while the engine is hot. Set up any open-system tests with the engine cold, follow the test equipment instructions, and keep clear of hot coolant, belts, and fans.
Check for external coolant leaks
With the cooling system closed, bring the engine to operating temperature if it can safely get there. A warm cooling system is pressurized, which can make an external leak easier to find.
Inspect the coolant hoses, water pump, radiator, and the ground beneath the car. Look for wet areas, drips, and puddles. On the Jaguar, a thorough inspection found no visible external leakage, so I moved on to checks for an internal leak.
Look at the exhaust and engine oil
A substantial coolant leak into a cylinder can produce thick white exhaust clouds. My Honda del Sol had an obvious example of this when I bought it. The Jaguar did not. Its exhaust looked normal even though it was losing coolant rapidly.
The dipstick is another useful check. Coolant-contaminated oil can look creamy and frothy instead of like ordinary used oil. Again, the Jaguar’s oil looked normal.
That is an important point: the absence of white exhaust clouds or milky oil does not rule out a head gasket leak. This car had neither obvious symptom.
Test for combustion gases in the cooling system
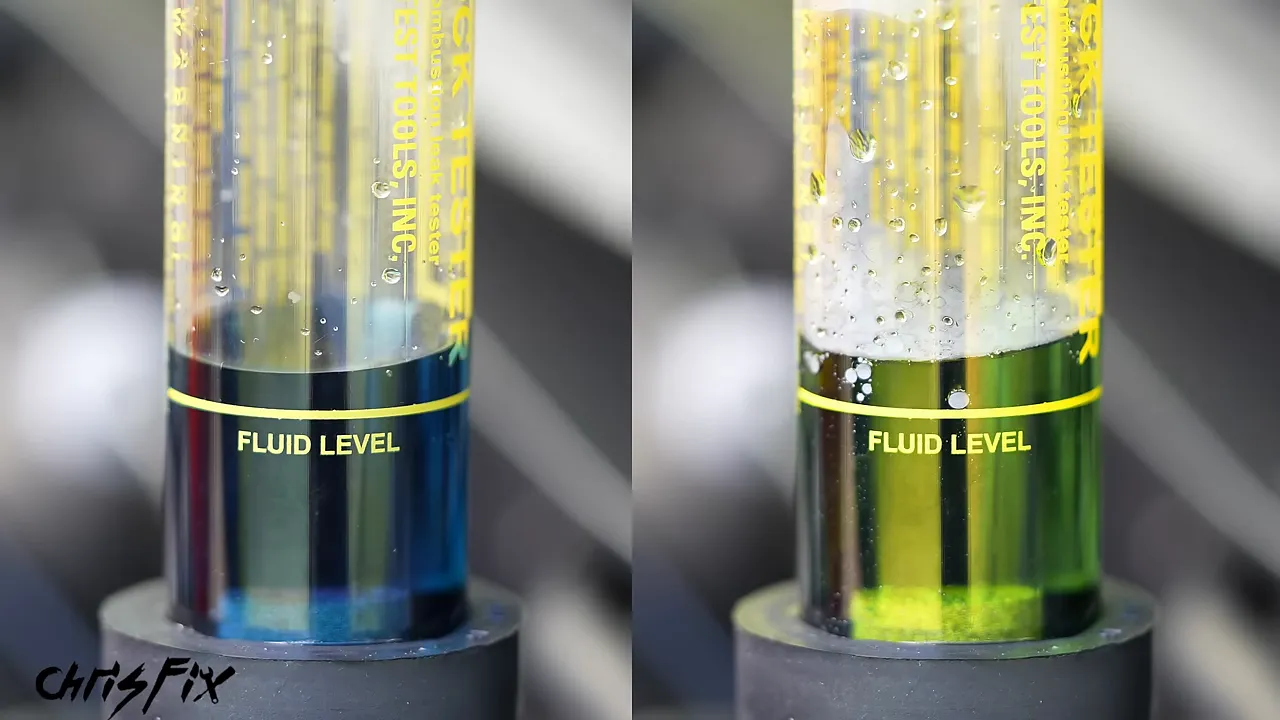
A combustion leak test kit gave us much clearer evidence. The kit I used contains blue test fluid that changes toward yellow when exposed to combustion gases.
- With the engine cold, prepare the radiator or pressurized reservoir opening according to the tester instructions.
- Keep the coolant level low enough that the tester will draw vapor, not liquid coolant.
- Add test fluid to the tester’s fill line and assemble it.
- Run the engine as directed and squeeze the bulb repeatedly to draw vapor through the fluid.
- Check for the specified color change.
On this Jaguar, the fluid changed from blue toward yellow. That confirmed combustion gases were entering the coolant, consistent with the suspected leak between a cylinder and the cooling system. A blue result means the test did not detect combustion gases under those test conditions, rather than proving that every possible leak is absent.
Use a spill-proof funnel as a supporting check
I also used a spill-proof coolant funnel fitted to the reservoir. With the funnel installed while cold and filled with the correct coolant, it becomes the highest point in the cooling system.
As the engine ran, bubbles rose through the coolant in the funnel. In this case, the bubbling supported the positive chemical test. Bubbles alone need interpretation because air can also be present while a cooling system is being filled or bled.
Use the correct antifreeze for your vehicle. I used a European-vehicle coolant whose application listing included this Jaguar, rather than leaving straight water in a car that would face freezing winter temperatures.
Should You Use Sealer or Replace the Head Gasket?
A proper mechanical repair is the best option for a vehicle you intend to keep. That means replacing the gasket and addressing the condition that caused the sealing failure.
If this happened to my Hummer, Corvette, or drift Mustang, I would repair it properly. Those are vehicles I value and plan to keep long term.
The Jaguar was a different situation. It was worth roughly $1,500 at the time, and the shop quote for head gasket replacement was about $7,600. Doing it myself would also have been a major job, with difficult access and substantial engine disassembly.
The practical choice was not between a bottle and an affordable repair. It was between trying a bottle and retiring a car my dad still needed for getting to work.
That is where a head gasket sealer can make sense: an inexpensive vehicle with a confirmed leak, an uneconomical repair, and an owner who accepts that the treatment might fail or cause additional problems.
Use it responsibly. A sealer should not be a way to hide a known defect and pass the car to an unsuspecting buyer. Our plan was to get more useful life out of the Jaguar and then donate it.
How Head Gasket Sealer Works
Several of the products I compared use sodium silicate, commonly called liquid glass. The treatment circulates with the coolant through the engine’s coolant passages.
At the leak, it encounters extremely hot combustion gases. Heat drives off liquid and leaves a hardened deposit that can block the small leakage path.
To demonstrate that behavior outside the engine, I heated a sample with a torch. The liquid dried and left a hard, brittle solid. That brittleness matters: sealing a gap is not the same thing as restoring a flat cylinder head or replacing a failed gasket.
Some formulas include fibers intended to reinforce the deposit, similar in principle to reinforcement in concrete. Another product in the comparison used copper and ceramic fibers rather than sodium silicate.
These are purpose-made products, not improvised material dumped into the engine. Years earlier, I dismantled a car my parents had bought used and found material I identified as sawdust packed into coolant passages. That engine had overheated and failed. A designed sealer is a different approach, but it still needs to be treated as a compromise with risks.
Choosing a Head Gasket Sealer for This Engine
I compared four readily available products with reasonably similar prices. This was a comparison of their instructions and formulations, not four separate long-term vehicle tests.
Match the required run time to the car
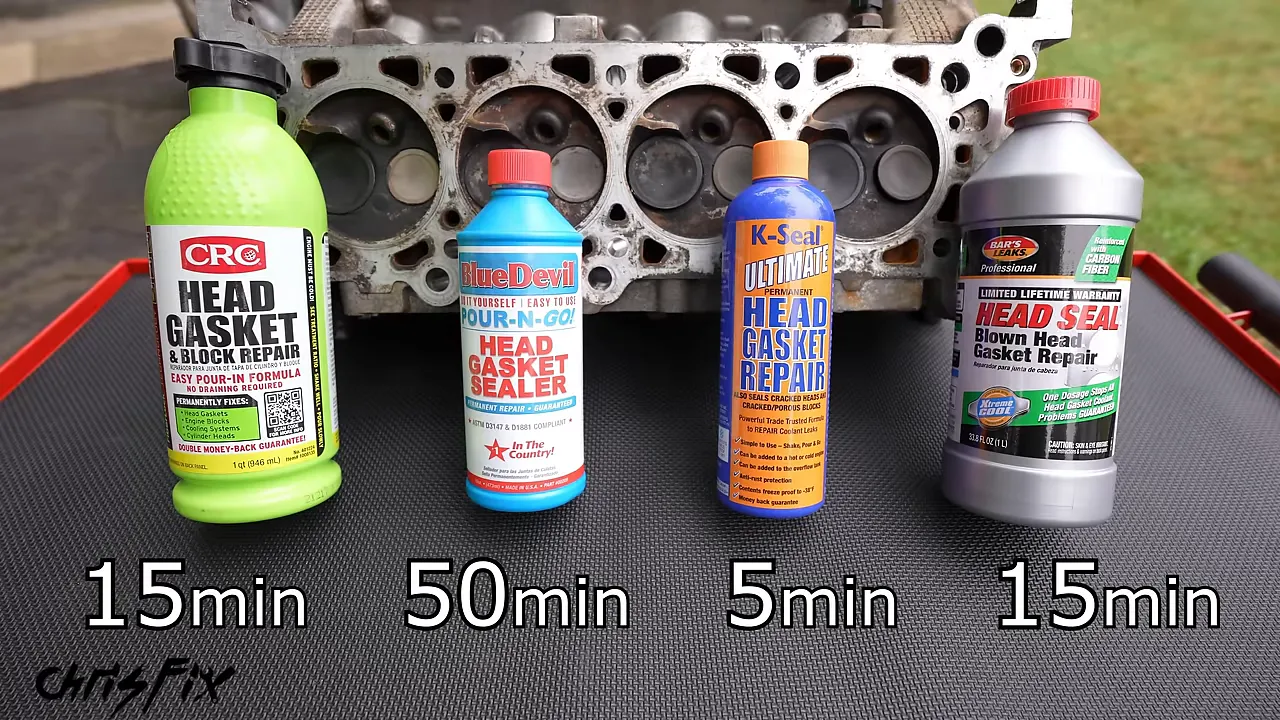
The Jaguar could run only about 15 to 20 minutes before coolant loss led to overheating. A product requiring a 50-minute idle procedure was not a suitable starting point for this car.
The bottles compared had application times ranging from about five minutes to 50 minutes, with other options around 15 minutes. The exact procedure matters more than the number alone, so read the complete current label.
Compare the formulations
- CRC: A relatively thin sodium silicate formula with finely chopped fibers.
- BlueDevil: A thin liquid containing sodium silicate and ethylene glycol.
- K-Seal: A copper and ceramic-fiber treatment that uses heat and pressure rather than liquid glass.
- Bar’s Leaks: A thicker sodium silicate formula containing carbon fibers.
I selected the Bar’s Leaks product for this test because its procedure fit the available run time, and I wanted to find out whether its fibers would help the seal hold long term.
At the same time, its thickness concerned me. I wanted to know whether it might restrict a thermostat, radiator, or heater core. The test would give us some answers, including one uncomfortable moment on the first drive.
How I Applied the Head Gasket Sealer
These were the instructions for the particular bottle used in this test, not a universal procedure. Other products can require different preparation, coolant conditions, dosing, or run times.
- Start with a cold engine. Remove the cooling-system pressure cap only after the engine has cooled completely.
- Determine the cooling-system capacity and dose. For the Jaguar’s approximately 10-quart system, the bottle instructions called for half a bottle. That label called for a full bottle above 10 quarts.
- Make room for the treatment. I removed some coolant from the pressurized reservoir with a baster.
- Shake the bottle thoroughly. The suspended material settles, so it needs to be mixed before measuring and pouring.
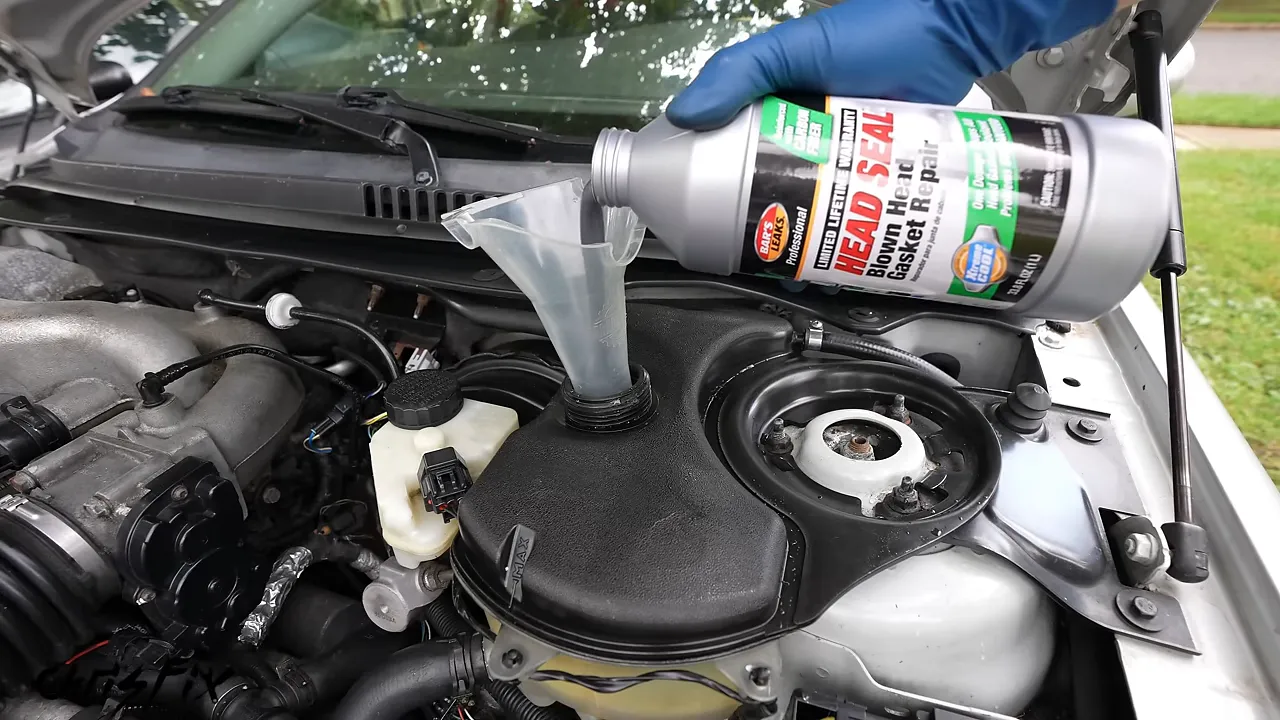
- Add the specified amount. I poured half the bottle into the Jaguar’s pressurized reservoir, then restored the coolant level for the procedure and reinstalled the cap.
- Start the engine and select maximum heat. On a vehicle with a heater control valve, selecting heat helps open that circuit.
- Monitor coolant temperature closely. I let the engine idle to operating temperature, which took about 15 minutes, then shut it off as directed.
- Let the engine cool completely. I left it overnight to complete the heating and cooling cycle before the first drive.
The reservoir on this Jaguar is part of the pressurized cooling circuit. Do not assume that adding treatment to a separate overflow bottle on another vehicle will circulate it through the engine. Use the addition point specified by the product and vehicle instructions.
The First Drive: A Temperature Spike and Continued Coolant Loss
The next day, I monitored coolant temperature directly from the vehicle’s computer rather than relying only on the dashboard gauge.
It did not go smoothly at first. About five minutes into the drive, temperature was climbing above the range I expected for this car. Around ten minutes in, it reached the mid-230s Fahrenheit, getting uncomfortably close to the point where I was prepared to shut the engine down.
Then the temperature dropped quickly and settled back around 199 to 205°F. The approximately 20-minute drive ended at about 207°F.
My suspicion was that sealer material had temporarily restricted the thermostat and then cleared. That was a suspected cause, not a confirmed diagnosis. I later found fibers collected inside the reservoir cap, which reinforced my concern about material accumulating where it should not.
Do not use this experience as a reason to keep driving an overheating engine. Stop safely and shut it down if it overheats. A bottle of sealer is not worth destroying an engine.
After the Jaguar cooled completely, I checked the reservoir. It was empty.
The first treatment cycle had not immediately stopped the coolant loss. The bottle indicated that sealing could take multiple start-and-stop cycles, so I replenished the coolant and continued the controlled test while closely monitoring temperature.
The next drive showed a major improvement
On the next drive, coolant temperature stayed around 200°F. More importantly, I drove for over an hour without overheating.
Remember, this car previously lasted only about 15 to 20 minutes before losing coolant and overheating. After the hour-long drive and a complete cooldown, the reservoir still held coolant at the level where I had left it. That was huge.
I repeated both checks:
- The coolant funnel no longer showed the persistent bubbling seen before treatment.
- The combustion leak test fluid stayed blue rather than turning yellow.
Together with stable temperature and the lack of coolant loss, those results showed that the treatment had sealed the leakage path under the conditions tested.
The Long-Term Results: Two Years and 10,000 Miles
The original goal was a full year and at least 10,000 miles. My dad used the Jaguar for city driving and long highway trips, including extended cruising around 2,500 rpm.
Then the coronavirus pandemic reduced how much he drove. Rather than finish with too little mileage, I extended the test to two years.
The Jaguar started at approximately 187,500 miles and finished around 197,500 miles. During that period:
- It continued serving as my dad’s daily transportation.
- It operated through seasonal temperature extremes.
- The cabin heat worked through winter, with no apparent heater-core blockage.
- My dad reported good fuel economy and normal running.
Near the end of the two years, he accelerated hard and felt the engine run differently, almost like a misfire. The coolant level dropped again. The leak had returned.
For this Jaguar, roughly $35 worth of sealer bought two additional years and about 10,000 miles. That was a worthwhile result for a low-value car facing an uneconomical repair. It was also clearly not permanent.
This demonstrates that a head gasket sealer can work long term in a particular application. It does not establish a success rate for other engines or guarantee that another bottle will last the same distance.
Engine Teardown: What Actually Failed?
Once the test was complete, I dismantled the engine to inspect the gasket, cylinder head, and cooling system.
Because this was a final investigative teardown rather than a repair intended to return the car to service, I cut the front core support to improve access. I removed the radiator, camshafts, head bolts, and cylinder head. That shortcut is not a normal head gasket replacement procedure.
A clean piston identified the leaking cylinder
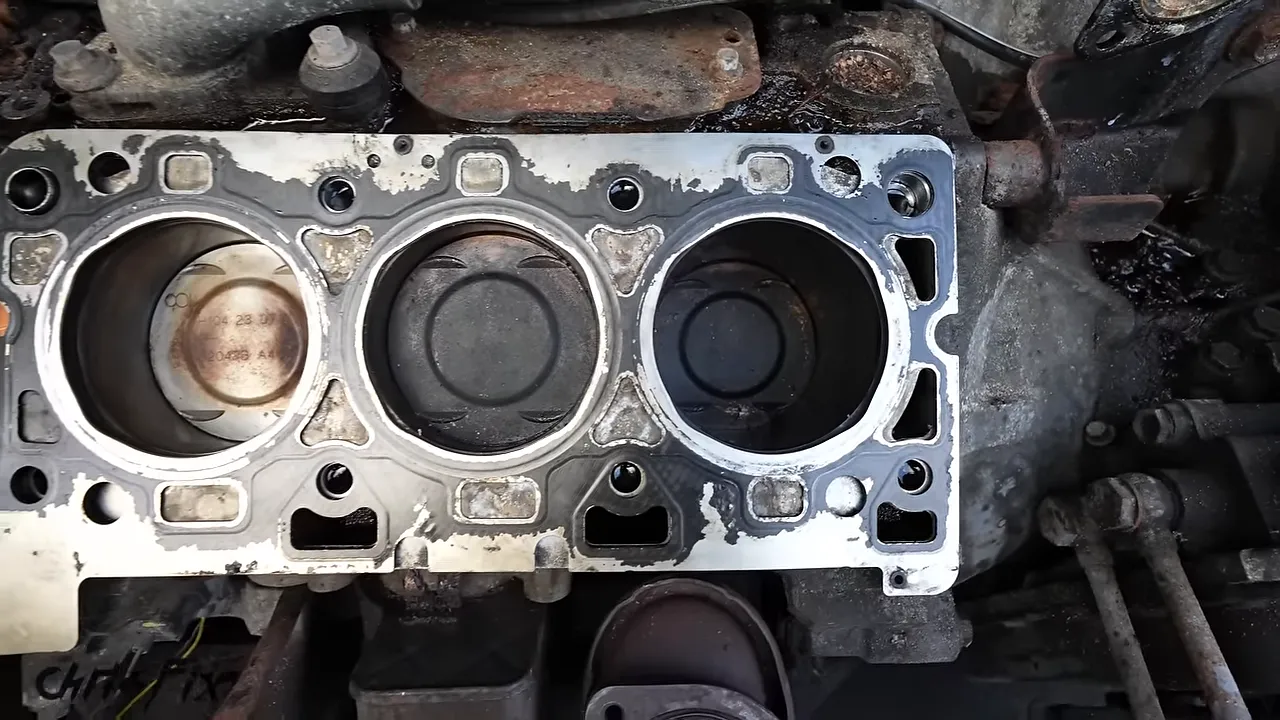
One piston crown looked noticeably cleaner than the others. The surrounding pistons carried carbon deposits, while coolant entering the affected cylinder had effectively steam-cleaned its piston.
The gasket did not have an obvious break
The Jaguar used a three-layer steel head gasket. When I separated and inspected the layers, I did not find an obvious catastrophic tear, missing piece, or other visible opening.
The gasket also intentionally covered many of the coolant openings visible in the block. On this design, coolant travels across the block, through the designated open ports, and then across the head. Those covered openings were part of the gasket design, not evidence that sealer had plugged them.
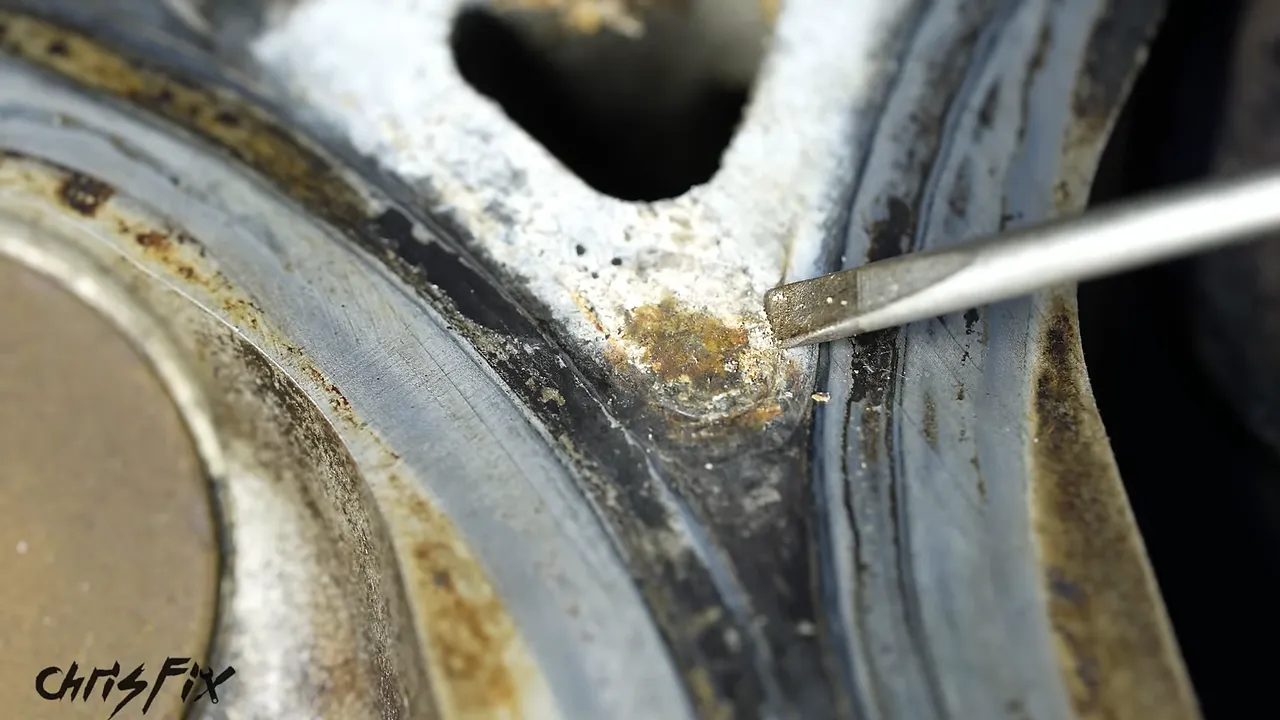
The sealer deposits were visible at the leak
On the cylinder head, I could see hardened deposits at two locations around the affected combustion chamber. These were the spots where the treatment had built up and sealed the leakage path.
What surprised me was how little material was needed. The leak did not require a giant missing chunk of gasket. A small gap had been enough to make the car unusable, and a relatively small buildup had kept it operating for two years.
Checking the Cylinder Head for Warpage
The underlying problem was a warped cylinder head. Even though the gasket did not show obvious physical damage, the head’s mating surface was no longer flat enough to maintain the seal.
You cannot reliably judge that just by looking at it. I used a precision-machined straightedge and a 0.001-inch feeler gauge.
- Clean the mating surface so gasket residue and sealer deposits do not distort the measurement.
- Place the precision straightedge along the head.
- Try to slide the feeler gauge beneath it.
- Repeat with the straightedge in different directions and positions.
Along one direction, the gauge would not slide underneath. Across another direction, it slipped beneath the straightedge near one end and became tighter toward the middle. That demonstrated the uneven surface.
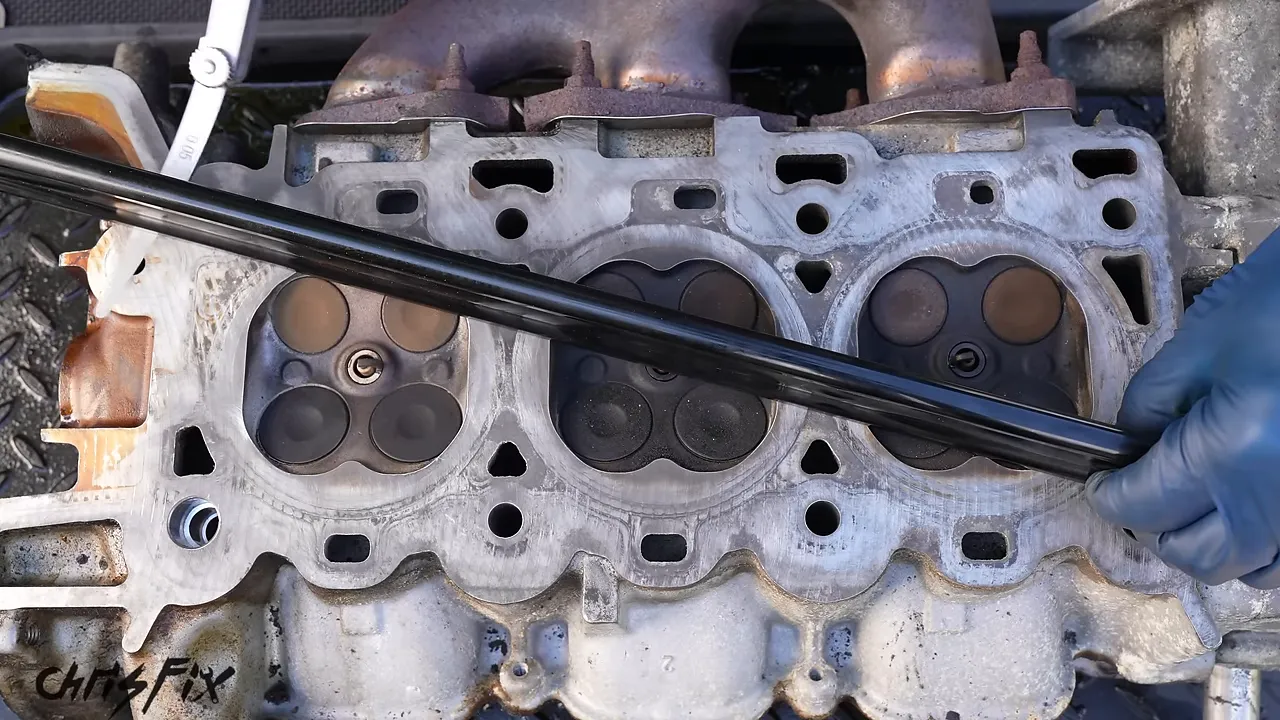
The measurements showed a gap detectable with a thousandth-inch gauge. The practical lesson is that very small surface changes can matter. For an actual repair, compare measurements with the engine manufacturer’s specifications rather than treating this test gauge as a universal rejection limit.
The sealer had blocked the resulting leak. It had not straightened the head or corrected the underlying damage attributed to overheating.
Did the Sealer Clog the Radiator or Heater Core?
I removed the radiator’s end tanks so I could inspect the internal tubes. With a light behind the radiator, I checked for open passages across both rows.
I found no visible blocked tubes in this radiator. That was an encouraging result after two years with the treatment in the system.
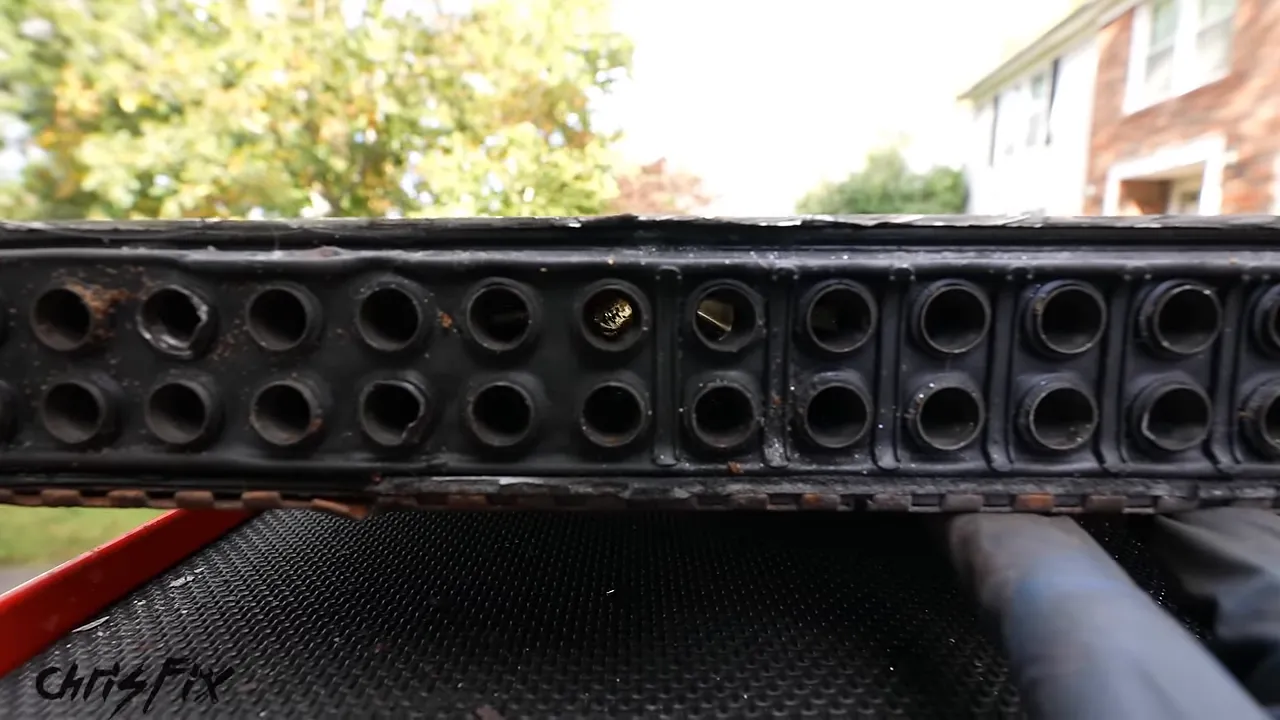
The heater had also continued to work through winter, providing practical evidence that the heater circuit had remained functional. I did not dismantle the heater core, so that is not the same as an internal inspection.
These results do not mean clogging is impossible. We still had that early temperature spike, a suspected temporary thermostat restriction, and visible fibers collected at the cap. The fair conclusion is that the radiator showed no lasting blockage in this test, while a temporary flow problem remained a concern.
Oil Analysis Revealed the Biggest Lesson
I also collected an engine oil sample for laboratory analysis. A service such as Blackstone Laboratories can provide this type of used-oil report.
For the experiment, I deliberately left the oil unchanged from the start of the leak so contamination would remain detectable. That was a test decision, not a maintenance recommendation.
The report found a small amount of coolant, but not a significant amount. It also showed elevated silicon and substantial wear indicators, particularly associated with the pistons.
I suspected the sodium silicate treatment contributed to the silicon reading after entering through the leakage path. The report raised a serious concern about contamination and wear, although it cannot establish that every bit of wear came from the sealer alone.
The practical takeaway is simple: once the leak is sealed, change the engine oil and filter promptly. Keeping potentially contaminated oil in the engine defeats the purpose of trying to extend its useful life.
What I Would Do Differently Next Time
The treatment worked, but I would change my approach in two important ways.
First, I would consider one of the thinner formulations before the thick, fiber-heavy product used here. My concern is the possible connection between the treatment and the initial temperature spike. I would probably start with the thinner CRC formula, while recognizing that I did not put it through this same two-year test.
I also considered thermostat removal as a way to avoid a restriction during treatment. That is not a universal instruction. Any thermostat changes need to follow the selected product’s directions and the vehicle’s requirements.
Second, I would change the oil and filter as soon as the sealing process was successful instead of leaving the oil in place for analysis at the end.
The Verdict: A Useful Compromise, Not a Replacement for Repair
Do head gasket sealers actually work? In this test, yes. A car that could barely run for 15 to 20 minutes became useful daily transportation again for two years and about 10,000 miles.
The teardown showed where the treatment had sealed the leak. The radiator showed no visible blocked tubes, and the cabin heat kept working. But the treatment did not repair the warped head, the leak eventually returned, and the oil analysis highlighted a contamination concern that should not be ignored.
For a valuable vehicle you plan to keep, repair the underlying problem properly. For a low-value car where the alternative is retirement, a carefully selected and correctly applied sealer may buy worthwhile extra time. Diagnose first, follow the exact instructions, monitor temperature closely, and treat the result as a compromise rather than a guarantee.


