A good project car does not have to cost a fortune. My first drift car cost about $1,000, and my Honda del Sol started as a $300 car. Both needed work, but that is the whole point: buy something affordable, fix it yourself, learn a ton, and have fun driving what you built.
So what project car should you buy? Buy a car you actually like. Something you want to drive, fix up, and spend time working on. Do not buy it just because somebody else thinks it is cool.
The trick is finding a car whose problems fit your goals and your budget. My latest challenge makes that especially interesting: turn a beat-up BMW E46 into a budget endurance race car for the 24 Hours of Lemons.
Key Takeaways
- Choose a project car you genuinely like, with problems that fit your goals and repair budget.
- Cheap, reliable, and fast involve tradeoffs, so set your priorities before buying.
- Diagnose running problems before replacing parts, and prioritize function over extra horsepower.
- A race series' car-value limit does not represent the total cost of racing safely.
Table of Contents
- Start With a Goal, Not Just a Cheap Car
- Understand the Project Car Triangle
- The Challenge: A $500 Endurance Race Car
- Evaluate the Listing: My $1,100 BMW E46
- Diagnose Problems Before Throwing Parts at Them
- Fix Functional Problems Before Chasing More Power
- Build a Team That Can Keep the Car Going
- Budget Racing Does Not Mean Budget Safety
- Plan for Tires and Pit Stops
- How an $1,100 BMW Could Approach a $500 Budget
- Buy the Right Problems, Then Make the Car Your Own
Start With a Goal, Not Just a Cheap Car
A cheap purchase price is a great start, but you also need to know what you want the car to become. A street car, a drift car, and an endurance race car can all start with very different priorities.
My DriftStang is a perfect example. I bought it for around $1,000 as a non-running Mustang that was headed toward the scrapyard. The goal was simple: turn it into a drift car and learn how to drift.
Instead of spending a huge amount all at once, I worked on it over time. It became a reliable track car that has been a blast to learn in. And, because a project car is never really finished, there are still two big plans:
- A used Saleen Roots-style supercharger: It does not directly fit this engine, so making it work is part of the challenge. The goal is roughly twice the power without blowing the budget or sacrificing reliability.
- A roll cage: The next step toward moving from Group B to Group A and learning to tandem drift.
The del Sol took a different route. It cost $300 because it had a leaking head gasket, worn-out suspension, and a rust hole under the passenger seat. I removed the cylinder head, replaced the head gasket, rebuilt the front suspension, and welded new sheet metal into the floor.
That left me with a running, driving del Sol for under $1,000. The next planned project is a budget turbo kit installed at home with common hand tools, with the aim of roughly doubling its power.
Neither car needed to be perfect when I bought it. Each needed to be something I wanted to work on, with a clear purpose and repairs I could tackle.
Understand the Project Car Triangle
Before getting excited about a listing, keep this little rule in mind: cheap, reliable, fast. Pick two.
- Cheap and reliable: Do not expect it to be especially fast.
- Cheap and fast: Expect reliability to become part of the project.
- Reliable and fast: It probably will not be cheap.
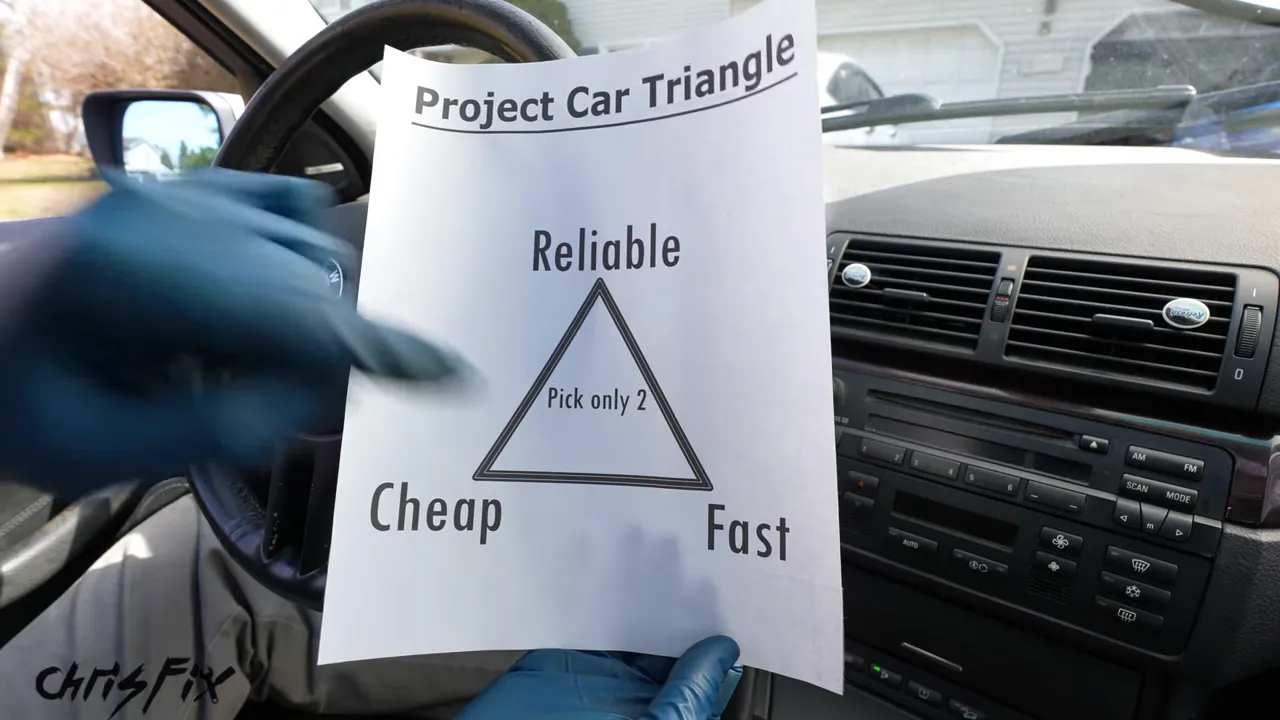
It is a useful reality check, not a reason to give up. You just need to decide where your priorities are.
For Lemons, the cheap part is already chosen for us. That leaves reliability and speed. My goal is to walk the fine line between reliable and reasonably quick, because a fast car does not help much if it spends the race getting towed back to the pits.
The Challenge: A $500 Endurance Race Car
eBay Motors challenged me to enter the 24 Hours of Lemons. Yes, Lemons, not Le Mans. It is budget endurance racing built around inexpensive cars, creative themes, and keeping questionable machinery alive for hours at a time.
For this build, the target is a $500 car-and-preparation budget under the series' accounting rules. That is not the total cost of going racing. Safety equipment is separate, and shipping the car does not count toward that $500 limit.
The judges inspect the car and question the team about its value. The idea is to keep somebody from buying a much more expensive car and pretending it cost $300. Instead of making the biggest wallet the biggest advantage, the challenge puts a lot of emphasis on maintenance and reliability.
That sounds right up my alley. Keeping old cars running is what I do!
These are the budget assumptions used for this project. If you are planning your own entry, check the current Lemons rules before buying parts or deciding what counts toward your car's value.
Why the $300 Mercedes Was Not the Right Deal
My first attempt was a local, non-running Mercedes CLK 430 with a V8. I paid $300, which left $200 in the car budget to get it going.
The seller's explanation was that somebody had crossed the battery cables. Once I got into it, though, the car looked much worse than that story suggested. The seats, door panels, and interior were covered in mold, and I suspected flood damage.
A nasty interior was not the biggest concern because the car was going to be gutted anyway. The real problem was electronic: diagnosis pointed to a couple of computer modules that needed replacement and Mercedes coding. There was no way I was getting that done within the remaining $200.
So I stopped. I sold the car to a scrapyard for $400, made $100 on the purchase and sale, and started looking again.
A cheap car is not automatically an affordable project. If the repair path does not fit your budget, recognizing that early can save you a lot of money.
Evaluate the Listing: My $1,100 BMW E46
With shipping excluded from the race-car budget, I expanded the search and found a 2004 BMW 330xi in Maine. It had a 3.0-liter M54 engine, all-wheel drive, and, best of all, a six-speed manual transmission.
I would have preferred rear-wheel drive for this project, but the manual transmission was a big plus. The E46 platform also appealed to me because it could support future drifting and autocross projects as these cars became more affordable.
Read the Good and the Bad
The asking price was $2,000, with an option to make an offer. The seller provided useful photos and a detailed description, which made it much easier to understand what I was buying.
The history report showed an accident and a low AutoCheck score. I asked about the accident, and the seller described it as a minor fender bender. That was his explanation, not a reason to ignore the rest of the car's condition.
The advertised positives included:
- A running car that reportedly ran and shifted well.
- A six-speed manual transmission.
- All-wheel drive, although that was not my preferred layout.
- An aero package.
- A claimed ZHP camshaft, with no documentation to confirm it.
- A reportedly lowered suspension, although it did not look particularly low.
That unverified camshaft is worth noting. The seller was honest that the claim came from a previous owner. I treated it as an unknown, not guaranteed extra value.
The list of negatives was much longer:
- Dents, scratches, dings, and key marks along both sides.
- Rust and cracked exterior pieces.
- No power steering assist.
- A rear-end clunk.
- Torn seat upholstery.
- An oil warning light and oil leaks.
- A sunroof jammed open.
- About 230,000 miles.
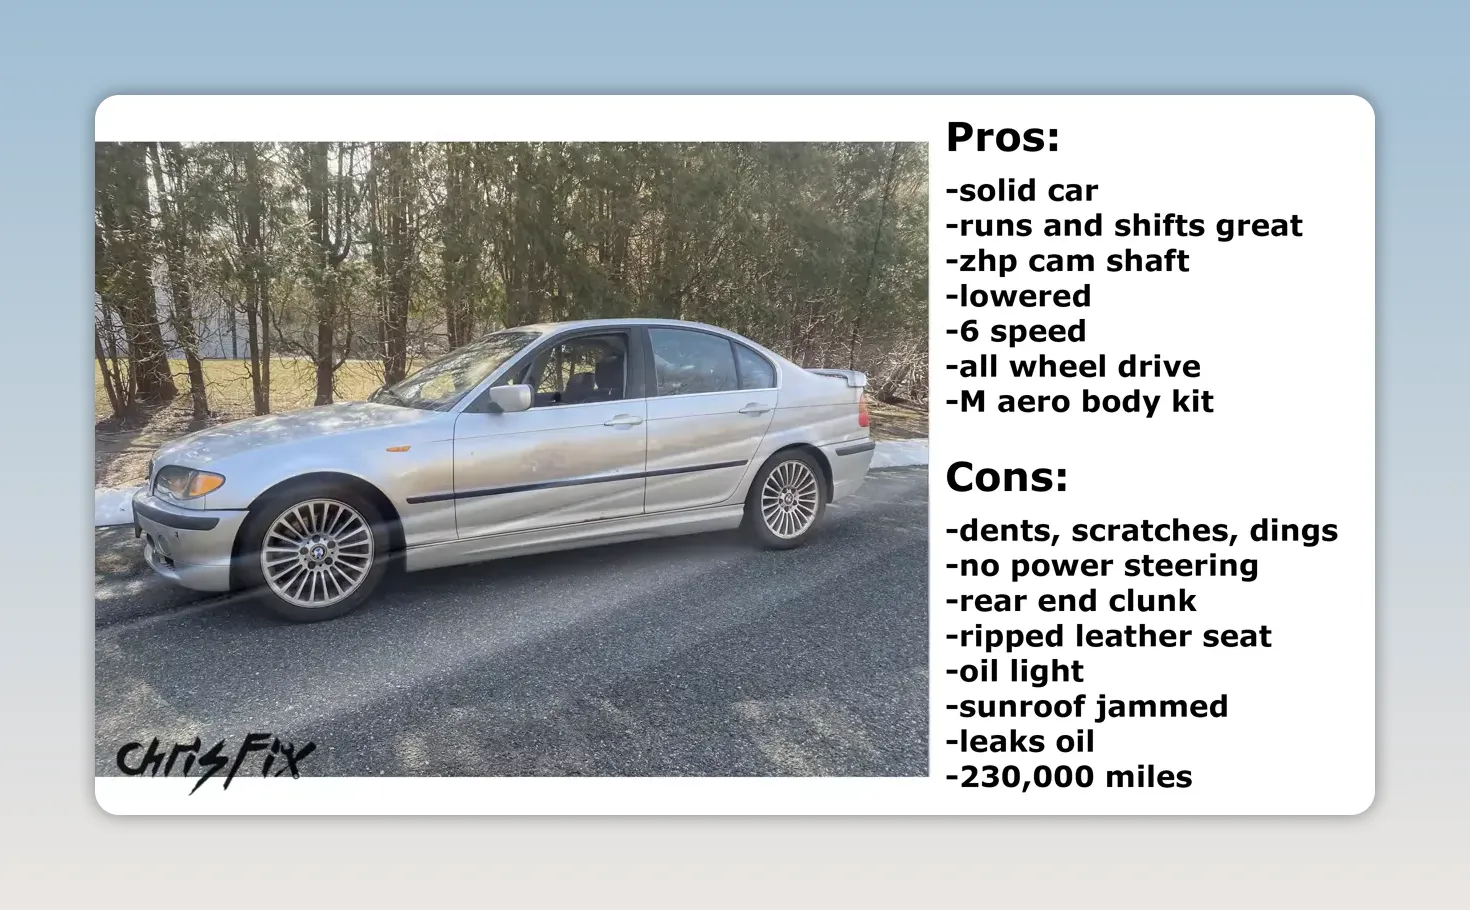
For somebody looking for a clean daily driver, that is a tough sell. For a race-car project, ugly paint and torn upholstery matter much less than the engine, transmission, suspension, and ability to stay running.
That does not mean every defect is harmless. Rust, warning lights, leaks, and clunks still need evaluation. The point is to judge the problems against the job you need the car to do.
Negotiate With Specific Reasons
I opened with a $1,000 offer. The seller countered at $1,750. I explained that the car needed a lot of work, but I was a serious buyer who could arrange a tow truck the next day and pay promptly.
We agreed on $1,100.
The useful part of that negotiation was not just offering less. I had specific defects to justify the price and a clear plan to complete the transaction. The seller did not have to wonder whether I was actually going to show up.
Of course, $1,100 is not $500. There is a plan for that, but first I needed to find out whether this BMW could start becoming a dependable car.
Diagnose Problems Before Throwing Parts at Them
The first major running problem showed up immediately. On startup, the idle dropped as though the engine wanted to stall. Then it shook and ran unevenly.
That is not what we want from an endurance race car. Before buying parts, I connected a Bluetooth OBD2 scanner to see what the computer could tell us.
Read the Trouble Codes
On this BMW, the diagnostic connector is under the driver's side of the dashboard, behind a small cover. I plugged in the scanner, opened its phone app, and read the check-engine codes.
The scan returned two confirmed faults:
- P0171: System too lean, Bank 1.
- P0128: Coolant temperature below the thermostat's regulating temperature.
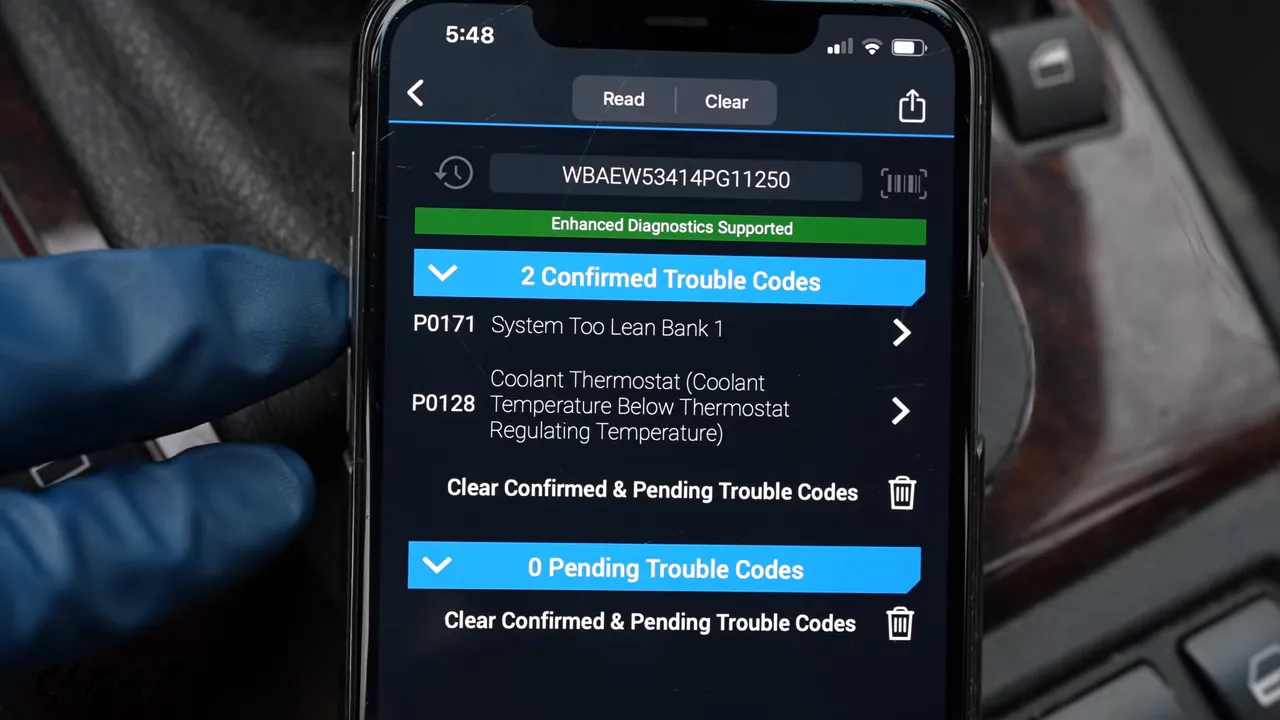
I started with the lean condition because it was directly relevant to the poor running. The app listed possible causes and frequently reported repairs, with mass airflow sensor replacement at the top.
That gave me a place to investigate. A common repair recommendation is a clue, not a substitute for checking the car.
Test the Mass Airflow Sensor
The mass airflow sensor sits just after the air filter box. It provides information the engine computer uses to determine fueling.
I disconnected its electrical connector and restarted the engine. With the sensor unplugged, the computer used fallback calculations rather than relying on its signal. The engine started much better, and the idle leveled out.
On this car, that strongly pointed toward the sensor. An improvement with the MAF unplugged is useful diagnostic evidence, but it should not be treated as proof that every car with the same symptom needs a new sensor.
Replace the Sensor on a Budget
To keep costs down, I used a replacement from a junkyard. The installation only needed a screwdriver and a few simple steps:
- With the engine off and the electrical connector disconnected, loosen the intake hose clamp.
- Release the retaining clips on both sides of the sensor housing.
- Remove the old sensor assembly.
- Install the replacement with its airflow arrow pointing in the correct direction.
- Fasten the retaining clips.
- Seat the intake tube fully onto the housing and snug the hose clamp.
- Reconnect the wiring harness.
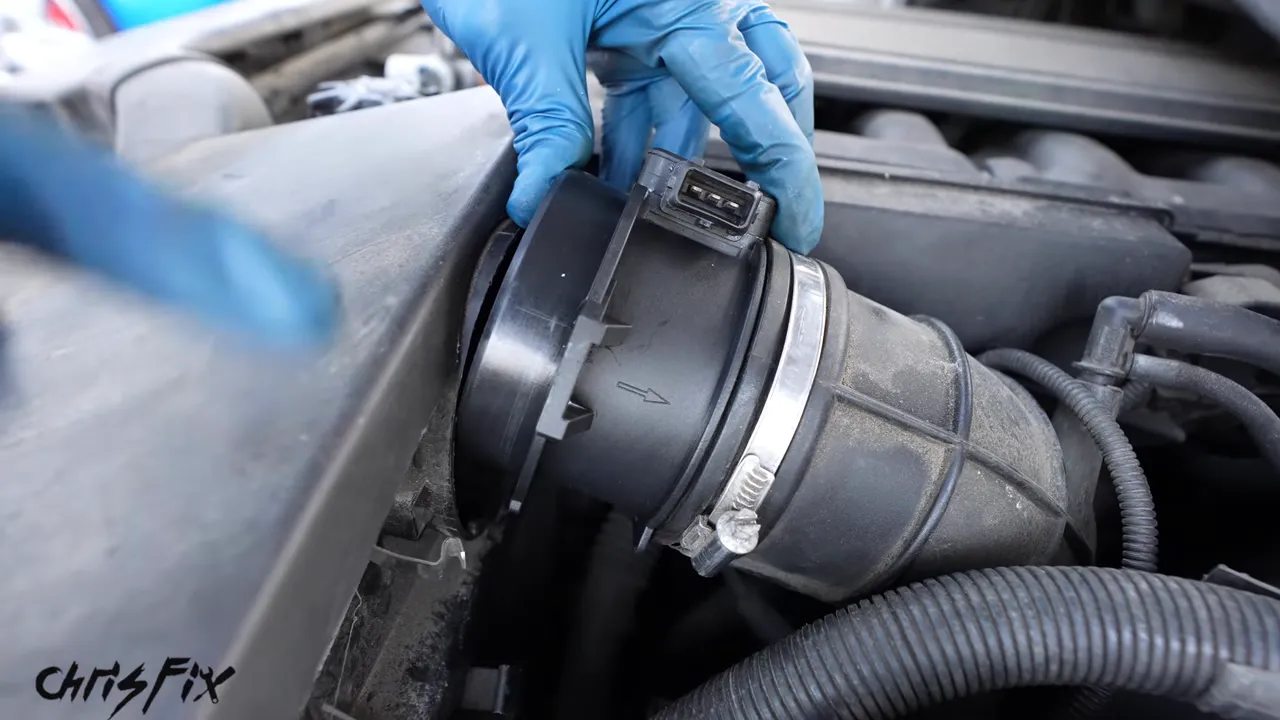
The restart was exactly what I wanted: no big idle drop toward a stall, and a much steadier idle. One problem down!
That did not complete the whole mechanical inspection. The thermostat code, oil warning, leaks, and rear-end clunk were still separate items to investigate.
Fix Functional Problems Before Chasing More Power
Once the engine was idling better, two obvious problems remained: the steering was extremely heavy, and the sunroof would not close.
No Power Steering Is Not an Endurance Strategy
Turning the steering wheel took a huge amount of effort. There was no way we were going to race for hours like that. Restoring the power steering was a necessary repair, not an optional upgrade.
The pump replacement is a separate job, covered in my power steering pump replacement guide.
The car did show some encouraging acceleration. Its quoted performance was around seven seconds from 0 to 60 mph and about 15 seconds through the quarter mile. Those were reference figures, not measurements from my test drive, but the BMW felt like it had enough pep to be interesting.
For this project, that is enough to start with. Keeping it running matters more than immediately adding horsepower.
Manually Close a Jammed BMW Sunroof
The sunroof would move toward the closed position, jam, and reverse. Leaving it open meant rain could get into the interior, so this needed attention right away.
On this BMW, I could manually close it through the sunroof motor:
- Carefully release the overhead access panel near the sunroof controls.
- Locate the motor behind the panel.
- Use a T25 Torx bit on a ratchet to turn the motor's manual drive until the glass closes.
- Refit the access panel and make sure it snaps into place.
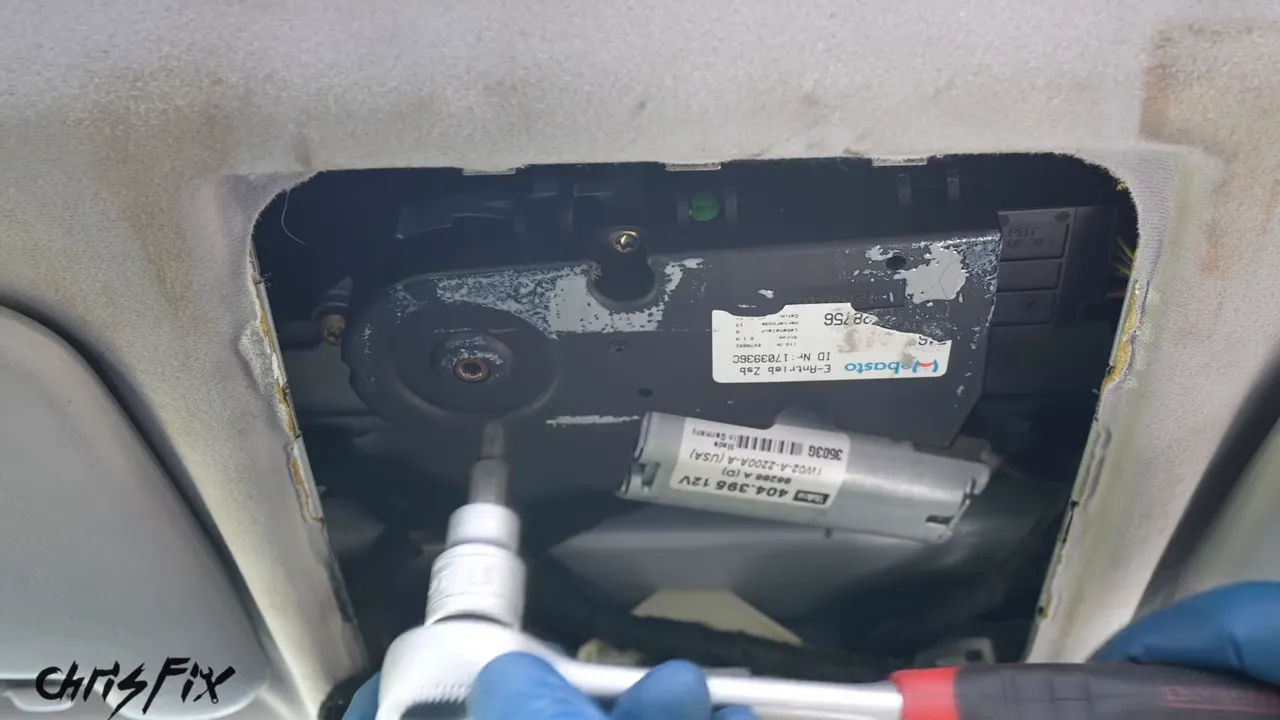
That got the glass closed. It was a practical way to secure the opening, not a rebuild of the mechanism. The interior sunshade still did not slide shut properly, so something in the assembly remained unhappy.
For the race build, my plan was to remove the glass sunroof and use a suitable carbon-fiber or fiberglass panel, subject to the rules. That would remove weight high in the car and eliminate the overhead glass.
Build a Team That Can Keep the Car Going
An endurance event might involve 14, 18, or 24 hours of racing. You need more than one person trying to drive, repair the car, and handle everything in the pits.
One of the best parts of this project is bringing my friends into it. Each brings something useful:
- Ari: Lots of DIY experience, including swapping a 600-horsepower supercharged engine and manual transmission into his Crown Victoria.
- Gary: Hands-on suspension experience with his Raptor, including taking it to jumping events.
- Aaron: BMW experience and drifting experience, plus a habit of finding another project BMW every time we talk.
- Pierce: Learning by taking apart his own BMW, with useful pit support and filming skills while he continues learning to drive a manual.
We have good chemistry, and that matters. Things are going to break. There will be problems to solve. Win or lose, I want this to be something we have a blast doing together.
Budget Racing Does Not Mean Budget Safety
Here is where the $500 race-car idea needs some perspective. The car may be cheap, but protecting the people inside it is a separate expense.
This is real wheel-to-wheel racing on a closed course, with multiple cars, a full cage, and potentially very high speeds. It is not something to fool around with.
Driver Safety Equipment
For our team, the personal equipment includes:
- A one-piece, multilayer fire-resistant racing suit.
- Fire-resistant socks, racing shoes, and gloves.
- A fire-resistant balaclava.
- A racing helmet.
- A head-and-neck restraint.
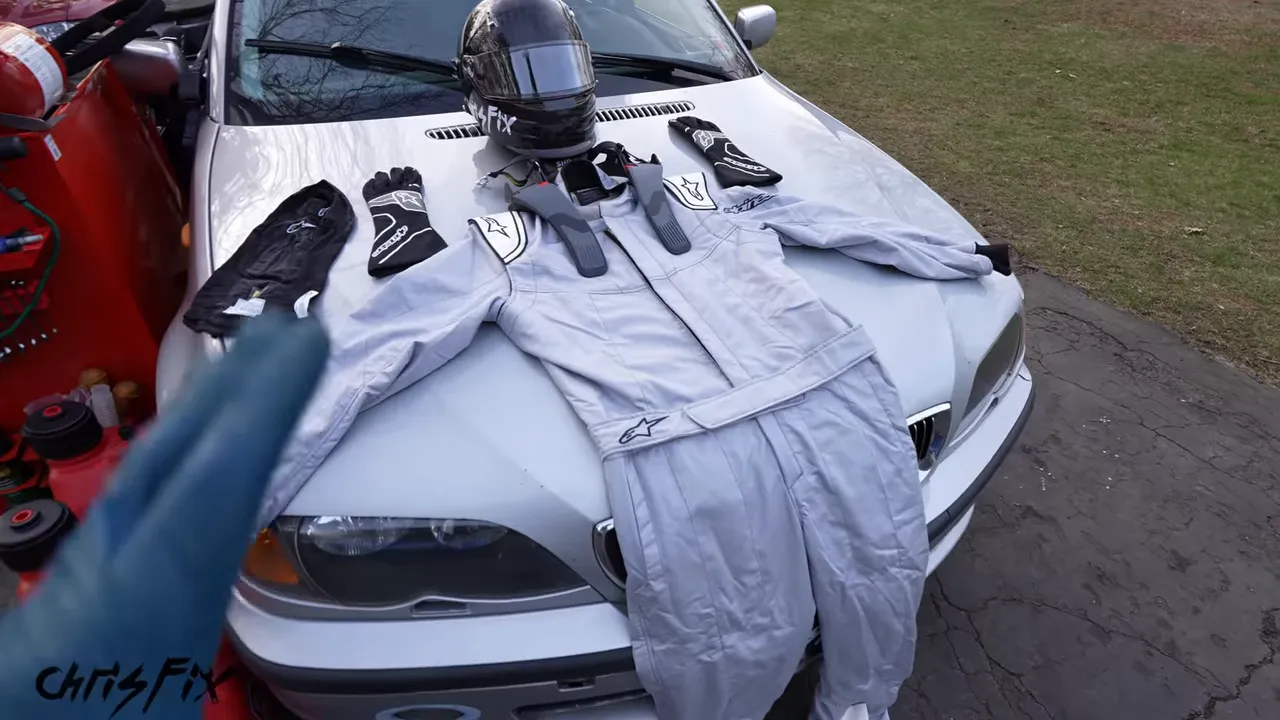
The equipment we selected was roughly $2,000 per person. With five people, that is about $10,000 in personal safety gear. That puts the purchase price of the car into perspective pretty quickly.
Car Safety Equipment
The planned car equipment includes:
- A full roll cage.
- A 10-pound fire suppression system routed to the engine bay and cabin.
- A battery isolator to shut down the engine and electrical systems quickly.
- A quick-release steering wheel.
- Front and rear tow hooks.
- A six-point racing harness.
- A full-containment racing seat with head-support wings.
- A wide, multi-panel mirror to improve visibility when the driver is tightly restrained.
These parts need to work together as a safety system and meet the event's requirements. Buying good equipment is not, by itself, a guarantee of passing technical inspection. Correct selection and installation matter.
Ask Local Shops About Grassroots Support
My local racing shop, Stable Energies, helped us choose equipment and offered support for the build. The plan was to include the businesses helping us, including eBay Motors, Stable Energies, and Konig, in the car's race livery.
Do not assume you need to be a famous racer to ask a local shop about a grassroots deal. Explain what you are building and how you might help promote the business. There may be a discount or support arrangement available, although it is never something to take for granted.
Plan for Tires and Pit Stops
An endurance car also needs a plan for tire wear. My initial guess was that we might use one or two sets during the event, but that was an estimate, not a result.
Konig supplied three complete sets of Countergram wheels. The idea is to have tires mounted and ready so a change does not turn into a long delay in the pits. Think race-team preparation, just probably not Formula One pit-stop speed!
For this build, we were working with a tire requirement of 190 treadwear or higher. The priorities were:
- Good grip through the corners.
- Consistent performance as the tires get hot.
- Enough life to make sense for endurance racing.
I had not selected a final tire at this stage. The useful lesson is to plan the tire strategy early rather than treating wheels and tires as something to figure out at the last minute.
How an $1,100 BMW Could Approach a $500 Budget
Now for the big question: how does an $1,100 purchase become a $500 race car?
Under the budget rules used for this project, every $10 over the limit meant one penalty lap. At $600 over budget, we were looking at 60 penalty laps. That is not a competitive place to start.
However, eligible non-safety parts removed from the car could be sold to offset its cost. The plan was to sell equipment we did not need for racing.
There were limits. Under the interpretation I was working with, I could not claim budget credit from selling the original steering wheel or driver's seat when replacing them with safety equipment. Non-safety items were the opportunity.
The Planned Parts Sales
I checked comparable listings and chose prices intended to help the parts sell promptly:
- Ashtray and radio bezel: $50. Comparable asking prices were around $60 to $70. Ours needed cleaning, but its spring-loaded mechanisms worked.
- Factory radio: $130. Similar listings were around $150 to $160.
- Harman Kardon sound system: $250. Comparable systems were listed at $270 or more, and ours sounded good.
- Complete wood trim set: $130. Similar sets were listed around $150. Our four-door car had a full set without cracks that could clean up nicely.
Those projected sales total $560. Subtract that from the $1,100 purchase price, and the net purchase cost becomes $540.
That would leave the car $40 over the target, or four penalty laps under the calculation used here. Four is a whole lot better than 60.
These were planned sale prices, not completed sales. They also describe the purchase-price offset, not a complete accounting of every repair needed to make the car race-ready. The remaining work still has to fit the applicable rules and budget.
Buy the Right Problems, Then Make the Car Your Own
The BMW still needs plenty of work. The power steering needs attention, the remaining faults need diagnosis, the safety equipment needs installation, and the interior needs preparation for racing.
It also needs a theme. Lemons teams build personality into their cars, so a creative livery is part of the fun. Once the mechanical and safety foundations are handled, this scratched-up silver sedan can start looking like our race car.
The biggest lesson is simple: buy a car you care about, understand its problems, and make sure the repair path fits your budget. Sometimes that means rescuing a $300 del Sol. Sometimes it means walking away from a $300 Mercedes. And sometimes it means buying an ugly, high-mileage BMW because the useful parts of the car fit the challenge.
You do not need to finish everything at once. Start with a clear goal, fix the important problems, and build it over time. That is where the learning happens, and that is what makes a project car so much fun.
|


