A profitable car flip starts with finding problems you can fix for less than the value they take away from the car. A filthy interior, faded paint, worn brakes, or a rattling exhaust can scare off buyers. If you know how to diagnose and repair those problems, that discount can become your opportunity.
But I don’t want to make this sound easier than it is. Flipping cars involves real risk. Hidden problems can eat up your budget, and selling the car can be harder than buying it. The goal isn’t just to find a cheap car. It’s to find the right car, at the right price, with repairs that match your skills.
My latest project is a 2013 Toyota Prius purchased for $2,700. It needs a hybrid battery, has terrible acceleration, makes an ugly rattling noise, and could use a serious cleaning. That gives us a useful example of how I search for a flip, inspect it, and improve its condition without spending money where it won’t help.
What You'll Learn
- Choose cars with repairable problems and a clear resale market, not simply a low asking price.
- Estimate repaired value, known repair costs, and an allowance for surprises before negotiating.
- Thorough cleaning and basic cosmetic restoration can improve appeal without expensive upgrades.
- Inspect tires, glass, upholstery, batteries, and rust because overlooked expenses can erase your margin.
Table of Contents
- What Makes a Good Car Flip?
- Three Examples of Car-Flipping Opportunities
- How I Find Cheap Used Cars Online
- Inspect the Car Before Committing to the Repairs
- Diagnose the Rattling Exhaust Before Assuming the Worst
- Deep-Clean the Interior for a Big Improvement
- Restore Faded Paint With a Practical One-Step Process
- Detail the Engine Bay Without Creating New Problems
- Restore Oxidized Headlights and Protect the Result
- Use Inexpensive Finishing Touches Instead of Unnecessary Upgrades
- Problems That Can Quietly Eat Your Profit
- Where the Prius Flip Stands
What Makes a Good Car Flip?
I like cars with a clear path from their current condition to a condition someone will want to buy. That means thinking about the next owner before handing over any money.
The Prius makes sense because it’s an economical, practical car. It seats five, has a surprisingly roomy cargo area, and offers excellent fuel economy when everything is working correctly. Those are useful selling points, not expensive modifications that only appeal to a small group of buyers.
My basic strategy is:
- Find a discounted car with problems I understand.
- Estimate its repaired value before negotiating.
- Budget for known repairs and unexpected problems.
- Fix the mechanical issues rather than just making the car look better.
- Clean and detail it thoroughly to make its condition more appealing.
I also use a checklist to separate the problems I like from the ones that can quietly destroy a profit margin. It’s especially helpful when you’re excited about a deal and might otherwise overlook something obvious.
|
Three Examples of Car-Flipping Opportunities
Before getting into the Prius, here are three projects that show how different types of problems can create an opportunity. These are individual examples, not a promise that every cheap car will work out this way.
A $500 Chevrolet Trailblazer That Wouldn’t Start
The Trailblazer was advertised for $1,000, and I bought it for $500. It didn’t start or even crank, so there was definitely some uncertainty.
My first check was the fuse box. Using the owner’s manual, I located the powertrain control module fuses and found a blown fuse with visible heat damage. After replacing it, the fuel pump came on and the engine started. That was a huge relief!
Getting it running wasn’t the end of the repair. A loud exhaust leak led me to a failed muffler, and the escaping hot exhaust had damaged the fuel tank. I replaced the muffler, installed a cleaned-up junkyard tank, and fitted a new OEM fuel pump assembly even though the existing pump wasn’t the main issue.
After that came rusty brakes, small broken or missing interior pieces, and a thorough detail. I restored faded exterior plastic with a ceramic coating and corrected the dull paint by hand with compound and polish.
The numbers were approximately:
- Purchase: $500.
- Parts: $500.
- Total purchase and parts cost: $1,000.
- Finished value: about $4,000.
- Difference: about $3,000.
The important lesson is that the cheap starting price gave me room to fix more than the original no-start problem.
A $300 Honda del Sol With a Failed Head Gasket
The Honda del Sol was another $1,000 listing that I negotiated down, this time to $300. It needed a head gasket, but this particular engine made that job relatively straightforward, and the parts were inexpensive.
That doesn’t mean a head-gasket car is automatically a good flip. A warped cylinder head or additional engine damage could change the whole budget. This opportunity made sense because the repair matched my skills and the purchase price reflected the risk.
I removed the exhaust and intake connections, carefully removed the timing belt from the cam sprocket, and loosened the cylinder-head bolts in the appropriate sequence. With the head off, I cleaned the mating surfaces and installed the new gasket. Reassembly included torquing the head correctly, restoring the timing belt, reconnecting the manifolds, and installing the valve cover. Exact sequences and torque specifications are engine-specific.
A hidden rust hole also needed attention. I cut out the rust, fitted a sheet-metal patch, welded in different locations to spread the heat, and protected both sides with rust-preventative paint.
The purchase and initial repairs came to about $500, against an estimated $2,000 resale value. That represented roughly $1,500 in potential profit. I kept the car, so that wasn’t a completed sale. Later valve-cover refinishing, suspension work, and new wheels and tires became part of my own project rather than the original flip budget.
A Vandalized 2016 Chrysler 200
I paid $4,000 for the Chrysler 200. It had spray paint on the body, sugar in the fuel tank, and mud throughout the interior. Fixed up, its estimated value was about $12,000.
The exterior cleanup started with carefully removing most of the spray paint using a pressure washer without damaging the original finish. A clay bar and quick detailer removed the remaining contamination, followed by polishing and waxing.
I also dropped and hand-cleaned the fuel tank, replaced the fuel pump with a new OEM assembly, and cleaned the fuel lines. Then I deep-cleaned the muddy interior.
With roughly $500 spent on the work, the purchase-and-repair total was about $4,500. Compared with a $12,000 finished value, that left a potential spread of approximately $7,500 before other expenses.
Cleaning is one of the best returns on effort in a car flip. Dirt can make an otherwise decent car look undesirable, yet removing it usually costs far less than replacing major components.
How I Find Cheap Used Cars Online
I use AutoTempest to search across multiple used-car sites rather than checking each one separately. It brings together listings from sources such as eBay Motors and Cars.com and helps broaden searches on Craigslist and Facebook Marketplace.
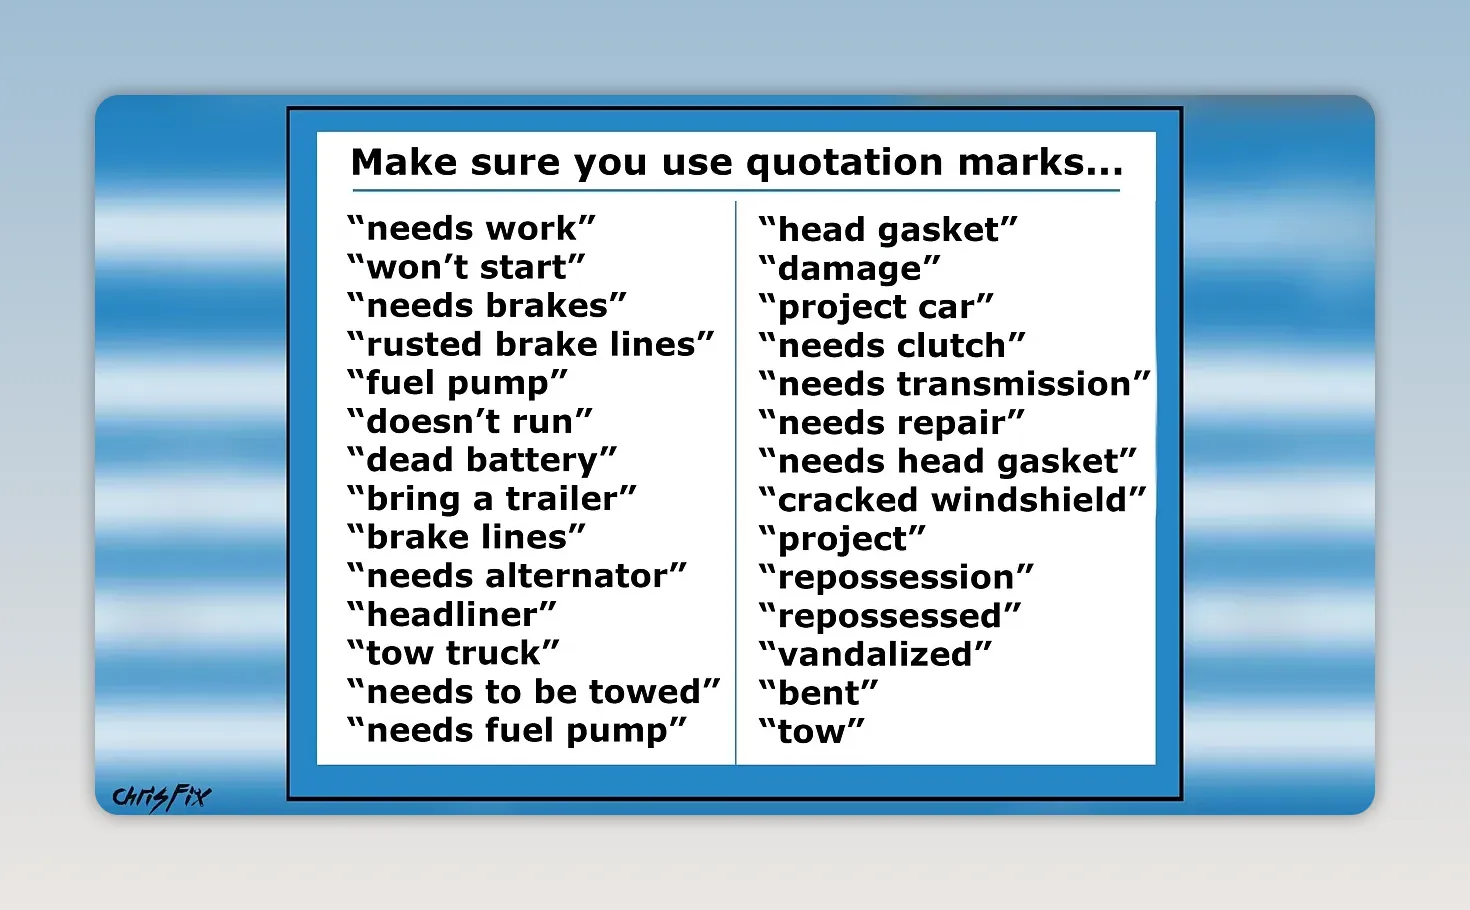
The trick is narrowing the results. Instead of searching only for a make and model, I search for language sellers use when something is wrong:
- Needs work.
- Needs brakes.
- Won’t start.
- Bring a trailer.
- Brake lines.
Those phrases don’t guarantee a bargain. They help find cars that other buyers may skip, which gives you a smaller group of listings to investigate.
Work Backward From the Resale Value
A low asking price is only useful if the repair numbers work. Here are two listings that illustrate how I evaluate a possibility.
2009 four-wheel-drive Ford Escape, 118,000 miles: The seller wanted $3,500 and reported a no-start condition diagnosed by a shop as a bad fuel pump, plus a loud muffler. My target purchase price would have been about $2,100, compared with a stated working trade-in value around $2,200.
- Fuel pump assembly: approximately $100.
- Muffler: approximately $100.
- Allowance for additional problems: approximately $200.
- Target total: approximately $2,500.
- Estimated repaired resale value: $4,500.
- Potential spread: approximately $2,000.
2008 Ram 1500, 170,000 miles: This truck was advertised for $3,900 and needed front brake calipers and brake lines. It had to be towed, and the listing suggested the seller was tired of dealing with inquiries.
Because it was already priced attractively, I would offer around $3,700 and arrange prompt pickup rather than expect a huge discount.
- Brake pads, rotors, calipers, and lines: approximately $400.
- Allowance for additional problems: approximately $400.
- Target total: approximately $4,500.
- Estimated repaired resale value: $7,000.
- Potential spread: approximately $2,500.
These were evaluations, not purchases or guaranteed outcomes. Notice that both budgets included money for problems beyond the seller’s description.
How I Negotiated the Prius to $2,700
The Prius stood out because similar cars in good condition were worth roughly $8,000 to $9,000 at the time. Its listing disclosed a failed hybrid battery, with a quoted Toyota repair cost of about $5,000, and a rattle the seller thought might be the engine.
During our phone conversation, the seller also described what felt like transmission slipping and a major loss of acceleration. He sent a clip of the engine clunking during shutdown, followed by another recording of the rattle. To me, the rattle sounded more like exhaust than an internal engine problem, but that was still a gamble.
I offered $2,500. He countered at $3,500, and we eventually agreed on $2,700.
I bought this one sight unseen, offering a quick transaction without a test drive. That is not how I normally recommend buying. It increased the chance of getting the deal, but it also increased the chance of getting burned. Normally, the inspection comes before the purchase.
Be patient with the search. Finding a worthwhile candidate can take two or three weeks. A car isn’t a good deal just because you’re ready to buy one today.
Inspect the Car Before Committing to the Repairs
Scan More Than the Check-Engine Light
Start with the car’s computers. An OBD2 scanner can provide valuable clues, but make sure its capabilities match the systems you want to inspect. Reading generic engine codes isn’t the same as scanning the hybrid system, transmission, airbags, and ABS.
- Plug the scanner into the diagnostic connector beneath the dashboard.
- Switch the ignition on without starting the engine. On this Prius, that meant pressing the power button twice with my foot off the brake.
- Connect the app or scanner and run a full-system scan.
- Read the results before deciding what needs replacement.
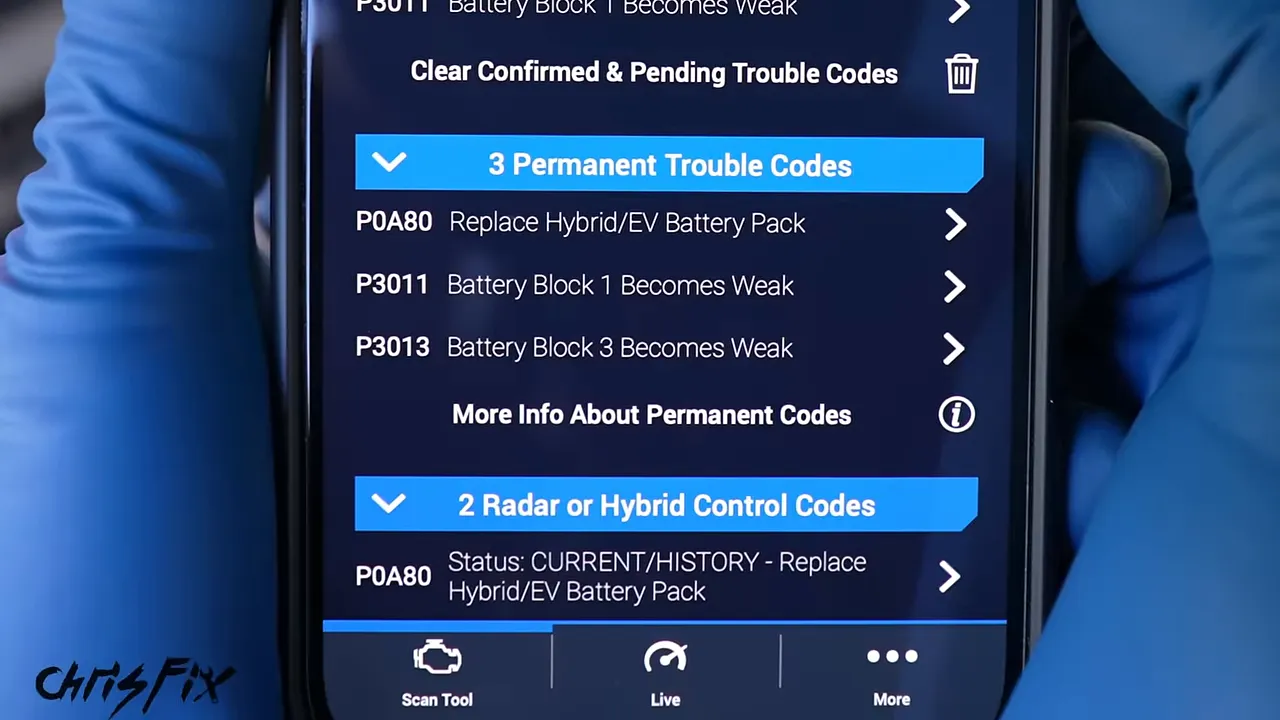
The Prius returned hybrid-battery-related faults, including weak battery blocks one and three. No additional engine, transmission, airbag, or ABS faults appeared in that scan. That supported the battery diagnosis, although an absence of codes isn’t a guarantee that every other component is healthy.
Check for a Head-Gasket Leak
A head-gasket repair can offer a good margin when the labor is the expensive part and you can do it properly yourself. The gasket alone may cost only $50 to $100, but fluids, other gaskets, and any additional damage still matter.
On the Prius, I wasn’t budgeting for that repair. Because third-generation Priuses can develop head-gasket problems, and this car’s coolant reservoir was low, I wanted to check it.
I used a combustion-gas tester at the coolant reservoir. Starting with a cold engine, I removed the cap, fitted the tester, added its test fluid, and ran the engine until it reached operating temperature. Drawing vapor through the fluid checks for combustion gases entering the cooling system.
With this tester, a change from blue to yellow indicates a positive result. The fluid stayed blue, so the test did not detect combustion gases under those conditions. That was reassuring, but low coolant still deserves attention rather than assuming one test rules out every possible leak.
After testing, I topped up with coolant meeting the vehicle’s required specification. Never remove a hot, pressurized cooling-system cap.
Use the Test Drive to Separate Symptoms
During a test drive, I’m checking several things at once:
- Steering: Does it track straight or pull?
- Suspension: Are there clunks, rattles, or unusual movements?
- Brakes: Does it stop straight without vibration?
- Powertrain: Does it accelerate and operate smoothly?
- Accessories: Do the heat, air conditioning, radio, and controls work?
The Prius tracked straight, had no obvious suspension noises, and braked smoothly. The accessories worked, too.
Acceleration was a different story. With the accelerator fully pressed, it struggled to reach normal road speed and shuddered in a way that felt like transmission trouble. My research suggested the failed hybrid battery could explain the loss of electric assistance and the jerking sensation.
That made the battery the next major repair, not proof that the transmission was fine. The repair still needed to be completed and the car retested.
Diagnose the Rattling Exhaust Before Assuming the Worst
The Prius sounded horrible at idle, but following the sound underneath the car led away from the engine and toward the rear exhaust. The culprit was a rusted bracket that had broken loose.
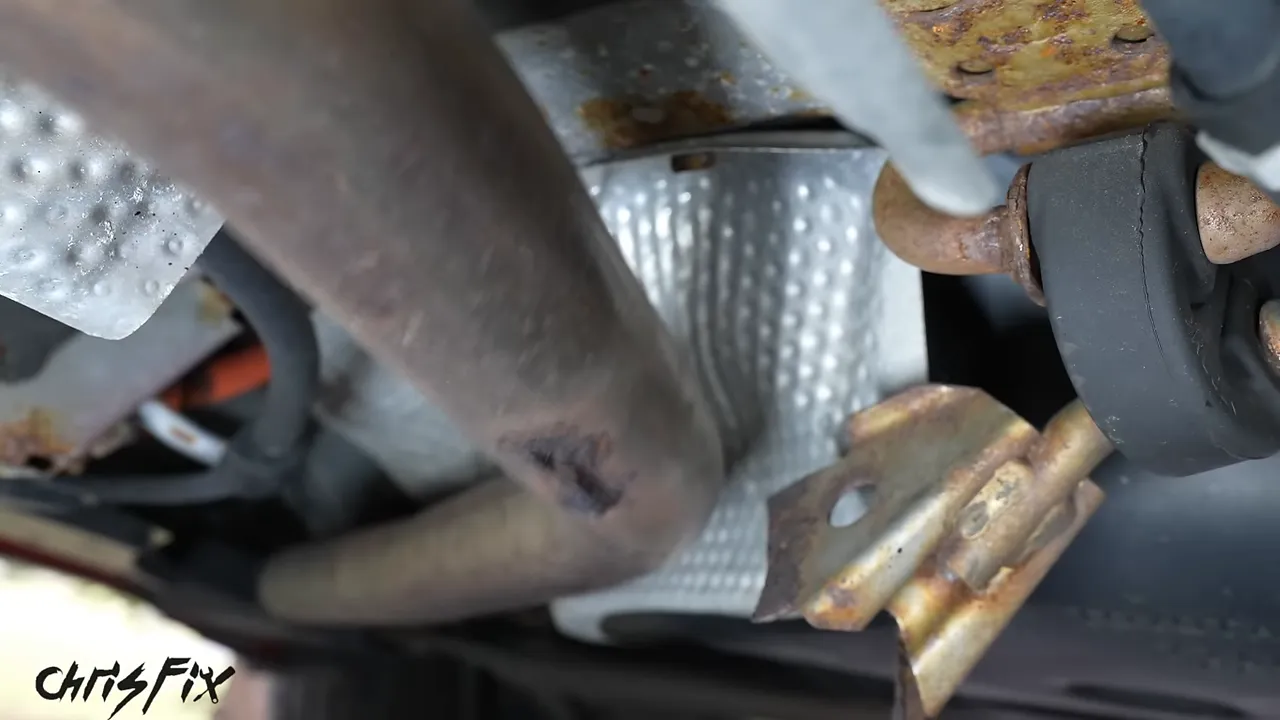
For access, I used ramps and chocked the rear wheels. Safe vehicle support comes first whenever you’re working underneath a car.
The repair involved:
- Shutting the car off and preparing the repair area.
- Using 80-grit sandpaper to remove rust from the bracket and pipe until the welding surfaces were clean, shiny metal.
- Disconnecting and securing the 12-volt battery’s negative cable as part of the welding preparation.
- Placing the welder’s ground clamp on the exhaust near the repair and welding the bracket back together.
- Grinding the repair and protecting the bare metal with high-temperature paint.
- Restarting the car to verify the rattle was gone.
This is a welding repair, not simply a detailing job. Follow the vehicle manufacturer’s welding and electrical-isolation procedures, especially on a hybrid, and leave it to someone qualified if it’s outside your skill set. Don’t treat disconnecting one battery cable as a universal procedure for every vehicle.
The finished weld wasn’t pretty, but the bracket was secured and the rattle disappeared. That’s exactly the kind of manageable repair I like finding.
Deep-Clean the Interior for a Big Improvement
A dirty interior can make a decent car feel neglected. Cleaning it properly changes the experience immediately: the seats are inviting, the controls feel clean, and the whole car smells fresher.
But remember the distinction: dirt can be removed; worn-out material may need repair or replacement.
Vacuum Thoroughly, Then Extract the Carpets
Start with loose debris. Vacuum every footwell, beneath the seats, between the seats and center console, and along the door-side edges. Small debris embedded in the fibers may need careful removal with a pick.
On this Prius, one stubborn “stain” turned out to be a worn-through spot in the carpet. I reduced the visual contrast with a black paint marker and feathered it with a towel. That was a cosmetic improvement, not a carpet repair.
Next, use an extractor vacuum to remove dirt that ordinary vacuuming leaves behind:
- Apply the appropriate carpet-cleaning solution evenly.
- Agitate it with a nylon brush to loosen embedded dirt.
- Extract the dirty solution from the fibers.
The carpets looked fairly clean before extraction, but the dirty recovery water told a different story. It also removed the slight odor that remained after vacuuming.
Clean the Pedals Without Making Them Slippery
A brush and soapy water remove dirt from the pedal texture. Wipe them clean afterward. Never apply slippery protectant to the pedals or steering wheel. Those surfaces need grip, not shine.
Restore Dirty Plastic Carefully
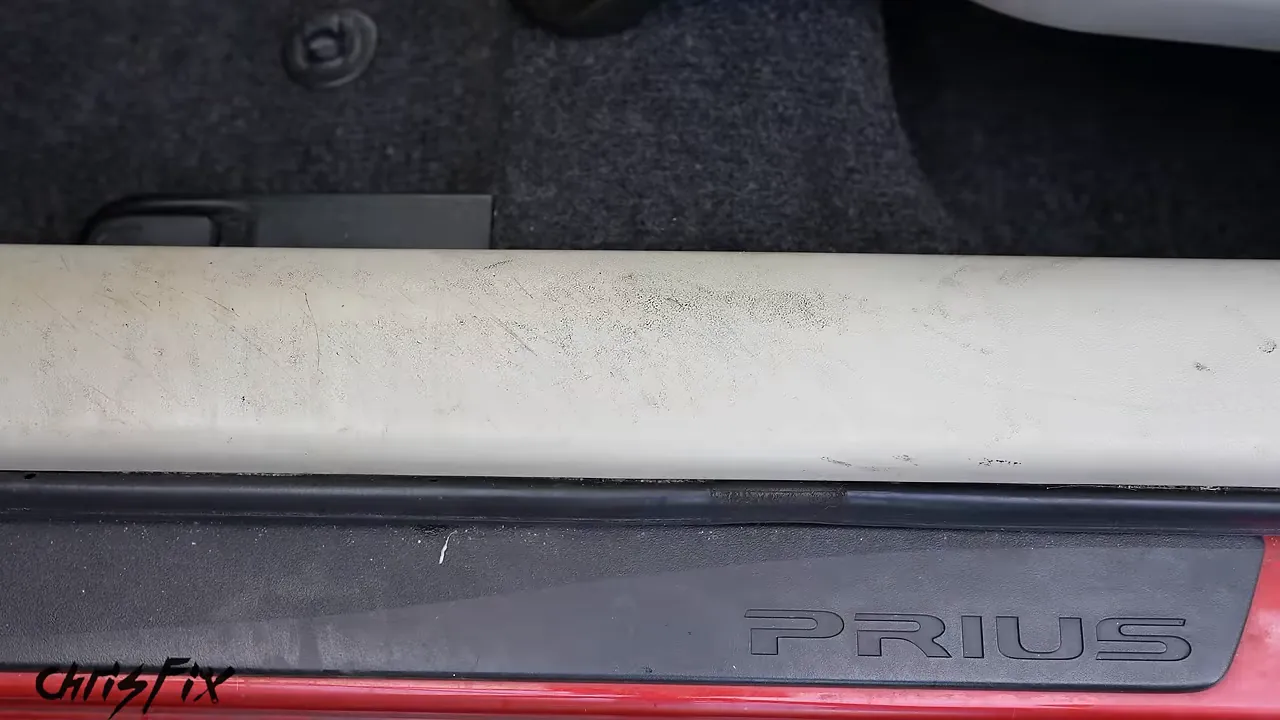
For ordinary interior plastic, start with soapy water, a brush, and a microfiber towel. Scratched, stained door sills may need more work.
I used melamine foam on the textured sill plastic after testing a hidden area. Melamine foam is abrasive. Use light pressure, and don’t assume it’s safe on smooth, glossy, or painted trim. It can change the finish or leave scratches.
After cleaning compatible plastic, apply protectant to a towel or brush rather than spraying directly across the interior. Work it in and wipe off the excess.
Pay attention to the little areas people touch and see:
- Seat-belt release buttons: Brush dirt out of the recessed lettering without flooding the mechanism.
- Cup holders: Clean the crevices around the base and trim.
- Vents: Loosen dust with a vent brush, vacuum it away, and remove excess dressing from tight spaces.
- Door-switch panels: Vacuum debris and clean carefully without soaking the switches.
- Center-stack trim: Remove fingerprints and buff away residue.
For the dashboard, I use a towel lightly misted with soapy water. A shiny dressing can create an unpleasant reflection in the windshield. On screens, use a compatible cleaning method and a clean buffing towel rather than leaving a smeary finish.
Extract the Cloth Seats
Vacuum the seats first, including seams and the gaps between cushions. Then lightly and evenly dampen the fabric with suitable upholstery cleaner, agitate it with a nylon brush, and extract the dirty solution.
Don’t saturate the seats. You want enough cleaner to work on the surface without leaving the cushions soaked and difficult to dry.
The same approach cleaned the fabric insert in the center-console tray. Even the seats that didn’t look terrible released a surprising amount of dirt.
Finish the Interior Without Overspending
I removed the cracked steering-wheel cover and found a decent wheel underneath. A little soapy water on a microfiber towel cleaned it up nicely.
The center armrest was different. Its material was worn out, so repeated cleaning wasn’t going to make it new again. Recovering it with fresh foam and material remained a separate repair.
A new set of floor mats cost about $50 and finished the interior nicely while protecting the carpet from further wear. Existing worn spots were still existing worn spots, even with mats installed.
Don’t Forget the Door Jambs
Open a clean car’s door and a dirty jamb immediately stands out. A waterless wash-and-wax product, a brush for tight hinge areas, and a microfiber towel make quick work of the dirt.
Clean both the body-side jambs and the inside edges of the doors. These protected painted areas often clean up beautifully because they haven’t had the same exposure as the exterior panels.
Restore Faded Paint With a Practical One-Step Process
I like finding paint with dullness, swirl marks, light clear-coat scratches, staining, or removable paint transfer. Those are opportunities for improvement at home, unlike damage that requires a full repaint.
Wash and Decontaminate First
- Rinse the car to remove loose dirt, including buildup around badges and lower doors.
- Wash from top to bottom using car-wash soap and a microfiber mitt.
- Rinse thoroughly.
- Inspect the clean paint for embedded contamination.
The Prius still felt gritty after washing. That roughness came from contamination attached to the paint, not loose dirt that another rinse would remove.
I used a clay bar with an iron-decontamination product that also served as lubrication in this application. Check product compatibility before combining those steps.
Work one panel at a time, keeping the surface lubricated. Move the clay back and forth, then repeat in the perpendicular direction. Rinse the panel and dry it with a microfiber towel. The goal is a smooth surface ready for polishing.
Use Cleaner Wax to Save Time
A full compound, polish, and protection process can take a long time. For this flip, I used a cleaner wax that combined polishing and wax protection in one step.
It was a practical choice for improving the existing paint without turning the detail into a much longer project.
- Apply cleaner wax to the dual-action polishing pad.
- Spread it on the panel before switching the machine on.
- Use the appropriate machine setting for the pad and product. My setup was around the 5,000 speed range.
- Move slowly, approximately one inch per second, using light pressure.
- Overlap passes by about 50%.
- Repeat in the perpendicular direction for even coverage.
- Buff off the residue with a clean microfiber towel.
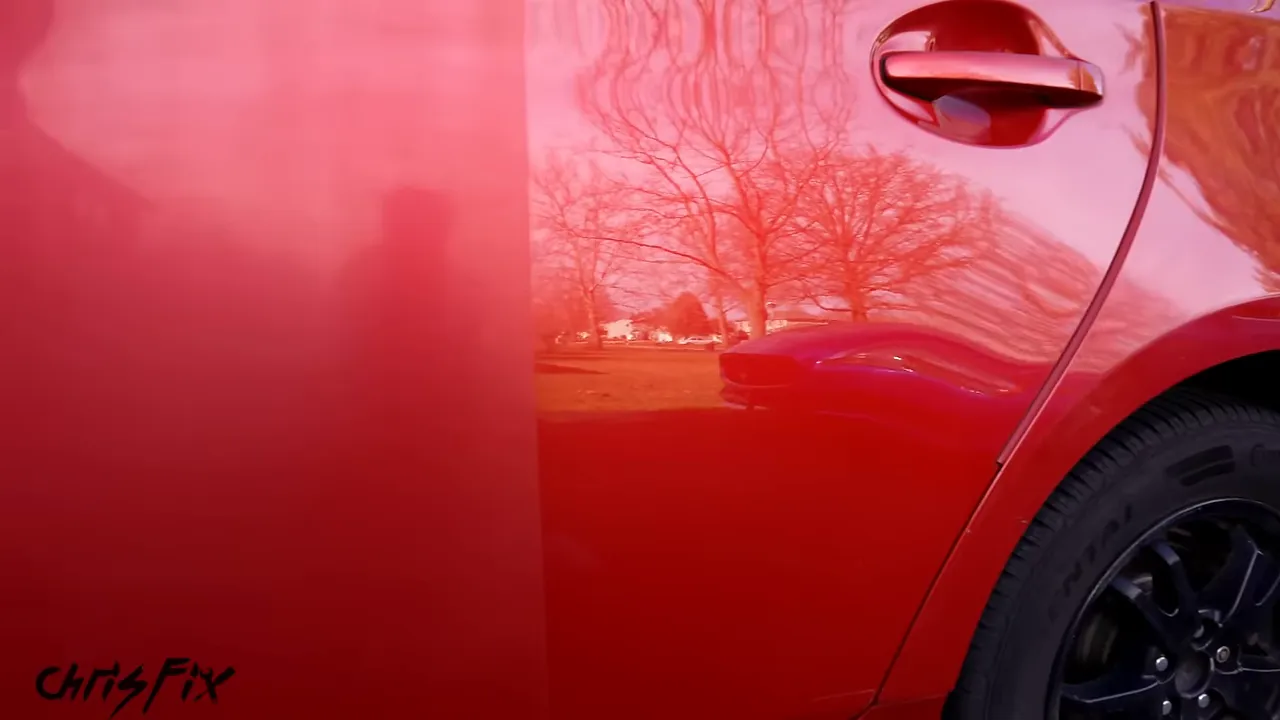
Holy smokes, the difference was huge! The dull red became a much deeper, glossier color, and light scratches improved dramatically.
Work around the car one panel at a time, letting the machine do the work. This is about improving correctable surface defects, not promising that polishing will remove every scratch or fix missing paint.
Detail the Engine Bay Without Creating New Problems
A clean engine bay helps finish the presentation, especially when a potential buyer opens the hood. The Prius engine compartment was dusty and dirty, but it cleaned up well.
My process was:
- Apply an appropriate degreaser to the areas being cleaned.
- Use brushes to loosen dirt on accessible surfaces.
- Gently rinse with the hose’s shower setting.
- Wipe away remaining dirt and moisture with an absorbent microfiber towel.
- Remove the decorative engine cover and clean it separately.
- Clean leaves, pollen, and dirt from the wiper-cowl area.
- Use a blower to remove pockets of standing water.
- Apply compatible water-based dressing to plastic and hose surfaces, work it in, and wipe away excess.
Don’t use high-pressure water in the engine bay. It can force water into electrical connections. Work carefully around sensitive components and follow the vehicle’s cleaning precautions, particularly on a hybrid.
The dressing helped the cleaned plastic retain a richer appearance rather than drying to a dull gray. The result was a much tidier engine compartment, not a substitute for a mechanical inspection.
Restore Oxidized Headlights and Protect the Result
Cloudy headlights make a car look older, and they’re another improvement that doesn’t necessarily require replacing the assemblies.
The Prius lenses weren’t heavily oxidized, so I started with 3,000-grit sandpaper and followed with 5,000 grit. More severe oxidation may require starting around 1,000 grit and progressing through 1,500, 2,000, 3,000, and 5,000 grit.
- Tape around the lens to protect nearby paint.
- Wet-sand with the starting grit, keeping both the lens and paper lubricated with soapy water.
- Use straight passes, then change direction for complete coverage.
- Wipe away residue and inspect for a uniform haze.
- Repeat with the finer grit to refine the sanding scratches.
- Work plastic polish into the lens with an applicator, then buff clean.
- Clean off polishing residue before applying compatible protective coating.
Sanding removes the deteriorated outer protection along with the oxidation, so don’t stop at a clear-looking lens. I wiped the lenses with isopropyl alcohol, applied a ceramic coating intended for the application, and allowed 24 hours for curing.
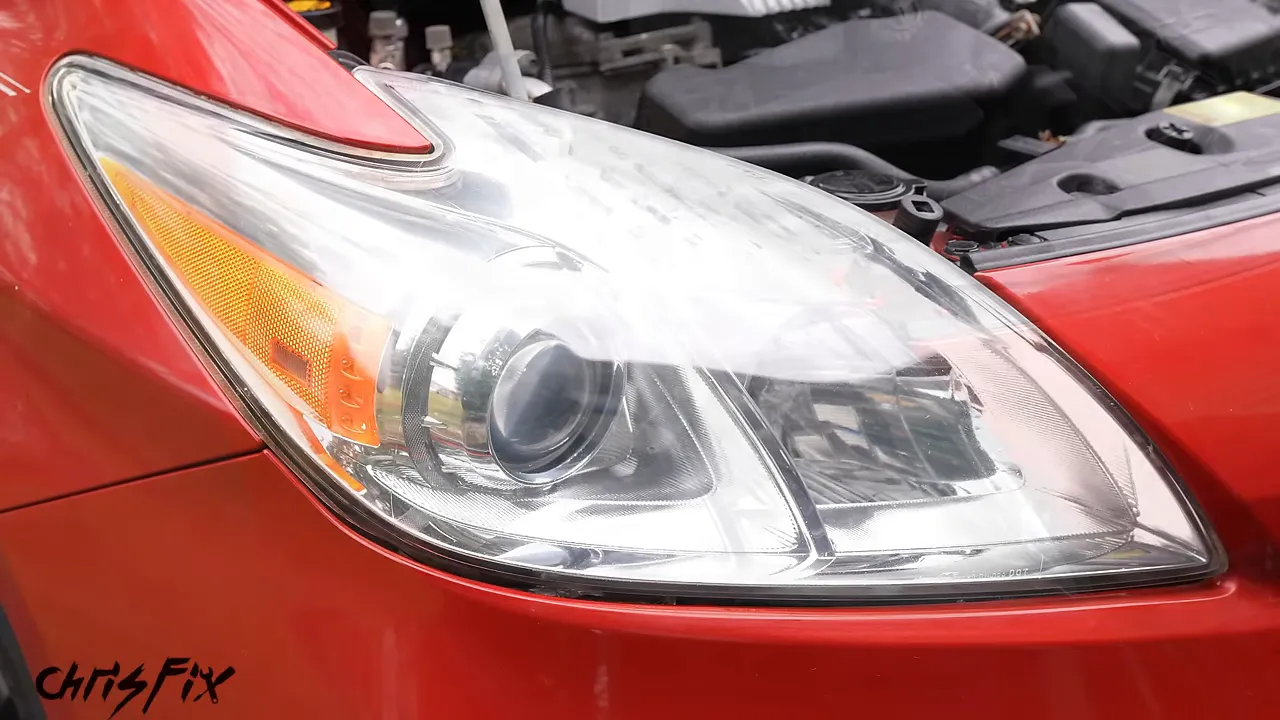
Follow the coating’s instructions for preparation, compatibility, and cure time. Restoring clarity is only half the job; protecting the result matters, too.
Use Inexpensive Finishing Touches Instead of Unnecessary Upgrades
The Prius wheels looked unfinished without their covers. A new set of aftermarket wheels might have looked great, but that wasn’t in the flip budget.
Instead, I found four good-condition hubcaps at the junkyard for $25.
Installation was simple: align the valve-stem opening, seat one side, and work around the edge until the cover is fully secured. Then pull gently at the center to check that it won’t easily come off.
A little tire dressing on the sidewalls completed the appearance. The goal is a clean, complete car, not a collection of upgrades that consume the margin.
Problems That Can Quietly Eat Your Profit
Some problems are worth taking on. Others are easy to underestimate because the car still seems usable. These are the items I inspect closely before buying.
Transmission and Major Drivability Problems
Make sure the car runs, drives, and operates correctly. Transmission repairs can be expensive, so don’t dismiss shuddering, slipping, or weak acceleration without a diagnosis.
On the Prius, I had a reason to suspect the hybrid battery. It still needed confirmation after replacement. Confidence in a theory isn’t the same as a verified repair.
Windshield Chips and Cracks
Inspect the entire windshield, especially the driver’s field of view. A chip or crack is easy to miss when you’re focused on the engine, and replacement can take a meaningful bite out of the budget.
Torn or Damaged Seats
I don’t mind dirty seats because I can clean them. Tears, cracks, and damaged upholstery are different. Replacement seats or upholstery work can be expensive, so price that work before buying.
Worn, Old, or Dry-Rotted Tires
Check every tire for tread depth, cracking, and uneven wear. A quick quarter test gives a useful screening point: place Washington’s head down into the tread. If you can see the top of his head, the tread is below approximately 4/32 inch.
That’s a budgeting warning, not the same thing as saying the tire has already reached the commonly used 2/32-inch replacement threshold. For additional guidance on tread, aging, and tire condition, see NHTSA’s tire-safety information.
Look across the full tread width, too. Uneven inner- or outer-edge wear can point toward an alignment or suspension issue. Check all four tires, not just the easiest one to reach.
A Weak 12-Volt Battery
If the seller needs to jump-start the car, investigate why. A replacement battery can be another unwelcome expense.
I connected a battery tester with the black lead on negative and the red lead on positive. The Prius battery tested good, with a reported state of health of 82%. That helped rule out an immediate replacement expense.
Major Rust or Body Damage
A small surface spot and extensive corrosion are very different projects. Rust often extends farther than the visible damage suggests.
For someone with bodywork or paint skills, that may be an opportunity. For me, major rust and body damage are usually things to avoid. Buy work that fits your skills, not work you merely hope will be simple.
Several Small Expenses at Once
None of these items automatically means you shouldn’t buy the car. They mean you need to notice them and include them in the price.
That can be harder than negotiating around a major failure. An owner may accept that a non-running car needs a discount but resist discounting tires that still hold air and remain usable. Unfortunately, your eventual replacement cost doesn’t disappear just because the seller doesn’t consider it a problem.
Where the Prius Flip Stands
The $2,700 Prius now has a repaired exhaust bracket, a deeply cleaned interior, restored paint, a detailed engine bay, clearer headlights, and inexpensive replacement hubcaps. Its appearance is dramatically better without expensive cosmetic upgrades.
But the flip isn’t finished. The hybrid battery replacement, planned cylindrical-cell upgrade, and proposed E85 conversion are separate work still ahead at this stage. The acceleration problem and shutdown vibration also need to be retested after the battery repair. There is no final Prius sale price or confirmed profit yet.
That’s the mindset to bring to your own flip: inspect before buying, leave room for surprises, repair the real problems, and make the car clean and inviting. A cheap purchase is only the beginning. The opportunity comes from knowing what you can fix, what it will cost, and whether the finished car is something someone else will want.


