A broken car can be a great deal, but only if you understand what is broken, what it will cost to fix, and what the car will realistically sell for afterward. The goal is not just to buy cheap. It is to turn a car someone no longer wants to repair into a clean, reliable vehicle the next owner will be excited to drive.
For this weekend flip, I bought a 2009 Toyota Highlander Hybrid for $2,800. It had a failed hybrid battery and a dealership replacement quote of about $9,000. I replaced the battery with an upgraded drop-in pack, detailed the entire car, restored the headlights, and added a dash camera. It eventually sold for $9,700, leaving a $2,800 margin over the purchase and project expenses.
Here is the whole process, from finding the deal to tightening the last bolt and negotiating the sale.
Table of Contents
- What You'll Learn
- What Makes a Good Weekend Car Flip?
- Find Cheap Project Cars With Targeted Searches
- Confirm the Problem Before Buying Expensive Parts
- Choose the Replacement Battery and Gather the Tools
- Remove the Seats to Reach the Hybrid Battery
- Isolate the Battery and Clear the Carpet and Vents
- Disconnect and Remove the Old Hybrid Battery
- Install the Upgraded Battery and Torque the Fasteners
- Replace the Cabin Air Filter and Deep Clean the Interior
- Super Clean the Engine Bay Without High Pressure
- Wash the Exterior, Glass, Wheels, and Hidden Areas
- Polish and Wax the Paint
- Restore the Foggy Headlights With a Protective Clear Coat
- Add a Dash Camera Without Permanent Modifications
- Write a Simple Listing and Leave Room to Negotiate
- The Final Car-Flipping Numbers
What You'll Learn
- Research repaired values and replacement-part costs before negotiating the purchase of a broken car.
- Verify the diagnosis with battery testing, full-system scanning, and supporting fault data.
- Thorough detailing and headlight restoration help a repaired car make a stronger first impression.
- This Highlander sold for $9,700 against $6,900 in listed purchase and project expenses.
What Makes a Good Weekend Car Flip?
My favorite projects have a specific, repairable problem that has scared away other buyers. A large repair estimate can make an otherwise decent car seem worthless to its owner, especially when that estimate approaches the car’s value.
I have used this approach before:
- 2005 Chevrolet Trailblazer: I paid $500 for a non-running SUV, diagnosed a bad fuel pump, replaced the damaged fuel tank with a working junkyard assembly, and cleaned up the interior and paint. With roughly $1,000 invested, the project produced about $3,000 in profit.
- 2013 Toyota Prius: I paid $2,700, rebuilt the hybrid battery with upgraded cylindrical cells, repaired a broken exhaust hanger, and detailed the car. The total investment was $5,100 against an estimated value of at least $8,000.
There is one important difference with the Prius: I liked it so much that I kept it. That $2,900 was potential profit, not money from a sale. Three years and more than 30,000 miles later, it was still a great daily driver.
The Highlander was going to be different. This one really was getting sold!
Find Cheap Project Cars With Targeted Searches
I use AutoTempest to search multiple car-selling sites in one place. It brings together listings from sources such as eBay Motors, Cars.com, and TrueCar, and helps broaden searches on Craigslist and Facebook Marketplace beyond one small local area. AutoTempest supported this project.
The useful trick is to search with words sellers use when something is wrong:
- Project
- Won’t start
- Dead battery
- Needs work
These searches uncover possibilities, not guaranteed bargains. You still have to read the listing, research parts, and inspect the rest of the car.
For example, I found a Mercedes SUV listed for $5,500. The seller said a dealership had diagnosed a failed fuel pump, and the driver’s window did not work. I found an OEM fuel pump for about $150 and a window motor for about $50. If those were the actual problems and the rest of the vehicle checked out, that could be an interesting project against an estimated repaired value of at least $8,000.
That “if” matters. A cheap part does not automatically mean an easy repair, and a seller’s diagnosis should not replace your own checks.
Why the Highlander Stood Out
The Highlander was advertised for $4,000 or best offer. The listing described a one-owner car with no accidents and a bad hybrid battery. The owner included a helpful list of pros and cons.
In the photos, it looked dirty but otherwise reasonably straight. There was no obvious major body damage, and it had nice newer tires. Dirt was something I could fix. A known battery replacement was something I could price before making an offer.
Research the Repaired Value Before Negotiating
I checked price trends for the same year, make, and model, narrowed the results to the most recent six months, and filtered out outliers. Comparable asking prices ranged from around $6,000 to $13,000, with an average near $9,100. The Blue Book estimate was about $9,200.
Asking prices are not sold prices. They help establish a range, but they do not guarantee what a buyer will pay.

With that value range in mind, I wanted to buy the Highlander for $3,000 or less. I offered $2,500. The owner countered at $3,500. After some back and forth, we agreed on $2,800.
The basic calculation is simple: expected sale price minus purchase price minus repair and preparation costs. Leave room for negotiation and surprises instead of spending every dollar of the potential margin upfront.
Confirm the Problem Before Buying Expensive Parts
The previous owner had seen a chime, multiple warning lights, and messages to check the brake and hybrid systems. A dealership charged about $200 to diagnose the vehicle and quoted roughly $9,000 for a replacement hybrid battery.
That paperwork was useful, but I still wanted to verify the diagnosis and check for other faults.
Start With the 12-Volt Battery
The Highlander needed a jump-start when I picked it up. Before blaming every electrical symptom on the high-voltage battery, I tested the ordinary 12-volt battery.
- Connect the battery tester to the positive and negative terminals.
- Select the battery type. This vehicle had a regular flooded battery.
- Enter the rating from the battery label, which was 550 cold cranking amps.
- Run the test and review the result.
The tester reported 100% battery life. That was a relief because replacing another battery would have cut into the budget.
Scan All the Vehicle’s Computers
I plugged a compatible OBD-II scanner into the port under the driver’s side dashboard and switched the ignition to the run position without starting the vehicle. Then I ran a full-system scan.
A full-system scanner can check more than the engine computer. On this car, it also checked systems such as ABS, airbags, cruise control, and hybrid control.
The ABS and cruise-control faults pointed back to the high-voltage system. The hybrid-control module stored P0A80, a code associated with hybrid battery deterioration and replacement.
Next, I opened the freeze-frame data, which records operating information when a fault is triggered. Most battery blocks were around 18 volts, but block three was around 16 volts. That voltage outlier supported the battery diagnosis rather than leaving us with only a warning message.
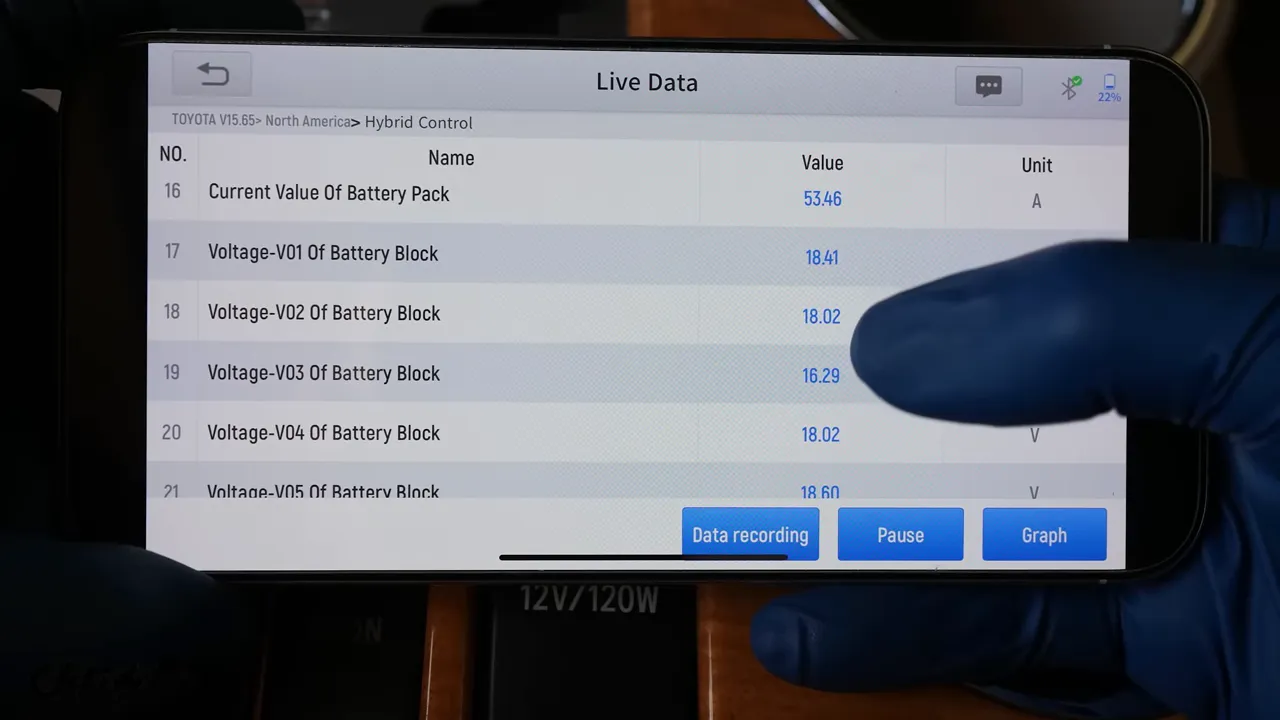
Choose the Replacement Battery and Gather the Tools
Instead of the dealership repair, I ordered an upgraded battery from Electron Automotive. For this project, there were two approaches worth considering:
- A rebuild kit with OEM cells: A little over $2,600 at the time of the project, but it requires opening and rebuilding the pack.
- A complete upgraded drop-in battery: $3,940 for this Highlander, with a stated three-year, 45,000-mile warranty.
I chose the complete battery to keep the job straightforward and give the next owner the benefit of that warranty. I had previously used an OEM-cell rebuild kit in a gray Prius, and its owner reported that it was still running well more than seven years later.
For removal and installation, I used common hand tools rather than power tools:
- Ratchets, extensions, and 10 mm, 12 mm, and 14 mm sockets
- Torque wrenches suitable for both inch-pound and foot-pound settings
- A pocket pry bar and trim-removal tools
- A pickup magnet and organized fastener storage
- A multimeter and compatible diagnostic scanner
- Safety glasses
- A moving blanket and a second person for lifting
High-voltage safety comes first. A hybrid battery can cause fatal electric shock. Removing the service plug interrupts the circuit, but it does not eliminate stored energy inside the pack. Follow the exact manufacturer isolation procedure, waiting periods, voltage-verification steps, and protective-equipment requirements. Ordinary disposable gloves are not electrical protection. Use the vehicle-specific information available through Toyota’s technical information service, and leave the high-voltage work to a qualified technician if you are not equipped or trained for it.
I also made a model-specific checklist to keep removal and installation organized. It is a useful companion to the factory procedure, particularly for tracking connectors, brackets, and fasteners.
|
Remove the Seats to Reach the Hybrid Battery
On this Highlander, the hybrid battery sits beneath the second-row seats and carpet. Move both front seats fully forward before disconnecting the 12-volt battery’s negative terminal so you have plenty of working room.
Unbolt the Second-Row Seats
- Remove the plastic covers over the front seat-rail fasteners.
- Remove the four front seat bolts with a 14 mm socket.
- Slide the second-row seats forward and fold them down to expose the rear rail covers.
- Pull the rear covers upward and organize them by location.
- Remove the rear rail bolts. There are six visible rear seat bolts, plus a hidden seat-belt bracket bolt that becomes accessible after the smaller seat is removed.
I kept the bolts with their matching plastic covers and laid the parts out in order on the third-row seat. A few minutes of organization here makes reassembly much easier.
Disconnect the Folding-Seat Release Cables
The folding-seat cables were the fiddliest part of the seat removal. They are under tension, so first pull the seat-release handle. A removed seat bolt can temporarily hold the handle open while you work.
Open the plastic cable retainer with a small pry tool. Rotate the metal disc until its opening lines up with the keyway, then carefully lift the cable out. Remove the temporary bolt from the release handle afterward.
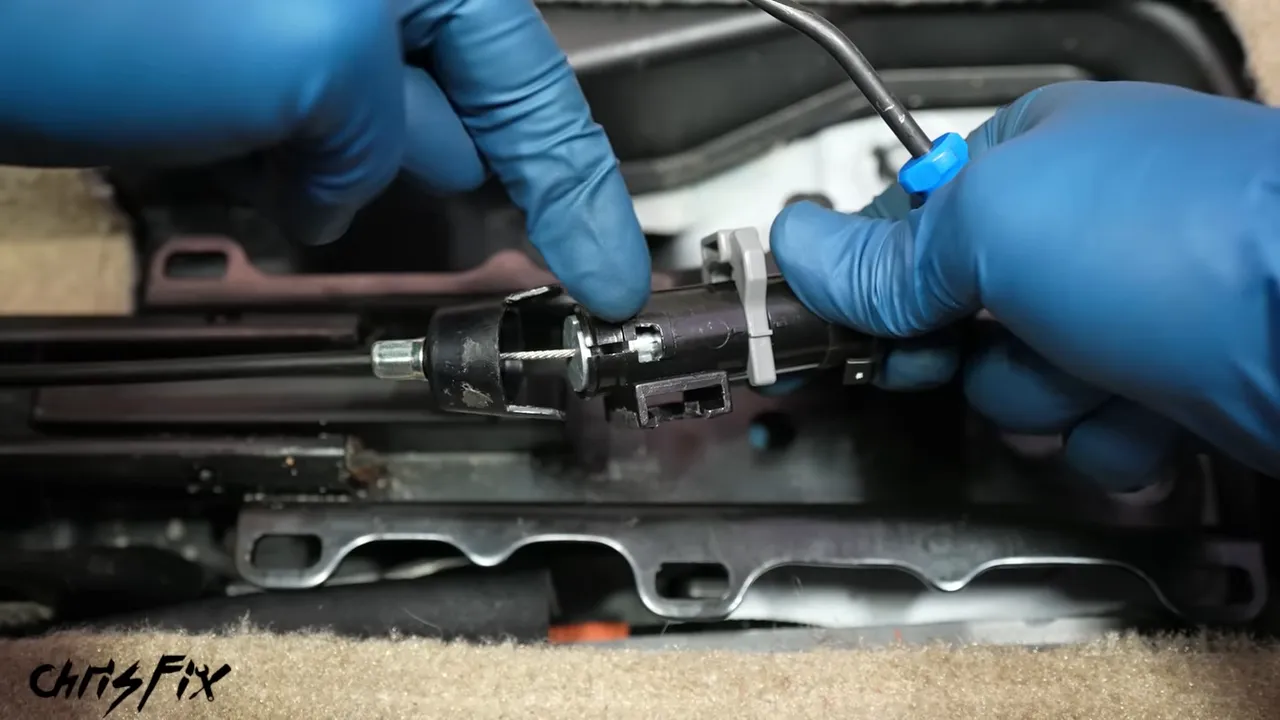
Remove the smaller seat first. Tilt it sideways through the doorway, then rotate it so the rails are vertical. Be careful not to drag those metal rails across the door trim.
With that seat out, remove the exposed 14 mm seat-belt bracket bolt and mounting plate. Then finish unbolting the larger seat, disconnect its release cable the same way, and lift it out.
Isolate the Battery and Clear the Carpet and Vents
Before touching the high-voltage connections, complete the manufacturer’s isolation procedure. The orange service plug is accessible through an opening in the carpet. Its handle opens so the plug can be withdrawn. Keep it under your control while the work is underway.
Next, remove the door-sill trim on both sides. Three battery-cooling intake grilles also need to come out. Each has two hidden fasteners behind small plastic tabs, removable with a 10 mm socket.
Clean the Battery-Cooling Intakes
Check this out: the backs of these grilles were packed with carpet fibers, dirt, and debris. Air could barely pass through them.
A hybrid battery needs cooling airflow. Clogged intakes restrict that airflow and contribute to heat buildup, so finding and cleaning them is important maintenance even if you are not replacing the battery.
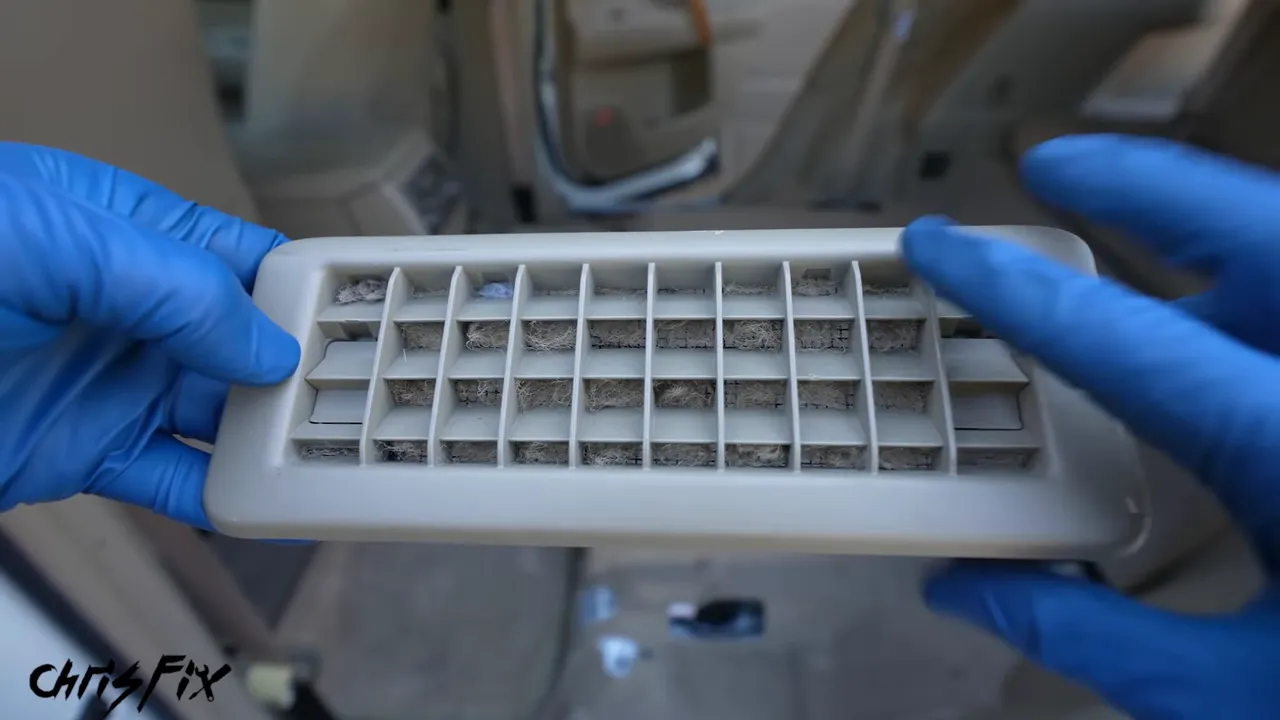
I rinsed the removed plastic grilles outside the car and cleaned out the debris. Keep water away from the battery and electrical components, and let the grilles dry before refitting them.
While the seats were out, I thoroughly vacuumed the carpet. This is probably the easiest access those areas will ever get, so take advantage of it.
Remove the three carpet clips, fold the carpet back, and lift off the rubber covering and the three black plastic air ducts over the battery.
Disconnect and Remove the Old Hybrid Battery
Access the High-Voltage Cable Connections
Disconnect the small electrical connector on the black plastic cover and remove that cover. Underneath is the high-voltage access panel.
The panel has a special safety clip that releases using the shaped end of the service plug. Release the clip, remove the two 10 mm bolts, and lift off the panel.
Do not assume that an unplugged battery is safe to touch. Complete the specified waiting period and absence-of-voltage checks with correctly rated, verified test equipment. In this repair, the measurement across the accessible cable terminals read 0 volts before the cables were disconnected. That reading applies to the tested points, not every component inside the pack.
Once isolation has been properly verified, remove the two terminal nuts with a 10 mm socket and extension. A pickup magnet helps prevent a nut from falling into the case.
Pay attention to the cable markings: red goes to red, and white goes to white. Tuck the disconnected cables clear of the battery so they cannot catch or get crushed during removal.
Disconnect the Harness and Mounting Bolts
Remove the small vent tube on the passenger side of the original pack. This particular replacement battery did not require that tube, so follow the replacement manufacturer’s instructions rather than assuming every pack uses the original arrangement.
Disconnect the six wiring-harness connectors and release all the harness holders around the case. The connectors are different shapes, but keeping the harness laid out in its original routing still helps. Move it onto the third-row seat, clear of the lifting path.
The battery is secured by:
- Six rear mounting bolts, using a 12 mm socket.
- Five front mounting bolts, also using a 12 mm socket.
- Two front duct-support brackets that must be removed to expose four of the front mounting bolts. Their fasteners use a 10 mm socket.
Remove the brackets, then the remaining mounting bolts. Check the entire perimeter for anything still attached before lifting.
Use Two People to Lift the Pack
This is a heavy, awkward assembly, roughly 180 pounds. Do not treat it like a normal 12-volt battery.
I protected the door sill with a moving blanket. With a helper, we turned the pack onto its side and carefully brought it through the rear doorway, protecting the trim and keeping fingers clear.
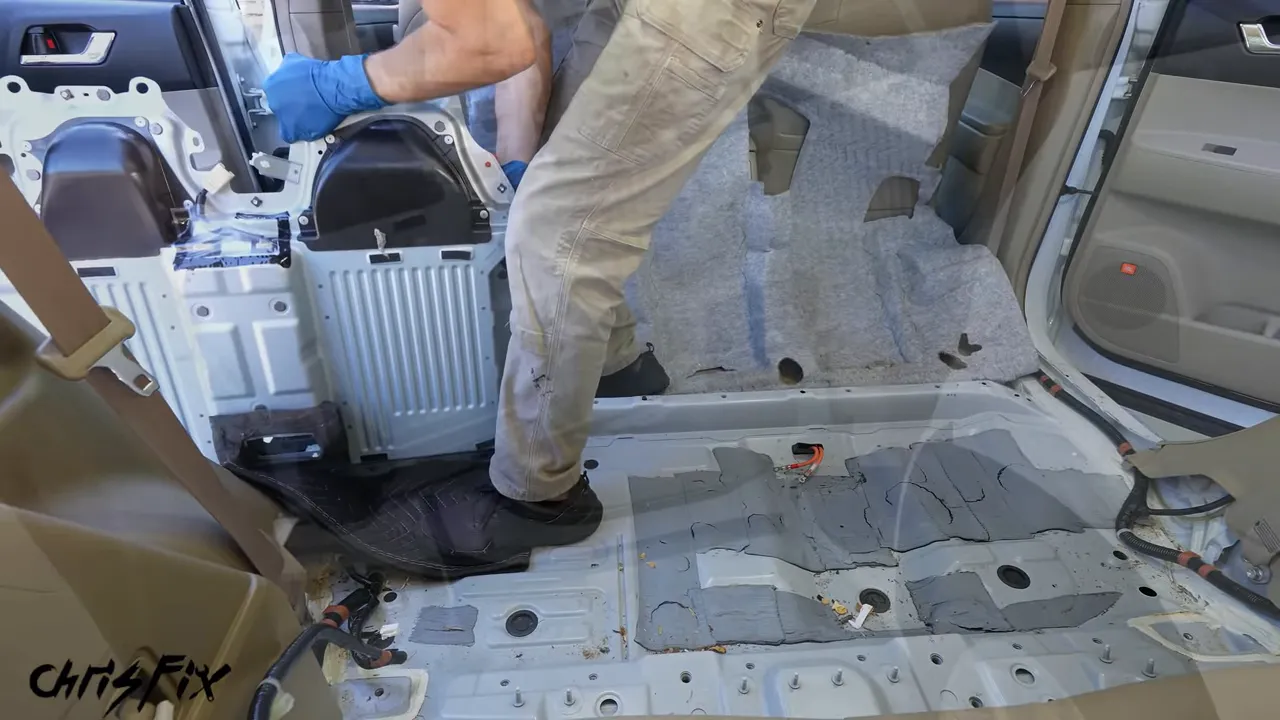
The old battery went onto the pallet supplied with the replacement and was strapped down for the core return. For this order, the supplier included return shipping and arranged pickup.
Install the Upgraded Battery and Torque the Fasteners
Bring the replacement pack into the car with the same two-person approach. Lower it carefully into place, making sure no cables, trim, or fingers are underneath.
Before tightening anything, align the mounting holes at both the front and rear. The pack may need a small shift to line up properly.
These were the torque settings used for this particular installation. Verify them against the correct service information and replacement-pack instructions for your vehicle:
- Battery-to-chassis bolts: 20 ft-lb, covering all five front and six rear bolts.
- Front duct-support bracket bolts: 60 in-lb.
- High-voltage cable terminal nuts: 60 in-lb.
- High-voltage access-cover bolts: 60 in-lb.
- Seat mounting and removed seat-belt bracket bolts: 27 ft-lb.
Do not confuse inch-pounds with foot-pounds. These are very different settings.
Reconnect the Wiring and Cooling Ducts
- Route the harness back across the battery and reinstall its holders.
- Connect all six harness plugs, checking for a solid click at each one.
- Reconnect the high-voltage cables to their matching marked studs and torque the nuts.
- Refit the metal access cover and lock its safety clip.
- Install the black plastic cover, its electrical connector, and its wire holder.
- Refit the black cooling ducts and rubber covering.
- Fold the carpet down, tuck its edges under the trim, and reinstall the three carpet clips.
- Reinstall the three cleaned intake grilles and close their fastener covers.
A connector that is almost seated can still trigger a warning light. Take the extra moment to check every connection now.
Test Before Reinstalling the Seats
With the connections and protective covers complete, reinstall and fully lock the service plug according to the vehicle procedure. Reconnect the negative terminal on the 12-volt battery and tighten it snugly without overtightening.
Now comes the exciting part: start the vehicle and check the result.
The Highlander started without the earlier warning lights, and the energy display showed the engine charging the new hybrid battery. Testing at this stage meant I could correct a missed connection without removing the seats again.
After the check, finish reassembling the interior. Reinstall the seat assembly needed to position the seat-belt bracket, refit that bracket and belt routing, and install the remaining seat. Reconnect both folding-seat cables and their retainers, remove any temporary bolts holding the release handles, torque all seat fasteners, and reinstall the rail covers.
On the test drive, the car drove well, the battery charged, and the air conditioning was ice cold. The dash showed almost 30 mpg during that drive, though that was a displayed reading, not a measured long-term fuel-economy result.
The mechanical problem was fixed. Now it was time to make the rest of the car match.
Replace the Cabin Air Filter and Deep Clean the Interior
Never underestimate how much a dirty interior hurts a car’s appeal. Nobody wants to grab a shifter covered in someone else’s grime.
Replace the Musty Cabin Filter
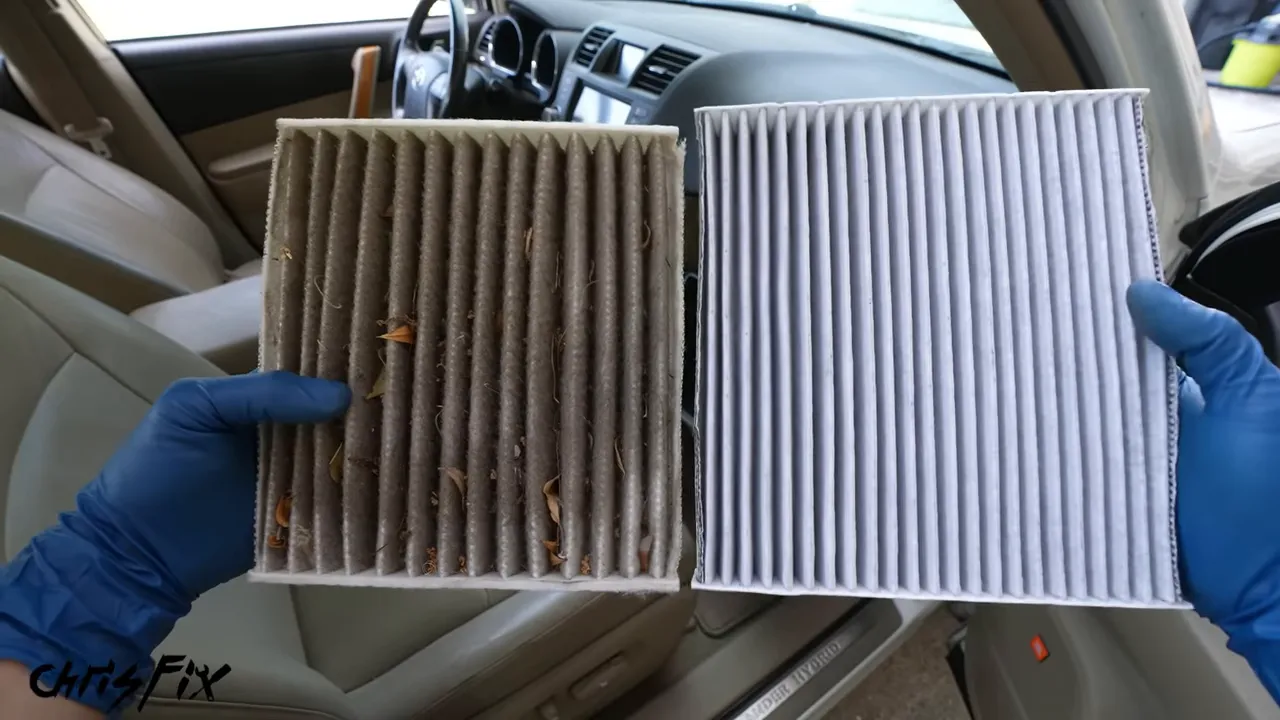
The air conditioning had a musty smell, so I started with the cabin air filter behind the glove box.
- Empty and open the glove box.
- Press its sides inward to clear the stops and lower it.
- Open the access panel and remove the filter-box cover.
- Slide the old filter out and note the orientation markings.
- Install the new filter, refit both covers, and close the glove box past its stops.
The old filter was filthy. The replacement used an “up” marking, which I kept facing upward. If your filter instead has an airflow arrow, follow its airflow instructions rather than assuming it means the same thing.
Clean the Plastics, Buttons, and Cup Holders
My basic interior-cleaning process is straightforward:
- Spray soapy water into a detailing brush rather than flooding switches or electronics.
- Agitate the dirt, working into textured surfaces and crevices.
- Use a clean microfiber towel to absorb the dirty solution.
- Apply a compatible, non-greasy interior protectant with a separate towel.
Repeat that process on the dash, door panels, console, shifter surround, buttons, and cup holders. A brush reaches down into deep cup holders where a towel alone struggles. Once the dirt is loose, push the towel into the bottom and absorb it.
Clean the accelerator and brake pedals, too, but never apply protectant to the pedals. A slippery brake pedal is the last thing you want.
Clean the Seats, Even When They Look Decent
The light-colored seats looked reasonably clean until I cleaned a small test section. Removing the surface grime revealed how much lighter the upholstery actually was.
Clean the full seat evenly, wipe away the dirty solution, and use a product compatible with the upholstery. Do not assume every leather, coated-leather, or synthetic seat tolerates the same treatment.
One stubborn stain needed more work. I used steam and brushing, then very carefully used the edge of a plastic razor as a last resort to lift the remaining residue. That was an aggressive spot treatment, not the starting point for every seat. Heat and scraping can damage finishes, so test first and stop before harming the surface.
The stain improved dramatically, although a faint area remained. A clean, honest result is better than damaging a seat while chasing perfection.
Extract the Carpets
- Remove the floor mats and vacuum loose dirt thoroughly.
- Apply cleaning solution across the carpet, with extra attention to stains.
- Brush the cleaner into the fibers.
- Extract the dirty solution, overlapping passes by about 50%.
- Allow the carpet to dry fully before replacing the cleaned mats.
The extracted water was disgusting, which is exactly why this step matters. By the end, the cabin looked dramatically better and the musty smell was gone.
Super Clean the Engine Bay Without High Pressure
A clean engine bay helps the whole car feel finished. My two main rules are simple: no pressure washer in the engine bay, and no greasy dressing that attracts dirt.
Weather-resistant connectors are not designed for a concentrated high-pressure water jet. Use a gentle approach, avoid directing water into sensitive electrical components or openings, and follow the vehicle’s precautions.
- Apply soapy water to the surfaces being cleaned.
- Agitate the grime with detailing brushes.
- Rinse gently using the hose’s low-pressure shower setting.
- Blow standing water out of hard-to-reach areas if you have an air duster or electric leaf blower.
- Dry accessible surfaces with an absorbent towel.
- Apply a suitable water-based protectant to plastics and rubber.
- Brush it into the details and wipe away the excess.
I used the same dry-to-the-touch, non-greasy protectant as on the interior. The engine bay took about 15 minutes of cleaning work and looked completely different afterward.
Wash the Exterior, Glass, Wheels, and Hidden Areas
White paint hides dirt surprisingly well, but the Highlander had embedded grime and very little gloss. Before polishing, all that loose dirt needed to come off.
Rinse First, Then Clean the Glass and Wheels
For the exterior rinse, I used a 25-degree pressure-washer nozzle from about two feet away. The purpose was to remove loose contamination before touching the paint with a mitt.
On the exterior glass, I used plenty of glass cleaner and a fresh plastic razor to help lift stubborn contamination, then rinsed and dried each section to avoid water spots. Keep the surface lubricated and check compatibility with any coatings or films.
For the wheels and tires, apply a suitable cleaner, scrub the sidewalls with a stiffer brush, and use a soft brush on the wheel finish. Work around the spokes, lug nuts, and valve stem. Rinse from the top downward and repeat on all four corners.
Hand Wash and Dry Carefully
I foamed the car with car soap and washed it with a microfiber mitt. Use straight back-and-forth movements rather than circles, and avoid dragging contamination across the finish.
Rinse from the roof downward. Then dry the paint, glass, and trim with an absorbent towel, using light pressure and letting the towel do the work.
Clean the mitt promptly before the dirt dries into its fibers. A dirty mitt is not something you want touching the next car.
Clean the Spots People Forget
Behind the fuel door, around the rear hatch, and inside the hatch openings, I used detailing spray, a soft brush, and microfiber towels. These areas are easy to overlook, but dirty edges stand out as soon as someone opens a door or hatch.
Attention to detail is what makes an older car feel genuinely clean instead of just freshly washed.
Polish and Wax the Paint
For this flip, I used a two-in-one polish and wax with a small dual-action polisher. The goal was to improve gloss, reduce minor scratches, and leave protection without turning the project into an extensive paint-correction job.
- Put a few small dots of product on the foam pad.
- Dab it around the working area.
- Start at low speed to spread the product without slinging it.
- Increase speed and work in overlapping passes.
- Keep the pad flat and moving, with light pressure.
- Overlap each pass by about 50%.
- Buff away the residue with a clean microfiber towel.
Work one body panel at a time. Do not hold the machine in one spot and build unnecessary heat.
If polish collects in an emblem’s lettering, use detailing spray and a soft brush to remove it. Leaving white residue in the crevices spoils an otherwise clean finish.
The paint was not terrible to begin with, but the improvement in gloss was incredible. To finish the wheels, I brushed a compatible water-based protectant onto the tire sidewalls, working it into the lettering and texture without coating the tread.
Restore the Foggy Headlights With a Protective Clear Coat
The yellowed headlights were now the one thing letting down the exterior. Choose a restoration kit with a protective clear coat, not just an abrasive that makes the lens look better temporarily.
This kit used 1,000-grit and 3,000-grit sanding discs followed by a wipe-on coating.
- Protect the paint. Tape around the lens edges. Opening the hood reduces the painted area you need to mask.
- Wet sand with 1,000 grit. Lubricate the lens and paper with soapy water and sand back and forth to remove the oxidized surface.
- Wipe the lens clean. The yellow residue shows what is being removed.
- Refine with 3,000 grit. Use lighter pressure and work both horizontally and vertically.
- Inspect the surface. Wipe clean and follow the kit’s preparation instructions. An alcohol wipe helped reveal missed areas before coating.
- Apply the clear coat. Work horizontally from the top down, overlapping each wipe by about 50%.
- Allow it to cure. This kit specified one hour of drying time.
The lens becoming hazy again after the alcohol evaporates is normal. The protective coating is what restores the final clarity in this process.
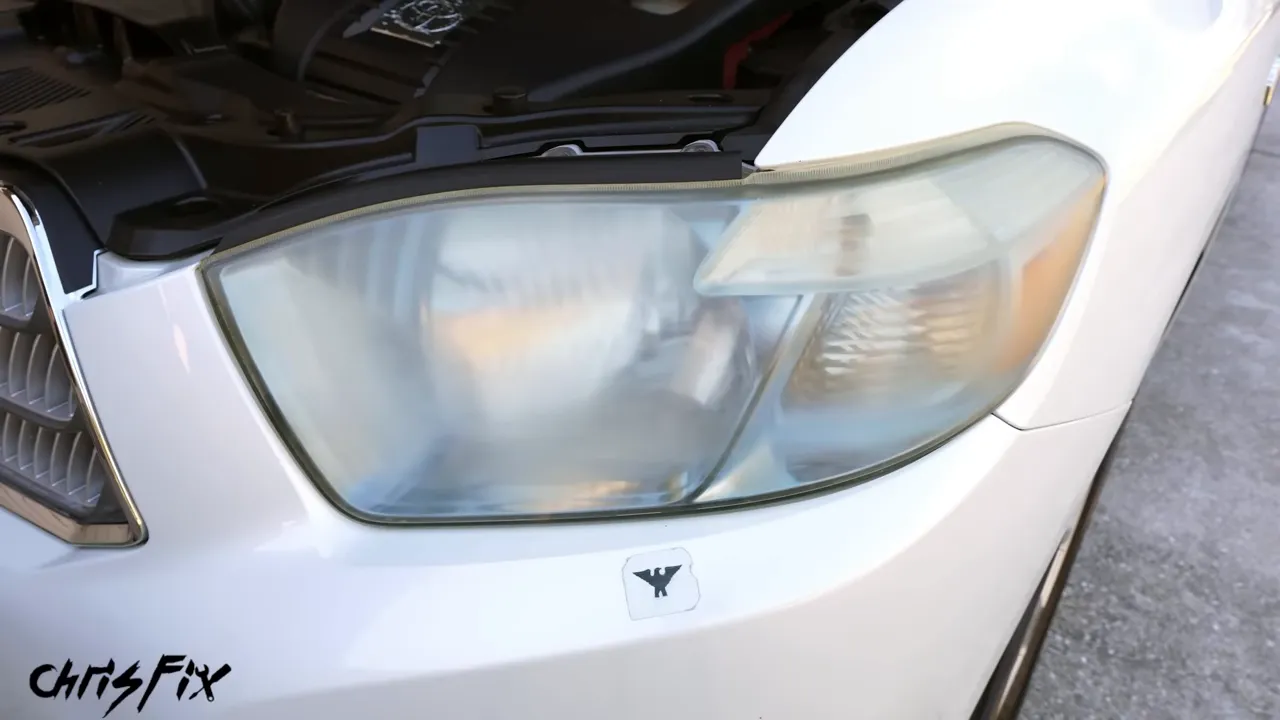
One small lesson from this job: tape does not like sticking to freshly waxed paint. Planning the headlight work before the final wax application would make masking easier.
Add a Dash Camera Without Permanent Modifications
I added a small Vantrue 4K dash camera that was on sale for $100. This was an optional extra, not a necessary repair. I hoped it would help the car stand out without adding much to the budget.
I mounted the camera behind the rearview mirror so it stayed out of the driver’s normal sightline, then powered it through the vehicle’s accessory socket.
To hide the cable, I removed the necessary console trim and lowered the glove box, routed the wire behind the dash, and brought it toward the passenger-side pillar and headliner. I avoided drilling or cutting trim so the next owner could remove the installation.
Keep dash-camera wiring clear of airbags and their deployment paths. Do not blindly tuck a cable behind pillar trim. Verify the vehicle-specific routing and secure the cable so it cannot interfere with safety equipment.
Once connected, I started the car to confirm the camera powered up, then set its language, date, and time. The adapter also had a USB port, which preserved a useful charging option.
Write a Simple Listing and Leave Room to Negotiate
With the repairs and detailing complete, I listed the Highlander for $10,500. That left room for negotiation above the roughly $6,900 project investment.
The description stayed simple and focused on the information a buyer would care about:
- Fully loaded equipment
- New upgraded hybrid battery with the stated three-year, 45,000-mile warranty
- Complete interior and exterior detailing
- Newer brakes and tires
- Installed 4K Vantrue dash camera
The photos showed the exterior, wheels, engine bay, dashboard, seats, and cargo area. After all that cleaning, those details were worth showing clearly.
About a week later, the second person who came to see the car bought it. The first offered $7,000, which I declined. The next buyer initially offered $8,000. I countered at $10,000, and we eventually agreed on $9,700.
When meeting someone from an online listing, choose a public location with plenty of people around. Complete the appropriate title and sale paperwork, too. For this sale, the buyer left with the car and title, and I kept the payment and bill of sale.
The Final Car-Flipping Numbers
Here is what went into this Highlander project:
- Vehicle purchase: $2,800
- New upgraded hybrid battery: $3,940
- Cabin air filter: $10
- Cleaning supplies and miscellaneous items: approximately $50
- Dash camera: $100
- Total project investment: $6,900
- Sale price: $9,700
- Margin over those expenses: $2,800
That is $2,800 for a weekend of repair and preparation, with the sale completed afterward. This calculation covers the listed expenses, not a wage for my labor or every possible tax, title, registration, tool, or selling cost another project might involve.
The best part is that the next owner received a much better car: a new hybrid battery, clear headlights, a clean cabin, fresh-looking paint, and a useful dash camera. The profit came from solving a real problem and doing the finishing work properly, not just moving a broken car along.
I had already put $2,100 of the proceeds toward my first proper barn find. Another project, another chance to bring an older car back to life. But the lesson from this Highlander stays the same: research the value, verify the fault, buy at the right price, repair it correctly, and pay attention to the details.


