Sugar in the gas tank sounds like the end of an engine, but it does not automatically mean the engine is ruined. The real job is removing the contamination, replacing the affected filter, and making sure the fuel system is clean before running the car again.
On this car, vandalism went beyond spray paint and scratches. There was sugar packed into the filler neck and sitting inside the fuel tank. I’m going to work through the whole system: the tank, filler hose, fuel pump, fuel filter, fuel lines, fuel rail, and all four injectors.
Much of this process is also useful when dealing with contaminated gasoline, water, or debris. However, the exact repair depends on the vehicle and the contaminant. Treat this as a walkthrough of this gasoline car’s fuel system, not a universal procedure for every diesel or high-pressure direct-injection system.
What You'll Learn
- Sugar remains granular in gasoline, making tank cleaning and filter replacement the main repair priorities.
- Clean the filler passage separately so leftover sugar cannot contaminate the tank again.
- Identify fuel supply lines correctly and keep flushing solvent out of the EVAP system.
- Inspect seals, verify connector locks, and check thoroughly for leaks before driving.
Table of Contents
- Does Sugar in a Gas Tank Ruin the Engine?
- 1. Gather Your Tools and Make the Car Safe
- 2. Disconnect the Fuel Pump and Remove the Tank
- 3. Remove the Pump and Clean the Fuel Tank
- 4. Clean the Fuel Filler Neck and Hose
- 5. Remove the Fuel Rail and Identify the Correct Line to Flush
- 6. Flush the Fuel Supply Line
- 7. Clean the Fuel Rail and Check the Injectors
- 8. Reverse-Flush the Fuel Injectors
- 9. Reassemble the Engine-Side Components
- 10. Replace the Filter or Pump Assembly and Reinstall the Tank
- 11. Add Fresh Fuel, Check for Leaks, and Start the Car
Does Sugar in a Gas Tank Ruin the Engine?
The important thing to understand is that table sugar does not readily dissolve in gasoline. Put sugar in water, stir it, and it dissolves quickly. Do the same thing with gasoline, and the granules remain.
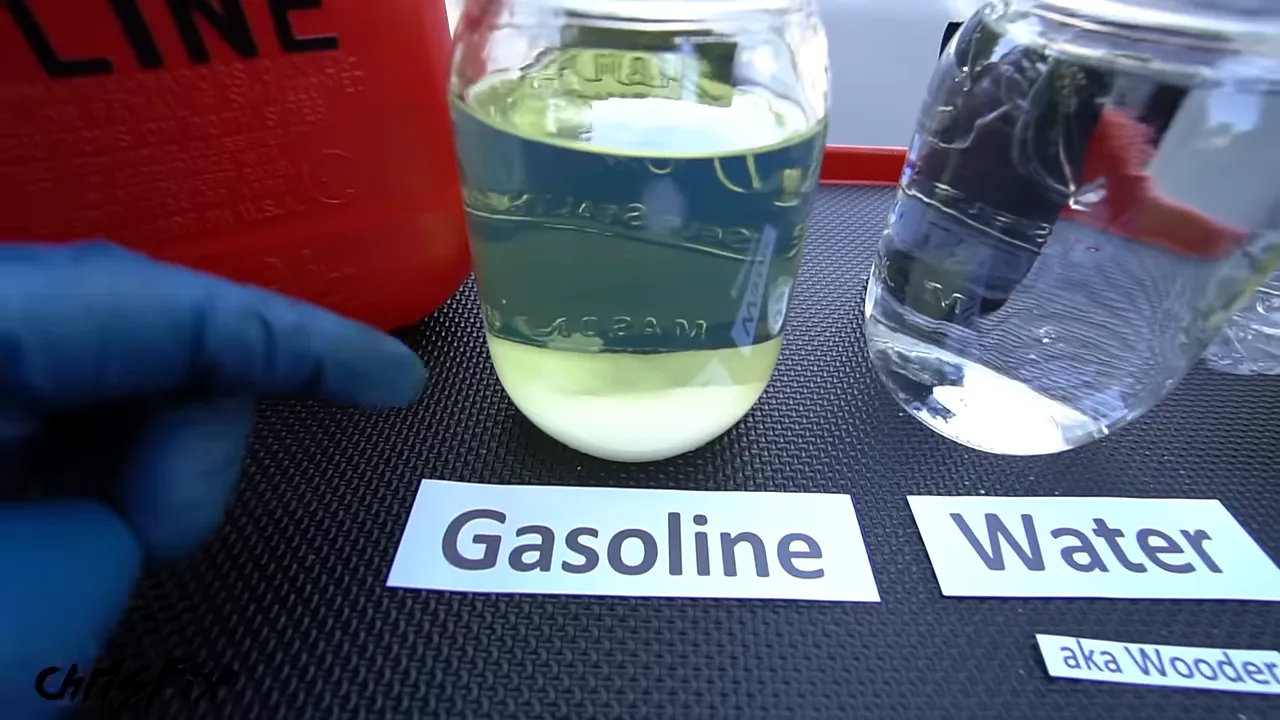
The sugar granules in this demonstration are roughly 100 to 400 microns across. A gasoline fuel filter rated around 10 microns can capture particles much smaller than those granules. That helps explain why sugar can collect in the tank and pump assembly without necessarily reaching the injectors.
That does not make sugar harmless. It still needs to come out, and the contaminated filter needs attention. Do not keep starting or driving the car to see whether it clears itself out.
For sugar contamination, cleaning the tank and filler passage and replacing the fuel filter are the main priorities. I’m also cleaning the downstream components to demonstrate the complete process and check for other debris.
1. Gather Your Tools and Make the Car Safe
Most of the disassembly on this car uses common hand tools. Here is what I used:
- A socket set, ratchet, screwdrivers, and torque wrench
- A jack, suitable vehicle supports, and wheel chocks
- Safety glasses and fuel-resistant gloves
- A fire extinguisher suitable for flammable-liquid fires
- Fuel-safe drain containers, absorbent towels, and a funnel
- An air compressor with regulated pressure
- 99% isopropyl alcohol for the cleaning steps shown here
- A plastic-bristle brush
- A replacement fuel filter or pump assembly, as required
- A new pump seal and replacement injector O-rings if needed
An injector tester is useful for comparing spray patterns and flow, but it is not necessary for removing the tank or cleaning the fuel lines.
Gasoline and isopropyl alcohol are both highly flammable. Work with excellent ventilation, away from flames, heaters, smoking, sparks, and other ignition sources. Disconnecting the battery reduces one potential ignition source; it does not eliminate every fire hazard.
Before disconnecting any fuel fitting, relieve fuel pressure using the vehicle manufacturer’s procedure. Do not assume the system is depressurized just because the car has been parked for a while. Keep a towel around the connection to contain residual fuel.
For this job, I chocked the front wheels, raised the rear, placed ramps beneath the rear tires, and lowered the car onto them. That gave me room to remove the tank without starting the contaminated car. Use the correct lifting points and rated supports, and never work beneath a vehicle supported only by a jack.
With the vehicle secure and the ignition off, disconnect and isolate the negative battery cable before opening the fuel system.
2. Disconnect the Fuel Pump and Remove the Tank
Access the pump connections
This car has a convenient access cover beneath the rear seat. Pulling up the seat cushion and removing four cover screws exposes the top of the fuel pump assembly.
The electrical connector has a red secondary lock. Release that lock first, then press the connector’s release tab and unplug it. The fuel fittings also have locking tabs, but they do not all release the same way.
- Confirm that fuel pressure has been relieved.
- Place absorbent material around the fitting.
- Release the secondary locking clip, if fitted.
- Press the connector’s release tab and carefully pull the line off.
- Repeat for the remaining connections, keeping track of their locations.
On this car, disconnecting everything through the access opening lets the tank and pump come down together without pulling on the wiring or hoses. On other vehicles, access and disconnection order will differ.
Disconnect the filler hose and tank straps
Underneath the car, two straps hold the tank in place. The exhaust runs close to it, so check the clearance before removing anything. Fortunately, this tank can be angled past the exhaust without removing the exhaust itself.
A nearly empty tank is much easier to handle. This one had less than about a gallon remaining. If yours contains more fuel, use an approved fuel-transfer method before lowering it.
- Loosen the filler-hose clamp.
- Gently twist the hose to break it loose, then pull it off the tank fitting.
- Support the tank securely with suitable tank-support equipment.
- Remove the strap fasteners and straps while maintaining support.
- Lower the tank slowly, checking for any remaining attached hoses or wiring.
- Carefully work it past nearby components and slide it out.
As soon as I disconnected the filler hose, sugar started falling out. That is why cleaning only the tank would not be enough. Anything left in the filler passage could end up right back in the clean tank.
3. Remove the Pump and Clean the Fuel Tank
Before opening the tank, clean the dirt from around the pump assembly. You do not want to knock outside debris into the tank while repairing contamination inside it.
The pump is retained by a locking ring that turns counterclockwise to release. Use the appropriate lock-ring tool and the manufacturer’s procedure. Avoid improvised steel striking tools around fuel vapors.
Lift the pump assembly slowly. This one has an internal fuel hose that must be unclipped before the assembly can come all the way out. Be careful with the fuel-level float as well.
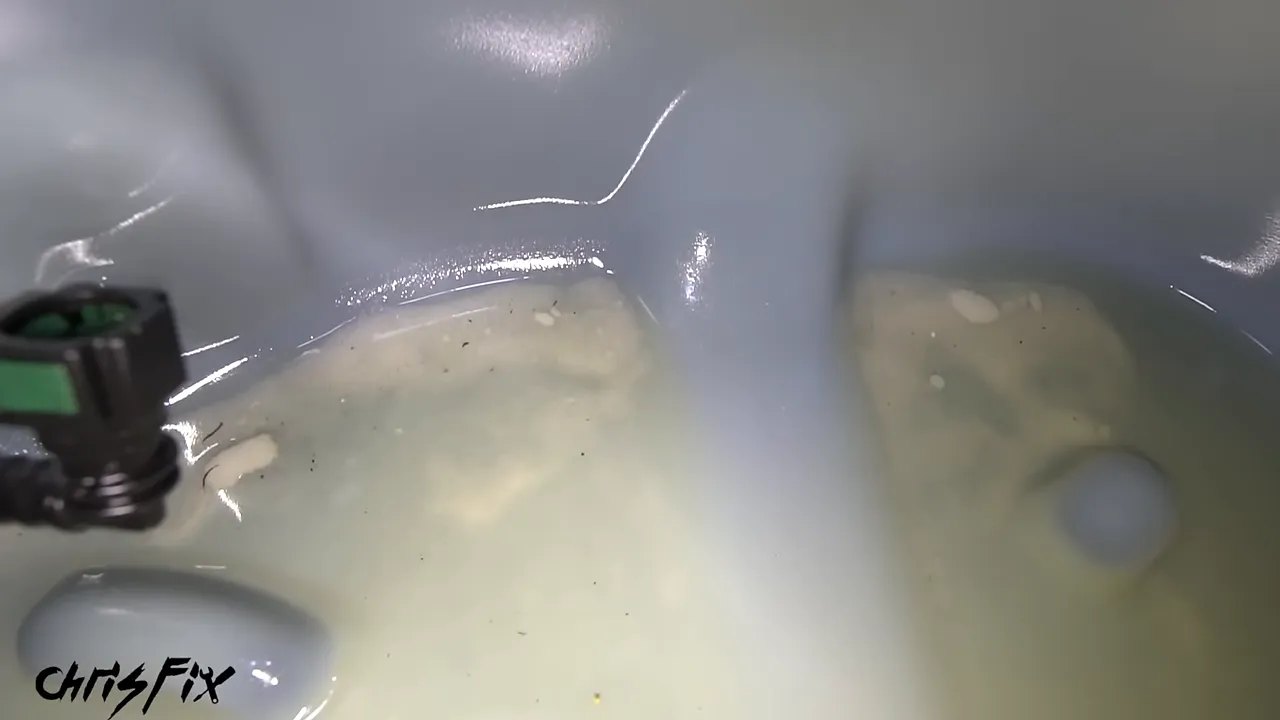
Drain the gasoline first
Pour the contaminated gasoline into a suitable fuel-safe collection container. Tilt the tank to remove as much as possible, then use absorbent towels to collect the remaining puddles. Remove any detachable internal hose that needs cleaning separately.
Once the gasoline is removed, the remaining sugar is easier to deal with. Trying to pick out every granule would take forever. Water does the useful work here because it dissolves sugar.
Rinse out the sugar, then dry completely
- With the pump removed and gasoline drained, rinse the inside of the tank with water.
- Move the tank around so the water reaches its recesses and dissolves the sugar.
- Drain the rinse water into a suitable collection container.
- Repeat as needed until the contamination is gone.
- Wipe out accessible moisture with clean, lint-free absorbent material.
- Allow the tank to dry completely before reassembly.
I set this tank outside in the sun after wiping it dry to help the remaining moisture evaporate. Keep it in a safe, ventilated location away from ignition sources. Do not use an open flame or an improvised heater to speed things up.
The tank must be clean and completely dry before fuel goes back in. The water rinse is for the removed, accessible tank in this sugar-cleaning job. It is not a reason to send water through the assembled fuel system.
Also, removing loose rust is not the same as repairing a rusted tank or line. Any deteriorated component still needs inspection and an appropriate repair or replacement.
Dispose of the contaminated fluids properly
I did not reuse the drained gasoline. Keep contaminated fuel in an approved, labeled, sealed container and arrange disposal through a facility that accepts it. Check before bringing in fuel, solvent, or contaminated rinse water, since collection requirements vary.
The EPA’s household hazardous waste guidance is a useful starting point. Do not pour these fluids onto the ground, into a drain, or into ordinary trash.
4. Clean the Fuel Filler Neck and Hose
The filler passage on this car was loaded with sugar, including clumps in the lower hose. Cleaning it while the tank is still removed keeps all that material out of the freshly cleaned tank.
- Carefully remove accessible clumps from around the filler opening without damaging the neck or hose.
- Collect the loose material rather than pushing it farther down.
- Flush the disconnected filler passage with water to dissolve the remaining sugar.
- Collect the runoff at the lower opening.
- Drain the passage thoroughly.
I followed the water rinse with 99% isopropyl alcohol. Alcohol mixes with residual water and can help carry it out, but it does not make trapped water disappear. Let the filler neck and hose dry completely before reconnecting them.
Beautiful, now the tank and filler passage can dry while we move to the engine bay.
5. Remove the Fuel Rail and Identify the Correct Line to Flush
On this engine, the plastic engine cover and intake tubing block access to the fuel rail. I removed the intake vacuum hose, loosened the clamps at the air box and throttle body, disconnected the sensor wiring, and lifted out the tubing.
Cover the exposed throttle-body opening with a clean towel so dirt or loose hardware cannot fall inside. Keep track of that towel because it must come out before the intake goes back together.
With pressure relieved and towels beneath the connections, disconnect the rail’s fuel supply and the nearby EVAP hose. Remove the two rail mounting screws, then gently wiggle and lift the rail until the injectors release from their intake ports.
Lift each injector connector’s secondary lock, press the release tab, and unplug it. The rail and injectors can now move to a clean work area.
Do not confuse the fuel supply with the EVAP plumbing
This car uses a returnless fuel system. One supply line feeds the fuel rail, and the fuel-pressure regulator is built into the pump assembly. There is no fuel return line running from the rail back to the tank.
The other nearby hose serves the evaporative-emissions system. Do not blow compressed air or cleaning solvent into the EVAP system. Identify every line from the vehicle’s service information before flushing anything.
On this car, only the disconnected supply line between the tank and fuel rail needs flushing.
6. Flush the Fuel Supply Line
With the line disconnected at both ends, position the tank end securely over a suitable catch container. The aim is to move contamination out of the line, not into another component.
- Use regulated compressed air to push the remaining fuel out toward the catch container.
- Add 99% isopropyl alcohol to the disconnected supply line.
- Continue until alcohol reaches the outlet.
- Use regulated air again to push the alcohol through.
- Repeat if needed, then allow the line to dry.
I used 50 psi for this car’s disconnected line. That is a detail of this repair, not a pressure specification for every vehicle. Verify suitable pressure, solvent compatibility, and cleaning procedures for the components you are servicing. Control the outlet so fuel or solvent cannot spray toward anyone.
Do not use water to flush the fuel lines. Unlike the open tank, the lines are difficult to wipe out and inspect for trapped moisture.
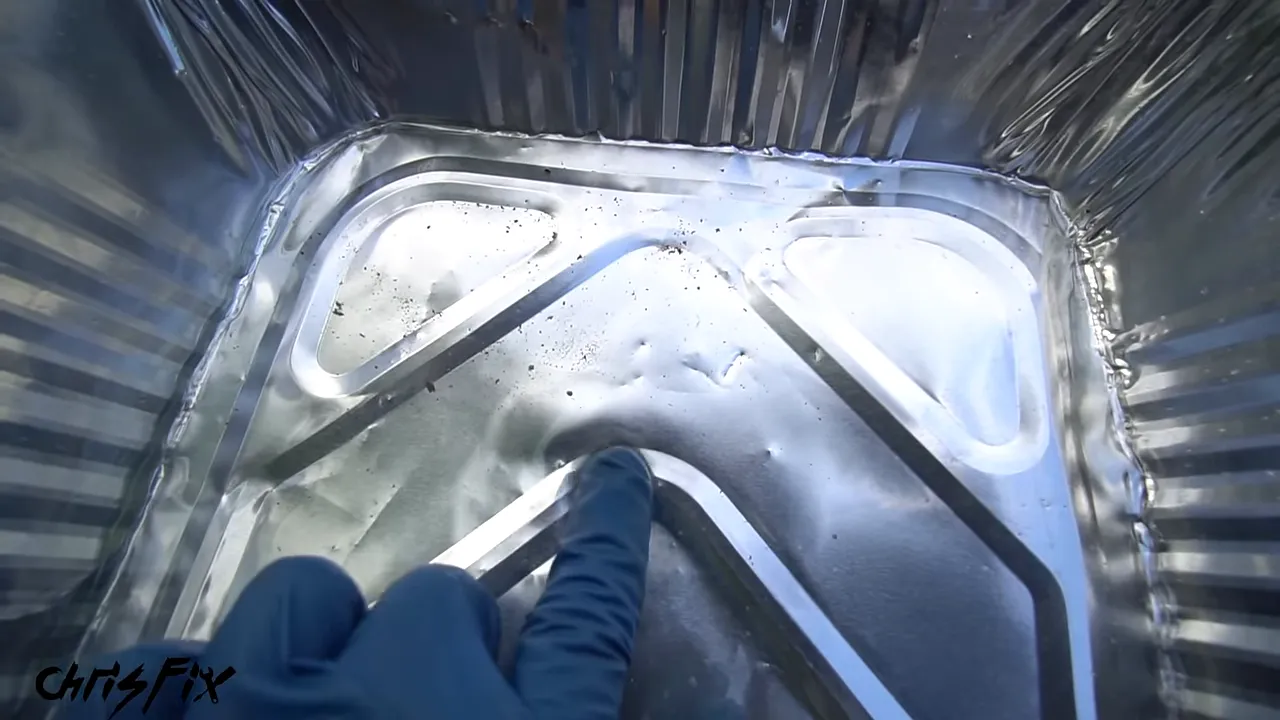
The results were interesting. The clean catch pan ended up with small, gritty specks that looked more like sand or rust than sugar. I could not identify the material just by looking at it, but it was debris I did not want reaching an injector.
7. Clean the Fuel Rail and Check the Injectors
Flush the empty rail
Drain any remaining gasoline from the rail before removing the injectors. Each injector is held by a retaining clip. Carefully remove the clip, then pull the injector from the rail without losing the hardware.
With all four injectors removed, add alcohol to the rail, temporarily close the inlet, and move the rail back and forth to rinse the interior. Drain it into a catch container, then use regulated air to clear the remaining solvent. Repeat if necessary and let the rail dry.
This rail looked clean, and I did not see debris come out.
Compare spray pattern and flow
I put all four injectors into a fuel injector tester before cleaning them. The test lets you compare the spray patterns and the amount of test fluid each injector delivers under the same conditions.
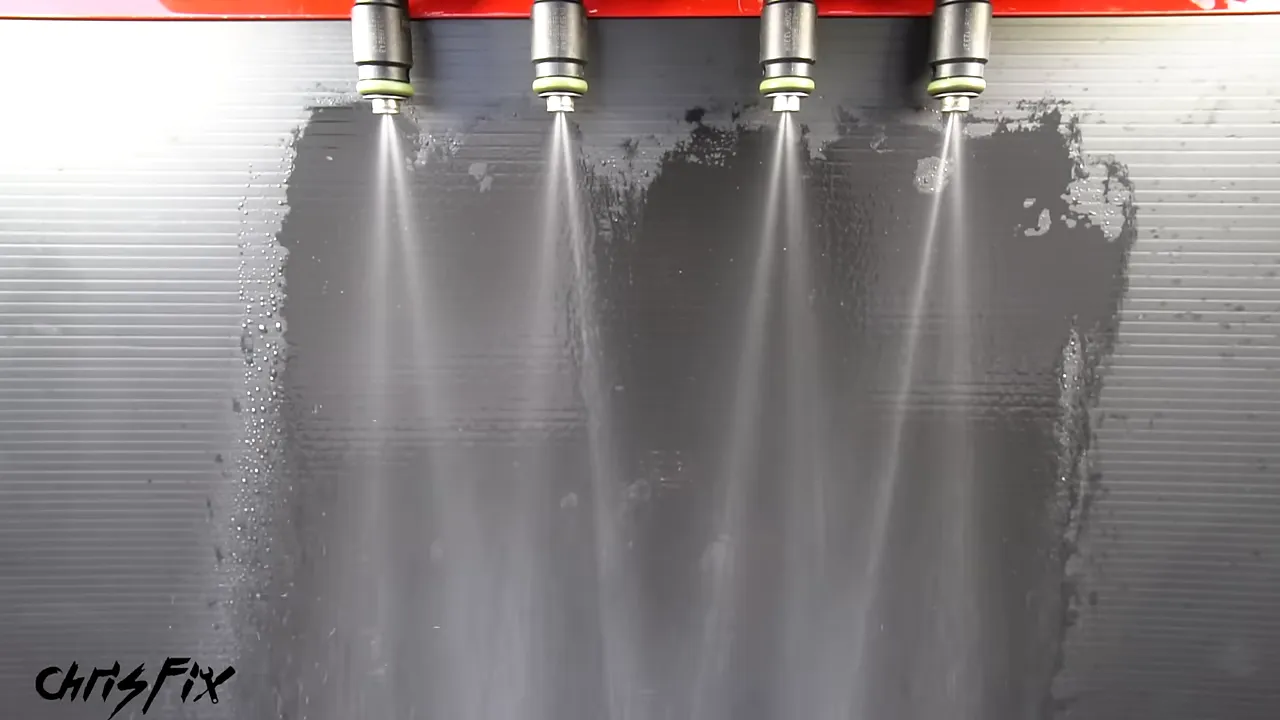
All four produced good-looking sprays, and the collected volumes were equal at the end of the test. That was reassuring: there was no obvious flow imbalance or sign of a clogged injector in this test.
The test does not chemically identify contamination, but these results were consistent with the filter keeping the sugar out of the injectors.
8. Reverse-Flush the Fuel Injectors
Normally, fuel enters the top of an injector and exits through the nozzle. A reverse flush sends cleaning fluid in the opposite direction, helping dislodge material that may not come out when pushed along its normal path.
The setup demonstrated here uses a hose that fits the injector nozzle, a matching electrical connector, regulated air, and brief electrical pulses. The on-screen pressure for this injector-cleaning setup is 30 psi, separate from the 50 psi used on the disconnected supply line.
Injector electrical requirements vary. Do not assume a 9-volt battery or a particular connector is suitable for every injector. Use a compatible injector pulser or follow the injector manufacturer’s requirements. High-pressure and specialized injectors may require professional equipment.
There is another important safety point: switching electrical connections can create sparks, and alcohol vapor can ignite. Keep all switching and potential ignition sources away from the cleaning fluid and vapor. Alcohol is not a nonflammable substitute for gasoline.
Clean, reverse-flush, then forward-flush
- Clean deposits from the outside of the nozzle with a plastic-bristle brush.
- Attach the appropriate hose to the nozzle end.
- Connect a compatible injector-pulsing setup.
- Add the compatible cleaning solvent to the hose.
- Apply suitable regulated pressure and pulse the injector briefly to move solvent backward through it.
- Finish by flushing in the normal direction.
- Repeat for the remaining injectors and let them drain and dry.
Cleaning the outside first matters. Otherwise, the reverse flush could push exterior deposits into the injector you are trying to clean.
Inspect the O-rings and reinstall the retaining clips
Before reassembly, inspect both O-rings on every injector. Look for cracks, cuts, flattened areas, or other damage, and replace any questionable seal.
I used a thin coating of silicone paste on the O-rings to help them slide into place without pinching. Use a lubricant approved for the seals and fuel-system application you are working on.
Push each injector fully into the rail, then install its retaining clip. The clip must engage the injector’s groove correctly.
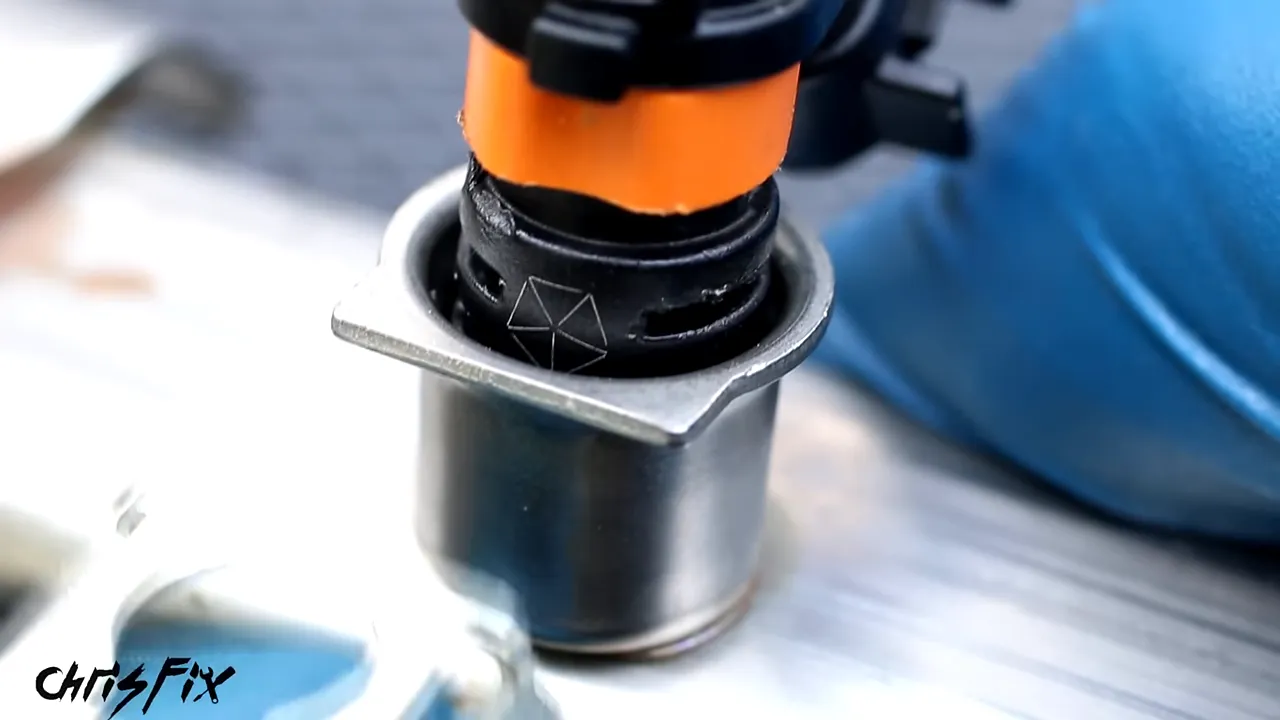
Give every injector a firm pull to confirm it is retained. A clip that looks close enough is not good enough around pressurized fuel.
9. Reassemble the Engine-Side Components
Position the rail so all four injectors line up with their intake ports. Press it into place evenly and verify that every injector is fully seated.
- Reconnect the injector wiring until each connector clicks.
- Engage the secondary connector locks.
- Install the fuel-rail mounting screws.
- Remount the EVAP purge valve where applicable.
- Reconnect the fuel supply and its secondary locking clip.
- Reconnect the EVAP hose.
- Remove the protective towel from the throttle body.
- Reinstall the intake tubing, sensor connector, vacuum hose, and clamps.
- Refit the engine cover.
On this car, the rail screws thread into plastic, so overtightening is a real concern. I used medium-strength threadlocker during this repair, but follow your vehicle’s specified fastener treatment and tightening procedure rather than applying it automatically.
That finishes the lines, rail, and injectors. Now we can return to the tank.
10. Replace the Filter or Pump Assembly and Reinstall the Tank
The original pump assembly had sugar and other residue inside it. More importantly, this car’s fuel filter is built into the assembly and is not separately serviceable.
That is why I replaced the complete fuel pump assembly with a new OEM unit rather than reinstalling the contaminated one. The car was also being prepared for a charity auction, and I wanted to hand over a properly repaired, reliable car.
Check how your vehicle’s filter is serviced. A separately replaceable filter does not automatically mean you need an entire pump assembly. Inspect the pump and follow the appropriate contamination-repair procedure.
Install the pump with a new seal
- Compare the replacement assembly with the original, including its connections and configuration.
- Clean and reinstall any internal fuel hose removed earlier.
- Install the new tank-opening seal.
- Lower the pump into the completely dry tank without bending the level-sender float.
- Reconnect the internal hose and confirm it locks.
- Seat the assembly correctly and secure the locking ring using the specified procedure.
I also cleaned the outside of the tank before installation. Nobody is likely to see it afterward, but removing dirt makes the assembly nicer to handle and inspect.
Raise and reconnect the tank
Carefully move the tank past the exhaust and support it in its original position. Fit both straps, start the fasteners by hand, and tighten them to the factory specification. Use threadlocker only where appropriate for the specified procedure.
Slide the filler hose fully onto the tank inlet before tightening its clamp. Do not overtighten a clamp around a plastic fitting.
At the pump access opening, reconnect the fuel and vent fittings to their correct locations. Confirm that every fitting clicks into place and that all secondary locks are engaged. Reconnect the pump wiring and its safety lock.
The access cover and rear seat can then go back in, but keep access available for the final leak inspection as needed.
11. Add Fresh Fuel, Check for Leaks, and Start the Car
Do not fill the tank all at once. Start with a small amount of fresh gasoline and inspect underneath, especially around the filler-hose connection and tank. If everything is dry, add enough fuel for startup and the trip to the gas station. I added about four gallons.
I also installed a compatible locking gas cap. This car’s fuel door did not lock, so a locking cap adds a useful barrier against casual tampering.
With the fuel system closed and the work area clear, reconnect the negative battery cable. Prime the fuel system according to the vehicle’s procedure. On some keyed vehicles, cycling the ignition to the run position allows the pump to prime before cranking. Push-button systems differ, so check the appropriate procedure instead of assuming they all work the same way.
This car cranked for a few seconds while fuel reached the engine, then started and ran smoothly. Beautiful!
Inspect the whole system under pressure
With the system pressurized, carefully check:
- The fuel supply connection at the rail
- The injector-to-rail seals
- The pump connections and tank seal
- The filler hose and underside of the tank
Look for wetness or dripping, and pay attention to gasoline odor. Smell is a warning, not a substitute for a visual inspection. Shut the engine off immediately if you find a leak, and correct it before proceeding.
Once everything passes inspection, lower the vehicle safely and take a short test drive. Recheck for leakage afterward.
After a few minutes on the road, this car was running and driving great. The sugar was out, the contaminated pump and filter assembly had been replaced, and the rest of the fuel system was clean.
The key is removing the contamination instead of trying to run it through the engine. Work methodically from the tank to the injectors, let cleaned components dry, secure every seal and connector, and finish with a thorough leak check.


