A project car goes into storage for a couple of weeks. Then life happens, a few more things get in the way, and suddenly five years have gone by.
That is what happened to my $300 Honda Del Sol. And just when I finally needed a push to get moving again, a hurricane left water inside the car. Not exactly the fresh start I had in mind!
But the goal was simple: get the Del Sol running and driving again, take it to the drag strip, and measure its horsepower before installing a turbo. Not finish every modification. Not make the paint perfect. Just get the project moving again, one problem at a time.
The trick to restarting an abandoned project car is separating the repairs it needs now from the upgrades you want later. Here is how that worked on this little Honda, including the setbacks, the fixes, and the surprisingly fun results.
Key Takeaways
- Separate essential repairs from future upgrades so the entire build does not block your next milestone.
- Test failed components and compare replacement parts before installation to avoid unnecessary spending and delays.
- Dry flooded interiors thoroughly and treat odor improvement as separate from complete contamination cleanup.
- Record acceleration and dyno baselines before modifications so future performance gains can be measured.
Table of Contents
- How a $300 Del Sol Became a Long-Term Project
- The Repairs Already Completed Before Storage
- Step 1: Dry the Flooded Interior
- Step 2: Test the Battery Before Replacing It
- Step 3: Fix the Fuel Pump Without Letting a Parts Problem Stop Everything
- Step 4: Investigate the Seized Rear Drum Brakes
- Step 5: Add Fresh Fuel and Enjoy the Progress
- Step 6: Establish a Baseline Before Installing the Turbo
- What Comes Next: The $600 Turbo Kit and Supporting Upgrades
- Finish the Next Stage, Not the Entire Dream Build
How a $300 Del Sol Became a Long-Term Project
I originally found this 1993 Honda Del Sol while searching for a car with a bad head gasket. I used AutoTempest to search multiple used-car websites at once, and there it was: one of my favorite cars from when I was a kid, advertised for $1,000.
The removable roof stores in the trunk, the rear window rolls down, and the whole car has a unique personality. The name Del Sol means “of the sun” in Spanish, which fits it perfectly.
This particular one, however, needed a lot more than sunshine. It had a rattle-can paint job, steel wheels, dry-rotted tires, and small broken parts everywhere. The seller was refreshingly honest about the blown head gasket and squeaky suspension.
A short test drive also revealed a ridiculously loose shifter and suspension that clunked over practically every bump. The car moved under its own power and shifted through multiple gears, but it was clearly a rough project.
I offered $300 cash with the trailer ready to take it home that day. The seller accepted, and just like that, I had a budget project car and a very long repair list.
The Repairs Already Completed Before Storage
Before the Del Sol sat for years, I had already tackled several of its biggest problems. That matters because restarting a project does not mean starting from zero. Take stock of the work you have already done, then inspect what storage has changed.
Replacing the Blown Head Gasket
The head gasket was the first priority. Coolant was getting into the engine, and the drained oil looked like thick chocolate milk. No cosmetic upgrade was going to solve that.
The repair involved removing the exhaust manifold fasteners, moving the intake manifold away from the head, removing the timing belt from the cam sprocket, and loosening the head bolts in the appropriate sequence. On this engine, I worked from the outside inward during removal.
With the head off, I cleaned the mating surfaces and installed the replacement gasket. The old gasket had a visible failure that explained the coolant leak.
During reassembly, I tightened the head bolts from the center outward so the head seated evenly, then reinstalled the timing belt, intake, exhaust manifold, and valve cover. Fresh oil, a new oil filter, and coolant finished the job.
This was my first head gasket replacement, so that first successful start felt awesome. For a repair like this, though, the overview is not a substitute for the engine-specific procedure. Bolt sequences, torque stages, timing alignment, and inspection requirements all matter.
Repairing a Rust Hole in the Floor
Project cars love hiding extra work. Once the interior came apart, I found a giant rust hole in the floor.
The basic repair was to cut away the rusted metal, shape a sheet-metal patch to fit, and weld it into place. Instead of concentrating heat in one spot, I moved between different areas of the patch to reduce distortion.
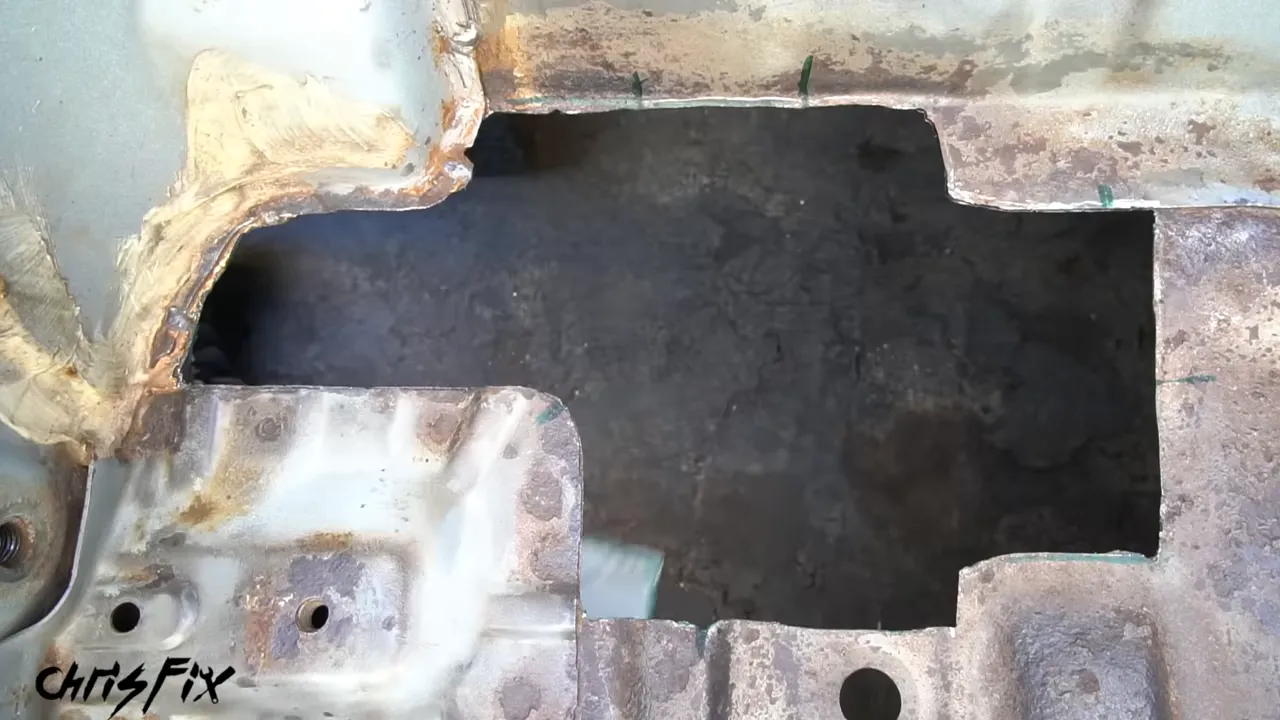
After welding, I coated both the top and underside of the repaired floor with a rust-preventive coating. That took care of a much more important issue than the tired paint outside.
Making the Valve Cover Look Good Again
Not every repair has to be purely functional. A small visual improvement can make a project feel exciting again.
I stripped the valve cover, worked away the old finish with a wire brush, and cleaned it with alcohol. Vinyl lettering masked off my logo before I applied a silver metallic base and an even blue color coat.
Once the paint dried, I removed the masking and carefully filed the raised Honda lettering back to a silver finish. A high-temperature clear coat protected the work.
The result completely changed the look of the engine bay without pretending the rest of the car was finished.
Adding a Hidden Fuel-Pump Kill Switch
After a friend had his Honda stolen and stripped, I wanted an extra theft deterrent on mine.
I mounted a concealed switch in the shifter trim and wired it into the fuel-pump circuit. With the circuit enabled, the engine started normally. With the switch interrupting pump power, it cranked without starting.
The important part of this modification is identifying the correct circuit and using appropriately rated components and secure wiring. It is an extra deterrent, not a guarantee against theft. It is also something to remember during future no-start diagnosis!
Rebuilding the Entire Front Suspension
The original front suspension was worn enough that the Del Sol did not feel safe to drive. The control-arm bushings moved dramatically under light pressure, which explained the vague steering and clunking.
This became a full front-end rebuild rather than a single-part replacement:
- Upper and lower control arms.
- Tie rods and strut assemblies.
- Axles.
- Wheel bearings, hubs, and ball joints.
- Front brake rotors, refreshed calipers, and brake pads.
- New tires and replacement wheels.
Disassembly started with releasing the staked axle nut, removing the brakes, and separating the knuckle from the upper ball joint, lower ball joint, and tie rod. A ball-joint separator provided a controlled way to release one of the tapered joints.
With the knuckle out, I removed its old hub, bearing, and ball joint. I painted the knuckles and strut forks, cleaned up and coated the wheel wells, then pressed the replacement components into place. The ball joints and bearings received their retaining snap rings.
Reassembly meant more than bolting on shiny parts. The axles had to seat fully in the transmission, the splines had to align with the hubs, and the fasteners needed the correct torque. The applicable castle nuts received cotter pins, and the axle nuts were torqued and staked.
Finally, the car went to an alignment shop. Replacing steering and suspension components had left the alignment out of specification, so that adjustment was part of finishing the repair.
The Del Sol was coming along nicely. I had even laid out a budget turbo kit. Then life got complicated, and what should have been a short storage break became five years.
Step 1: Dry the Flooded Interior
Before worrying about horsepower, I needed to get the water out of the cabin.
I used a wet/dry shop vacuum to extract water from the carpet. The better approach is to remove the carpet completely so both it and the material underneath can dry. For this initial cleanup, with the temperature around 90°F, I extracted as much water as possible and left the doors open in the sun for a day.
The next day, the carpet felt much drier, but the cabin still smelled musty. Sitting inside also irritated the back of my throat. That was a sign to stop treating this as just a wet-carpet problem.
Odor Treatment Is Not the Same as Complete Flood Cleanup
I used a chlorine-dioxide odor treatment as an interim measure before the planned interior teardown. This particular kit used a water-saturated sponge and an activation packet placed inside its vented container.
I prepared it outside wearing gloves, placed it on a flat surface near the middle of the cabin, closed the windows, and left the car unoccupied overnight. Afterward, I opened the doors, allowed the cabin to ventilate, removed the treatment, and continued airing it out.
Follow the exact product label for activation, exposure time, disposal, and ventilation. Do not breathe the treatment gas or occupy the car while it is working.
The musty smell was gone afterward, and I no longer experienced the same throat irritation. But an improvement in smell does not prove that hidden mold or contaminated padding is gone. The carpet still needed to come out for a thorough cleanup, with replacement carpet and seats planned later.
For additional context, the EPA’s mold guidance explains why moisture control and cleaning affected materials are central to addressing mold. An odor treatment should not replace that work.
Step 2: Test the Battery Before Replacing It
The next problem was obvious as soon as I turned the key: the battery was dead.
I had already tried charging it, but it would not hold a charge. Batteries are not cheap, so I tested it before spending money.
Using a battery tester, I connected the clamps and entered the battery’s rating of 410 cold cranking amps. The tester reported only 262 CCA and gave a replacement recommendation.
That supported replacing the battery rather than repeatedly trying to charge it.
Why I Chose a Lithium Battery
The replacement was a lithium starting battery with two features I particularly liked.
- Lower weight: The old lead-acid battery weighed 25 pounds, 9 ounces. The lithium battery weighed 10 pounds, 15 ounces, saving 14 pounds, 10 ounces.
- A built-in restart reserve: This model can retain enough energy to provide another starting opportunity when its restart feature is activated after a discharge.
On a small, lightweight car, saving nearly 15 pounds with one component is pretty impressive. I also wanted a dependable battery as the project gained gauges and an upgraded ECU. Battery selection still needs to match the vehicle and charging system, so fitment matters more than weight alone.
For installation, the connection order is worth remembering:
- Disconnect the negative terminal first, then the positive.
- Remove the hold-down and lift out the old battery.
- Install and secure the replacement battery.
- Remove the terminal protectors.
- Connect the positive terminal first, then the negative.
Moment of truth: the new battery spun the engine over strongly. But the engine still did not start.
Step 3: Fix the Fuel Pump Without Letting a Parts Problem Stop Everything
With the starter cranking properly, I noticed something missing: the fuel pump was not priming.
This pump had been intermittent since I bought the car. Previously, a tap on top of the assembly followed by cycling the key could get it working again. That was a clue to the fault, not a repair.
The assembly also had heavy surface rust and what looked like an old epoxy repair. I wanted to replace the whole thing.
Removing the Old Assembly
Fuel-system work needs extra care. Relieve fuel pressure according to the service procedure, disconnect the battery as appropriate, work with good ventilation, and keep sparks, flames, and other ignition sources away.
Before opening the tank, I cleaned loose rust and debris from around the closed access area so it would not fall inside. Do not use an ordinary shop vacuum to extract gasoline or work around an open tank and fuel vapors.
Removal involved disconnecting the electrical connector, sliding back the return-hose clamp, and gently twisting the hose to break it free. Then I removed the high-pressure line’s banjo bolt and the six nuts securing the assembly.
The assembly lifted out, and that is where the job hit a roadblock.
Always Compare the Old and New Parts
The replacement assembly did not match the original. Side by side, the difference was obvious.
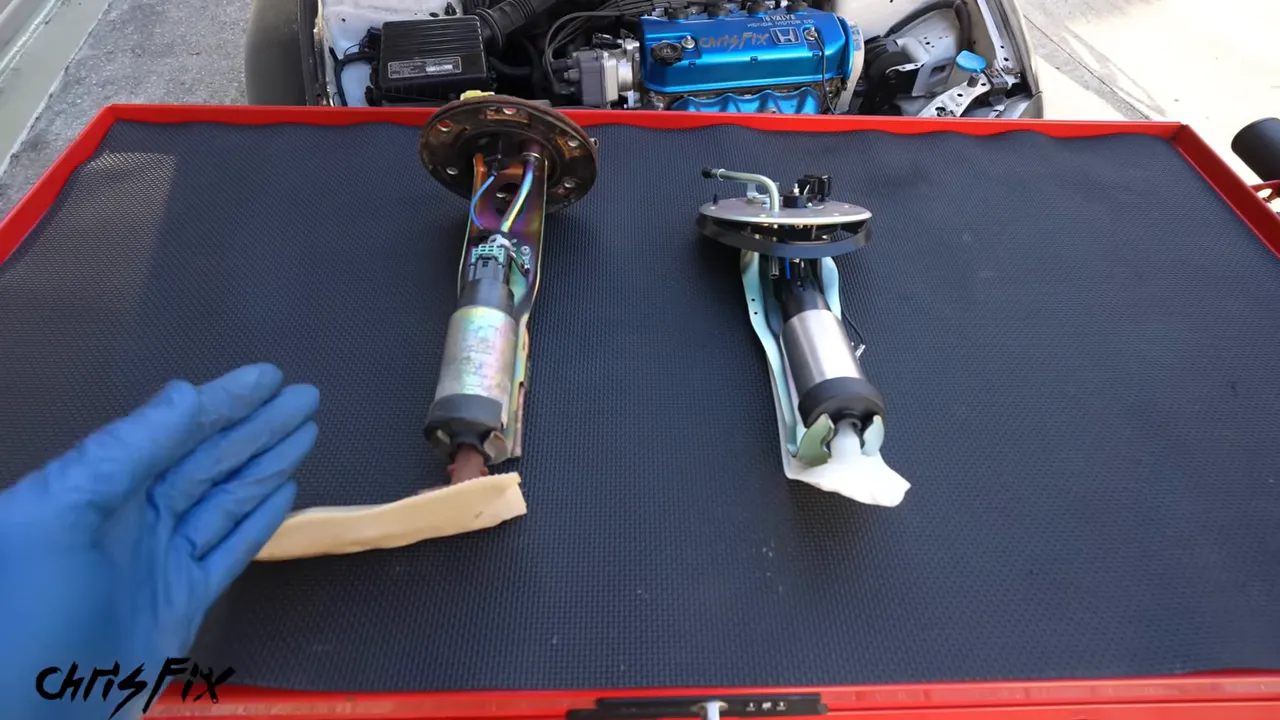
A quick search and conversations with Honda friends suggested that finding the correct Del Sol assembly would likely mean finding a good used one. I could keep looking, but I did not want a parts delay to become another five years of storage.
Fortunately, the pump motor in the replacement assembly appeared to match the original pump. I could transfer that component into the existing hanger and get the car running while continuing the search for a better assembly.
That is an important distinction: the complete assembly did not fit, but a compatible component provided a way forward. It does not mean every pump can be adapted safely.
Transferring the Pump Motor
I disconnected the replacement pump’s wiring and removed it from its hose and mounting bracket. Then I removed the original pump the same way.
The original Del Sol pickup sock had the shape needed for this installation, so I transferred it to the replacement pump. After that, I reconnected the electrical connector, installed the pump onto the hose, repositioned the clamp, and secured the pump in the original assembly.
This was a workaround for this particular project, not a complete renewal of the rusty hanger or an upgrade for future boost.
Removing Five-Year-Old Fuel and Reinstalling the Pump
Before reinstalling the assembly, I removed the old gasoline using fuel-safe equipment. Even though I had added stabilizer before storage, five-year-old fuel was not what I wanted for the first drive, drag-strip passes, or dyno testing.
The tank was roughly half full, so this was a manageable time to drain it and start fresh.
Reinstallation included several details that are easy to overlook:
- Orient the assembly correctly in the tank opening.
- Tighten its six mounting nuts evenly in a crisscross pattern.
- Use new sealing washers on both sides of the banjo fitting.
- Reconnect the return hose and position its clamp correctly.
- Reconnect the electrical plug until it clicks.
- Torque the banjo bolt to the specified value, which was 22 lb-ft for this application.
I added about a gallon of fresh gasoline, enough to reach the nearby station. While I was there, I cleaned the filthy fuel-filler recess with soapy water and a brush. Sometimes a tiny cleanup is just satisfying.
This time, cycling the key produced the fuel-pump prime I wanted to hear. The engine started, and I immediately checked the pump area for leaks. Everything stayed dry while the engine idled.
Step 4: Investigate the Seized Rear Drum Brakes
The engine ran, but the car still would not roll properly. Both rear brakes had seized.
Even an attempt to pull the car with the truck did not free them. That was the point to stop forcing it and inspect the brakes.
I raised the rear at the appropriate lifting point, supported the car on jack stands, and removed the wheels. I also slid a removed wheel underneath as an extra precaution, not as a substitute for the stands.
Tapping the drums freed them enough to turn and come off. Inside, the rust was substantial. The flood water appeared to have contributed to the drums sticking.
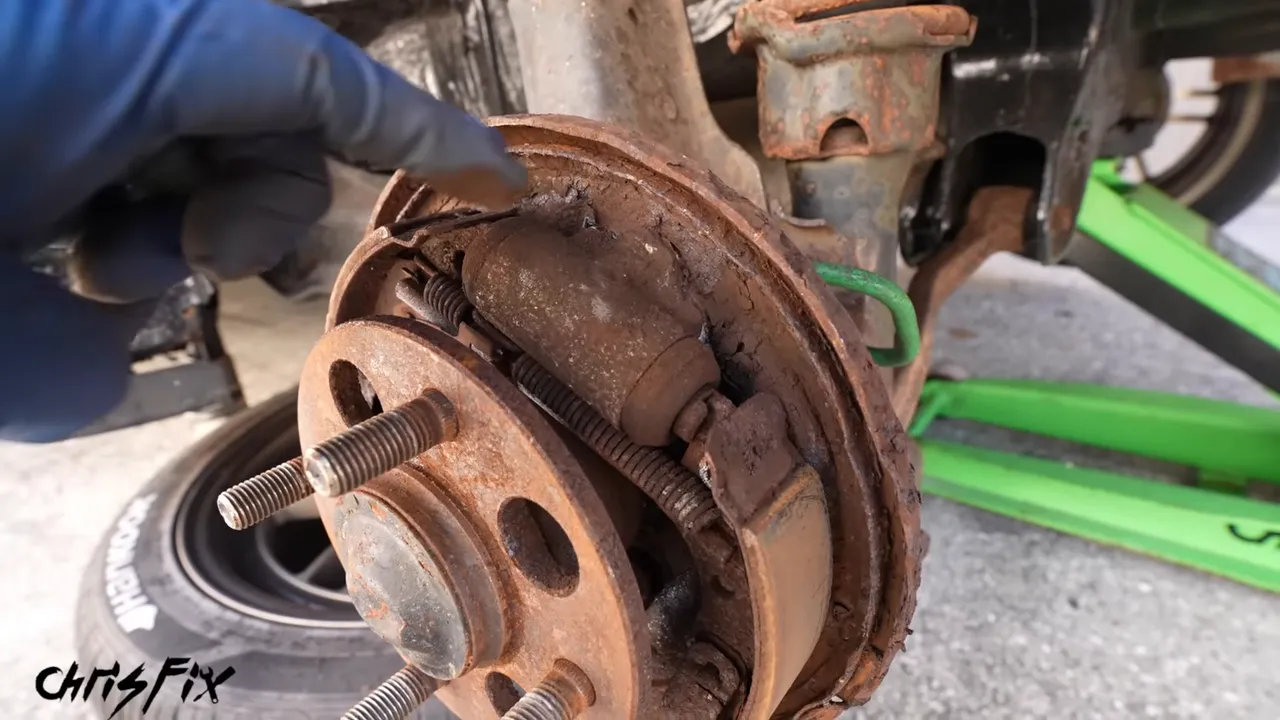
I freed both sides and reinstalled the drums and wheels. With the tires just touching the ground, I torqued the lug nuts in a crisscross pattern before lowering the car completely.
Freeing a stuck drum is not the same as rebuilding or verifying the brake system. These parts still needed replacement, and I already had a rear disc-brake conversion planned. For any stored or flooded car, brakes must be inspected and verified before road use. Do not treat “the wheels turn now” as proof that everything is safe.
Step 5: Add Fresh Fuel and Enjoy the Progress
With the car running and the wheels turning again, the next stop was the gas station.
I filled the Del Sol with Shell V-Power NiTRO+ 93-octane gasoline. Shell supported this stage of the build, and I chose the premium fuel with the future turbo setup in mind. That does not mean every stock project car needs 93 octane; use the fuel appropriate for the engine and its tune.
Fuel delivery is also about more than the pump. A comparison using injectors from another car showed how differently dirty injectors can spray. Two had uneven, compromised patterns, while the outside pair produced much more consistent sprays.
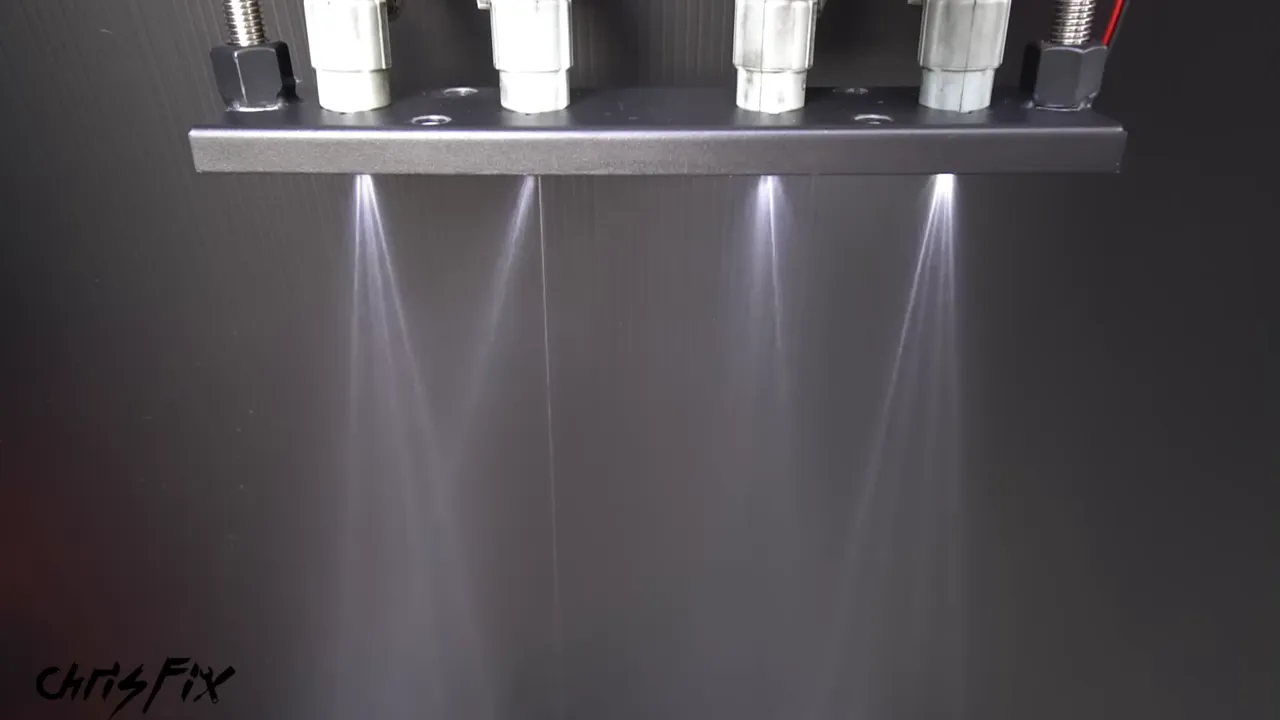
That was a useful reminder to consider the whole fuel system, especially before adding boost.
Getting back behind the wheel felt amazing. The Del Sol still had a cracked windshield, a check-engine light, a shifter that felt like a wet noodle, and a very loud exhaust problem.
Those issues still needed attention. The lesson is not to ignore safety or roadworthiness. It is to stop letting paint, cosmetic details, and a giant wish list prevent you from completing the essential repairs.
Step 6: Establish a Baseline Before Installing the Turbo
Now came the fun part. Before changing the engine’s performance, I wanted numbers for acceleration, quarter-mile performance, horsepower, and torque.
A baseline gives future modifications something meaningful to beat. Otherwise, it is easy to spend money and judge the result entirely by how fast the car feels.
Quarter-Mile and 0 to 60 Results
At the drag strip, Cleetus McFarland gave me a few tips before my pass. I had only tried a quarter-mile run once before, years earlier.
My results were:
- Quarter mile: 18.4 seconds.
- Trap speed: About 76 mph.
- 0 to 60 mph: 11.22 seconds.
For perspective, that 0 to 60 time was slower than my Prius. This was definitely a baseline, not a record attempt!
Cleetus then took a turn and ran approximately 17.9 seconds. His experience knocked about half a second off my time in the same car, which is a good reminder that the driver is part of the result.
I was happy to be that close on my second-ever drag-strip outing. More importantly, the Del Sol had gone from sitting in storage to making passes.
Dyno Results: 92 Horsepower and 89 lb-ft
Next, we headed to the chassis dyno. Think of it as a giant treadmill for a car. Since the Del Sol is front-wheel drive, the front wheels went on the rollers.
Cleetus guessed 93 horsepower. He was pretty close.
- Peak horsepower: 92 hp at approximately 6,000 rpm.
- Peak torque: 89 lb-ft at approximately 4,700 rpm.
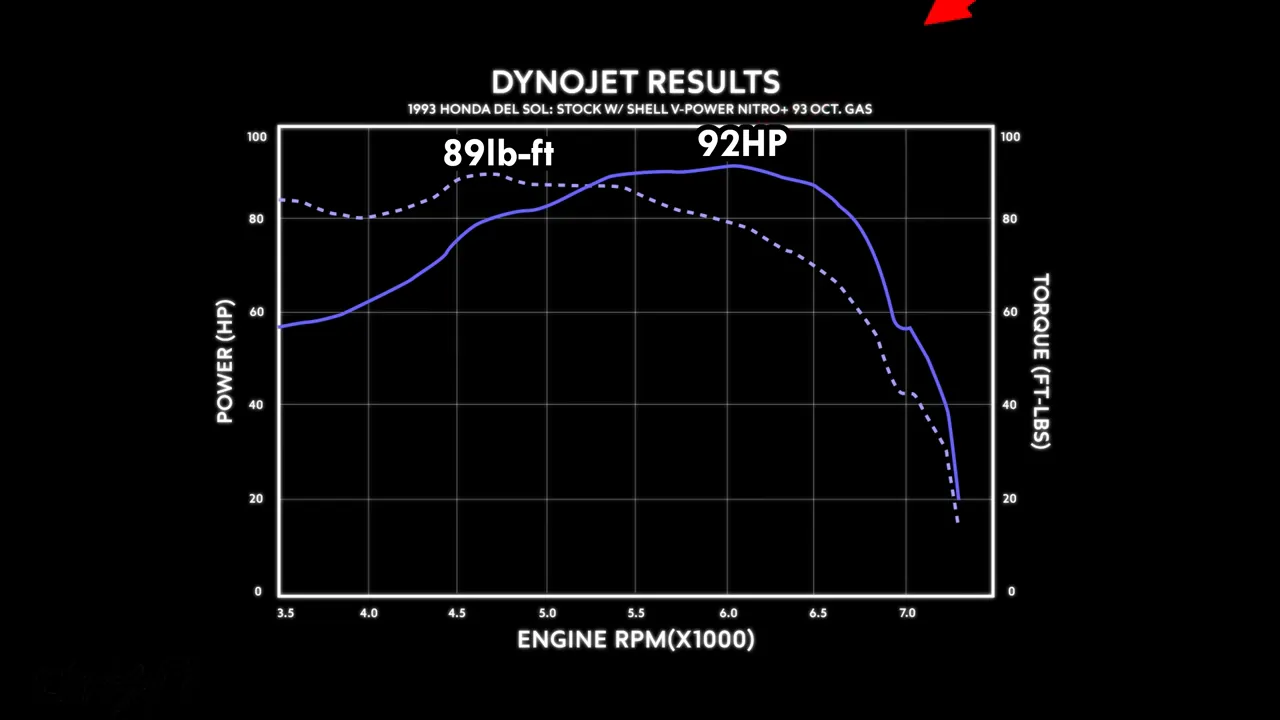
On the graph, the dotted line represents torque and the solid line represents horsepower. One detail stood out: power dropped sharply around 6,500 rpm.
I did not have an explanation for that yet. Rather than guessing, it is something to investigate as the build moves forward.
What Comes Next: The $600 Turbo Kit and Supporting Upgrades
The Del Sol was finally running, driving, and tested. Now the turbo project had a real starting point.
The plan is to use a budget-friendly $600 eBay turbo kit and try to make reliable power. But the price of the kit is not the total cost of turbocharging the car.
What the Turbo Kit Includes
The kit laid out for this build includes:
- A turbocharger.
- An intercooler, charge pipes, and couplers.
- Oil feed and drain plumbing.
- A wastegate.
- A blow-off valve.
- Exhaust components and associated hardware.
That is a starting collection of hardware, not everything needed to make the engine ready for boost.
The Supporting Fuel, Ignition, and Tuning Work
The preparation list also includes colder spark plugs, a replacement fuel filter, a higher-flow fuel pump, upgraded injectors, and an ECU that can be tuned.
Monitoring is another part of the plan. I want gauges for boost, air-fuel ratio, fuel pressure, and oil pressure so I can keep track of what the engine is doing.
Bolting on a turbo and preparing a car for a turbo are two different jobs. Fuel delivery, tuning, and monitoring belong in the budget from the beginning.
A Valved Exhaust to Replace the Damaged System
The existing exhaust was in rough shape, with the muffler hanging underneath the car and far more noise than I wanted.
The replacement is a valved exhaust. The idea is to open the valve for a louder, more direct exhaust path, then close it for quieter cruising and a little consideration for the neighbors.
Fixing the Loose Shifter
The shifter is so vague that first gear can look like neutral. Underneath, the linkage is rusty, the bushings are worn out, and there is play everywhere.
I sourced a much cleaner linkage from a junkyard. Its rubber bushings still need replacement, so the plan is to fit stiffer polyurethane bushings along with a short-throw shifter.
The goal is a more direct, crisp shift instead of stirring the lever around and hoping the right gear is somewhere in there.
Rear Disc Brakes, Suspension, Interior, and Bodywork
The rusty rear drums are scheduled for a drum-to-disc conversion using adapter plates and brake components from existing production vehicles.
The rest of the project list is still substantial:
- Rebuild the rear suspension, just as I rebuilt the front.
- Install replacement carpet and seats after the interior cleanup.
- Fit the planned carbon-fiber steering wheel.
- Install the front bumper, fenders, rear bumper, and spoiler.
- Finish the bodywork and paint after the major work is complete.
There is plenty left to do. The difference now is that the car is no longer just sitting there waiting for everything to happen at once.
Finish the Next Stage, Not the Entire Dream Build
This restart did not end with perfect paint, a finished interior, or a turbo making double the power. It ended with a running Del Sol, fresh fuel, completed baseline testing, and a clear list of next steps.
The battery failed. The fuel pump replacement did not fit. The rear brakes seized. Each problem could have become another reason to put the car away, but solving them individually kept the project moving.
Get the essential repairs done, verify the car is safe, and give yourself a reachable milestone. For me, that milestone was driving the $300 Del Sol again and finding out what it could do before boost.
And man, getting this little car back on the road felt good.


