Gear oil dripping down a rear tire or slinging around the inside of a wheel is a mess, but the bigger problem can be hiding inside the brake drum. A leaking axle seal can soak the brake shoes in oil while the differential keeps losing the fluid it needs.
That was exactly what happened to Henry from Donut Media during his cross-country trip in a Suzuki X-90. He had started at Jay Leno’s Garage in California and was headed to a car show in Rhode Island, restoring the little SUV along the way. With only a day left before the show, he was adding gear oil roughly every 100 miles.
Both rear axle seals were leaking badly. We needed to pull the axle shafts, replace the seals, deal with the oil-soaked brakes, and refill the differential. The good news is that this job takes fewer tools than you might expect.
This procedure applies to the bolt-in axle arrangement on this Suzuki’s solid rear axle. Before starting on your car, truck, or SUV, check its service information for the axle removal procedure, lifting points, seal installation requirements, and torque specifications. Do not assume every solid rear axle comes apart the same way.
What You'll Learn
- Remove the differential fill plug before draining so you know the axle can be refilled.
- Install each axle seal squarely, with its spring-loaded side facing the gear oil.
- Replace oil-saturated brake shoes rather than relying on cleaning the contaminated friction material.
- Support the axle shaft during reinstallation to protect the new seal from the splines.
Table of Contents
- How to Tell Whether the Rear Axle Seals Are Leaking
- Tools and Supplies for Rear Axle Seal Replacement
- 1. Chock, Lift, and Secure the Vehicle
- 2. Drain the Differential, but Remove the Fill Plug First
- 3. Remove the Wheel, Brake Drum, and Axle Retaining Nuts
- 4. Use a Slide Hammer to Pull the Axle Shaft
- 5. Remove the Old Axle Seal and Install the New One
- 6. Replace Oil-Soaked Brake Shoes and Inspect the Bearing
- 7. Reinstall the Axle Without Damaging the New Seal
- 8. Refill the Differential with the Correct Gear Oil
- A Leak-Free Axle and a Road Trip Back on Track
How to Tell Whether the Rear Axle Seals Are Leaking
Start by looking at the ends of the axle housing, behind each rear wheel. On this Suzuki, the signs were obvious:
- Gear oil coated the inside of the rear tires.
- Oil had been thrown around the inside of the wheels.
- Fresh oil was dripping from the drum brake backing plates.
- The differential needed frequent top-ups.
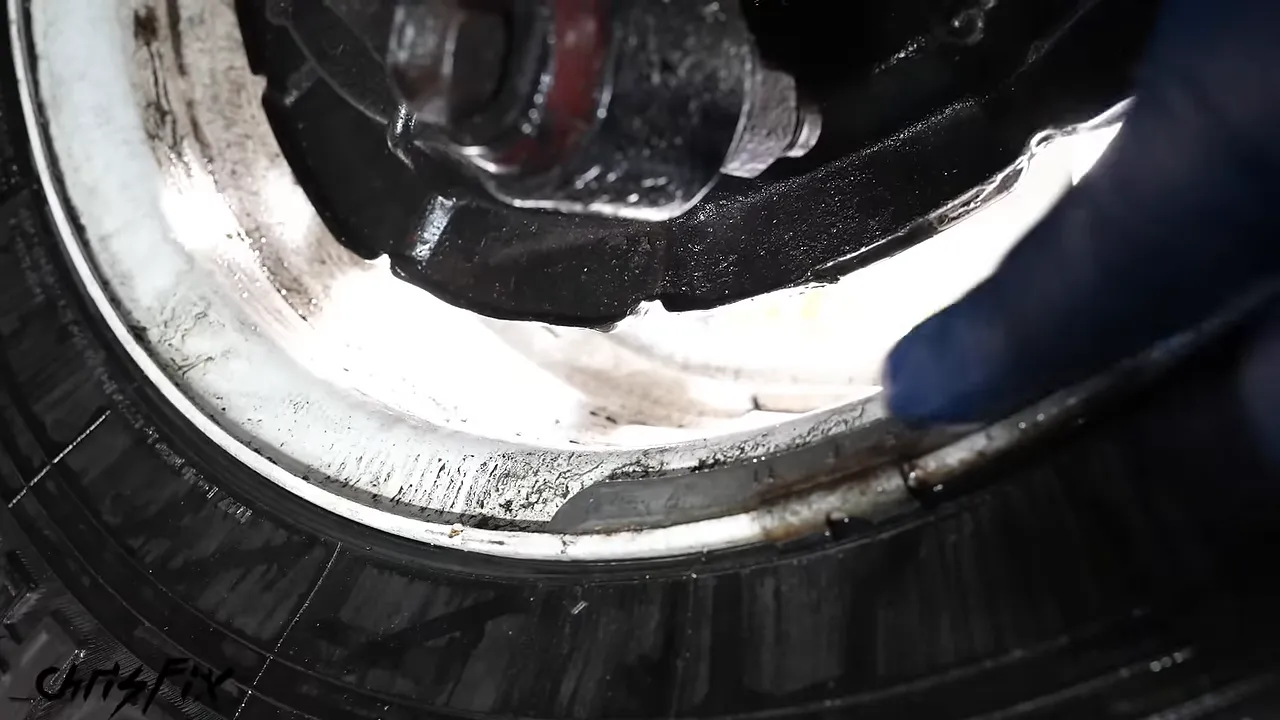
We found the same mess on both sides. Once the drums came off, the brake shoes were saturated with gear oil too. That explained why the brakes had not felt very good.
Do not treat this as just an oil leak. If the oil has reached the brake friction material, the repair needs to address the brakes as well as the seals.
Tools and Supplies for Rear Axle Seal Replacement
Most of this job uses ordinary hand tools. The two specialty tools that really help are a slide hammer to pull the axle shaft and a seal puller to remove the old seal.
- Socket and ratchet set, including the correct sockets for your axle retaining nuts
- Wrench set and breaker bar
- Torque wrench
- Hammer and a flat-ended punch
- Pliers, preferably supplemented by drum brake tools
- Seal puller
- Seal driver or a large socket that fits the seal’s outer rim
- Slide hammer with a wheel-stud adapter
- Floor jack, jack stands, and wheel chocks
- Drain pan, shop towels, and an oil-absorbent mat
- Replacement axle seals
- The correct differential gear oil and a fluid pump
- Medium-strength threadlocker where specified
- Replacement brake shoes if the existing shoes are oil-soaked
- Brake cleaner and suitable lubricant for the brake shoe contact points
- Safety glasses and gloves
I used an 80-piece socket set with 180-tooth ratchets. A fine-tooth ratchet is helpful behind the backing plate because there is not much room to swing the handle. It is a convenience, though, not a requirement for doing the job.
A slide hammer kit is worth having ready before you start. Some local parts stores also offer loaner-tool programs, so check whether you can borrow one rather than buy it.
1. Chock, Lift, and Secure the Vehicle
Before loosening anything, chock the front wheels so the vehicle cannot roll. You will need the parking brake released to remove the rear brake drums, so the chocks matter.
- Loosen the rear lug nuts slightly while the tires are still on the ground. The vehicle’s weight keeps the wheels from turning as you use the breaker bar.
- Lift the rear using an approved lifting point. On this Suzuki, I lifted from the rear differential.
- Position jack stands at the appropriate support locations and lower the vehicle onto them.
- Check that the vehicle is stable before working underneath it.
Never rely on the floor jack alone. Once the wheels are removed, I also slide them underneath the vehicle as an extra precaution. That is a backup, not a substitute for correctly positioned jack stands.
2. Drain the Differential, but Remove the Fill Plug First
Put an absorbent mat and drain pan beneath the differential. Gear oil is messy, and a little preparation makes cleanup much easier.
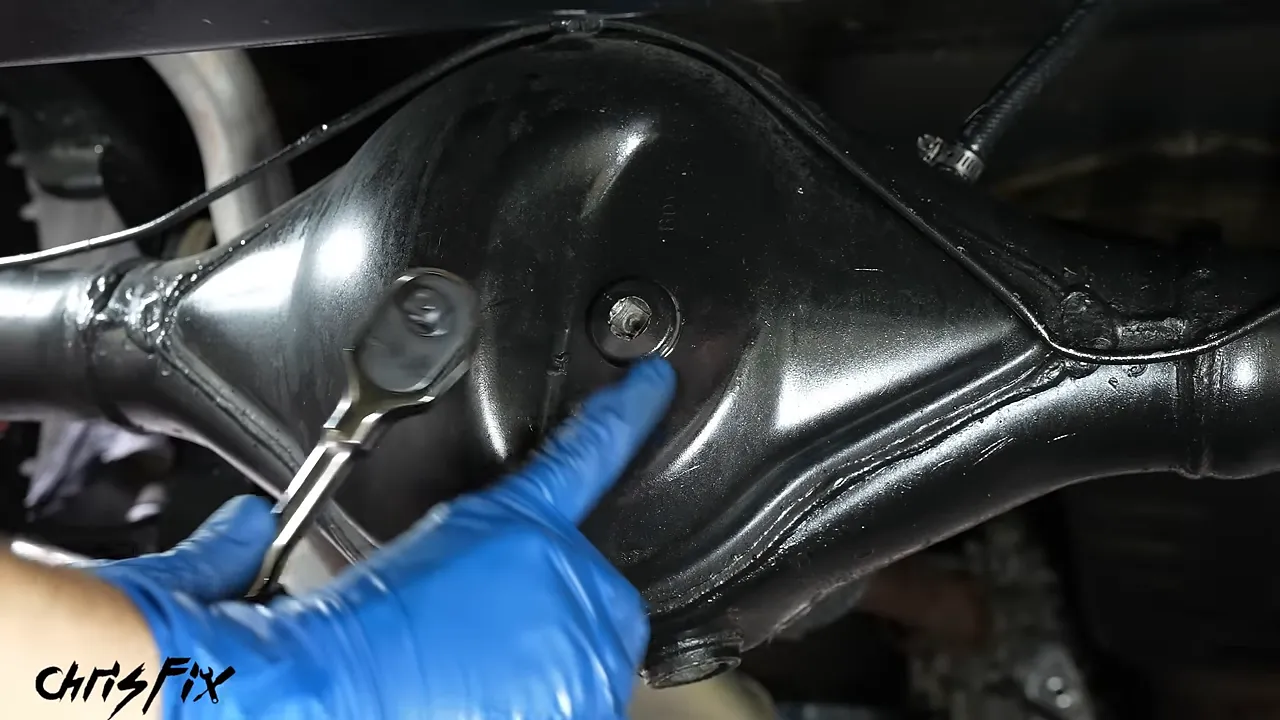
Here is a step you do not want to skip: loosen and remove the fill plug before removing the drain plug. If you drain the differential first and then discover the fill plug is seized, you have an empty differential with no easy way to refill it.
On this axle, the square drive of a 3/8-inch ratchet fits directly into the fill plug. Once that plug is out, remove the drain plug and let the oil drain completely.
Inspect the Magnetic Drain Plug
The drain plug gives you a quick look at what has been circulating inside the differential. A small amount of fine, silvery paste on a magnetic plug is typical wear material. Large flakes or chunks of metal are a different story and deserve further investigation.
Clean the plug, reinstall it by hand, and torque it to the vehicle’s specification. The drain plug on this Suzuki was tightened to 18 ft-lb. That is the specification for this repair, not a universal differential plug torque.
Temporarily thread the fill plug back in by hand to keep dirt out while you work. Keep the drained oil contained and take it to an appropriate collection facility. The EPA provides guidance on handling and recycling used oil.
3. Remove the Wheel, Brake Drum, and Axle Retaining Nuts
Remove the loosened lug nuts, take off the wheel, and set it underneath the vehicle. Then confirm that the parking brake is released.
Try pulling the brake drum off by hand. Ours would rotate, but it would not slide off. Fortunately, the drum had two threaded removal holes.
To use those holes:
- Choose bolts with the correct diameter and thread pitch.
- Thread one bolt into each hole until both contact the surface behind the drum.
- Tighten the bolts alternately, a little at a time.
- Keep the force even until the drum releases.
With the drum removed, inspect the brake shoes for oil contamination. Our shoes were soaked, so new shoes became part of the repair.
Remove the Four Axle Retaining Nuts
On this axle, four nuts behind the backing plate hold the axle assembly in place. There are two on one side and two on the other. The nuts take a 12 mm socket on this Suzuki.
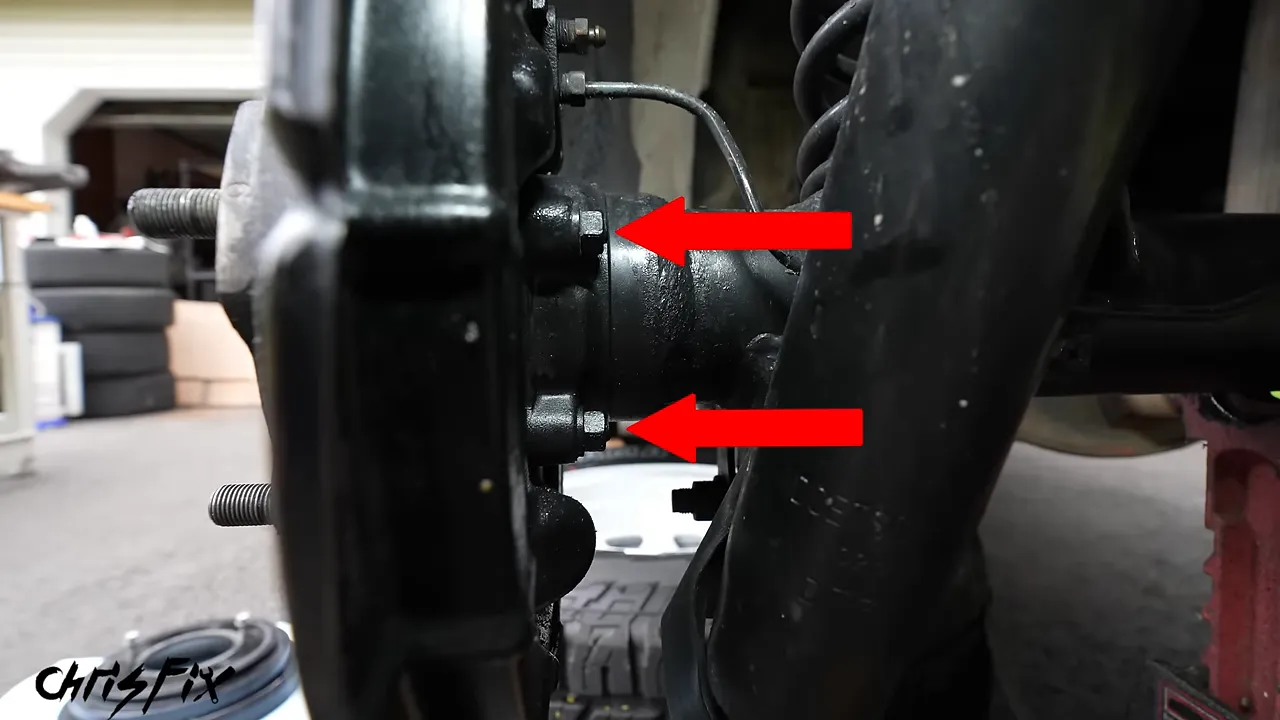
Break all four loose and remove them. Move the drain pan beneath the axle end because some remaining gear oil can drip out even after the differential has been drained.
At this point, try pulling the axle out by hand. It is worth a shot, but ours was firmly seated. Time for the slide hammer.
4. Use a Slide Hammer to Pull the Axle Shaft
A slide hammer uses a moving weight to apply an outward impact. With the right adapter attached to the wheel studs, it pulls directly on the axle flange.
- Select an adapter that fits the wheel-stud pattern.
- Slide the adapter over the studs and secure it with three lug nuts.
- Tighten the lug nuts so the adapter is firmly attached.
- Thread the slide hammer into the adapter.
- Tighten the jam nut against the adapter so the connection cannot loosen.
- Slide the weight outward against the stop until the axle releases.
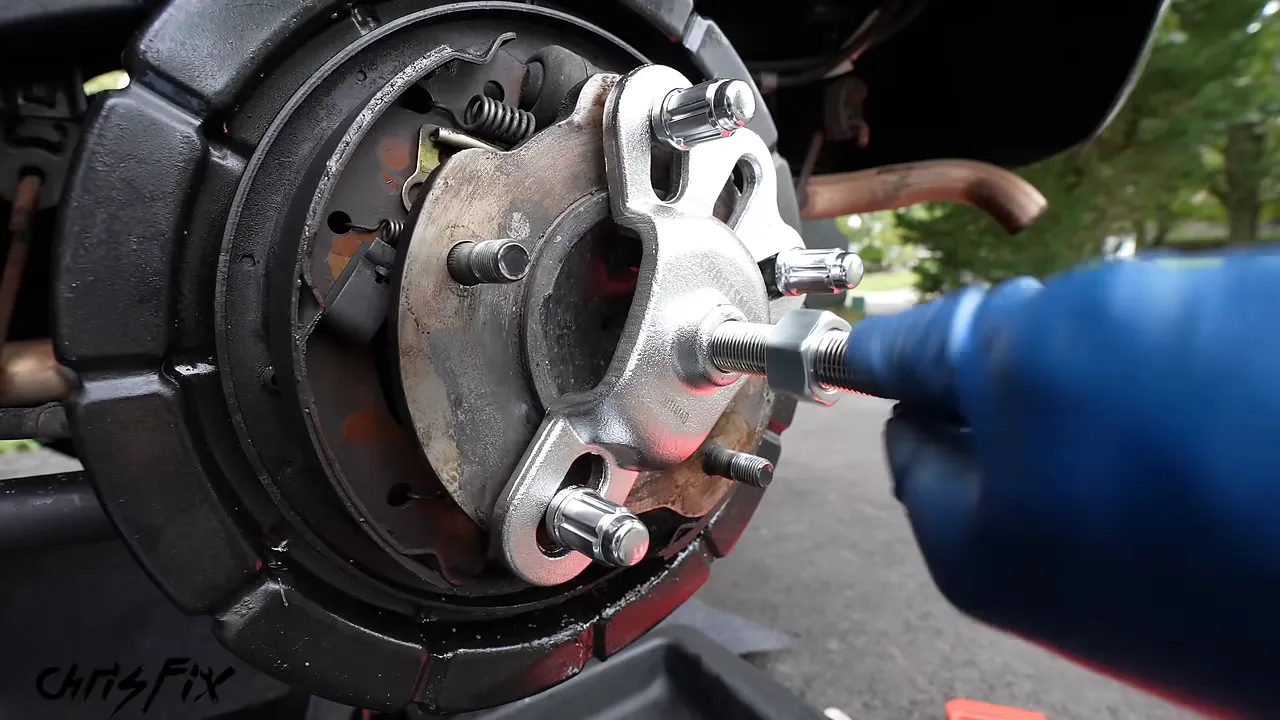
Once the axle pops free, remove the tool and pull the shaft out the rest of the way by hand. Support and guide the shaft as it comes out.
Protect the splines at the inner end. These engage with the differential, so do not drag them through the axle tube or bang them against the housing.
5. Remove the Old Axle Seal and Install the New One
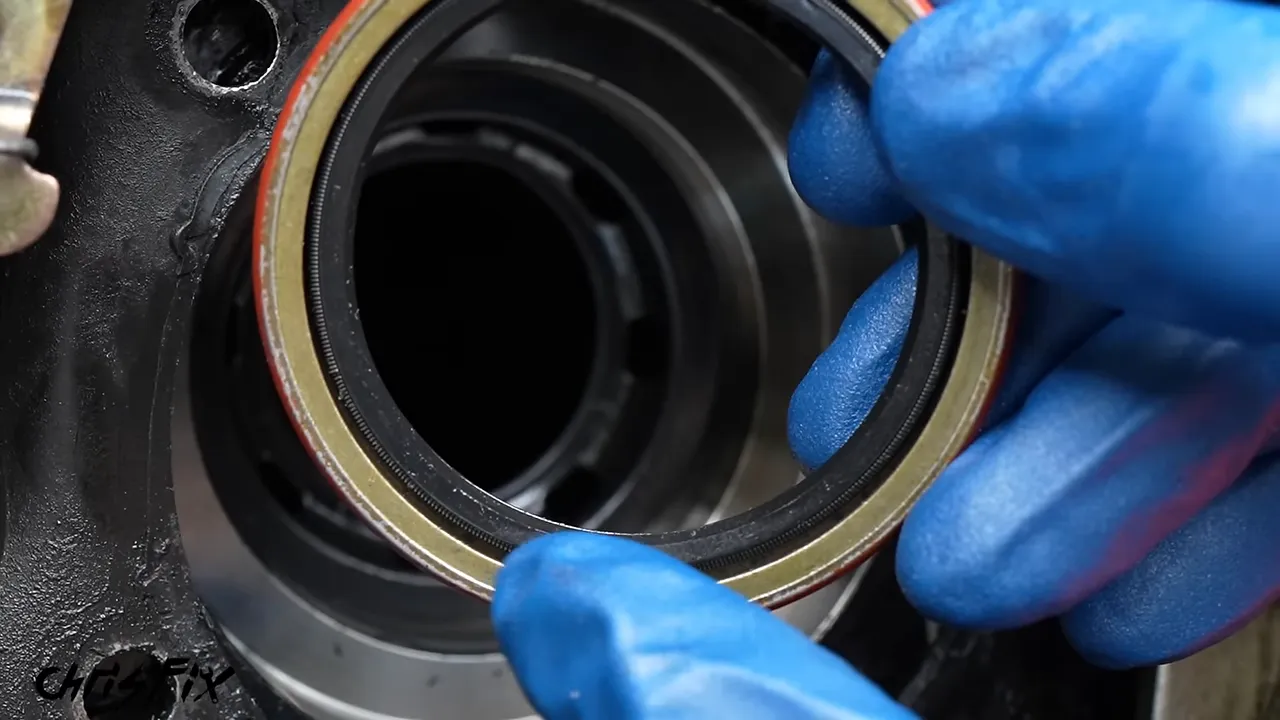
With the axle shaft out, you can reach the seal inside the end of the housing. Ours was visibly cracked. No wonder it was leaking.
Remove the Seal and Record Its Orientation
Hook the seal puller behind the old seal and use controlled leverage to pull it out. Keep the tool from damaging the housing’s sealing surface.
Before discarding the seal, note which way it was installed. Take a photo if necessary. Replacement seals may look different from the originals, so paint marks or other cosmetic details are not always a reliable guide.
For the spring-loaded lip seal used here, the open side with the spring faces inward, toward the gear oil. That places the sealing lip in the correct direction to retain the fluid. Follow the replacement seal’s instructions for your application.
Clean the Seal Bore
Wipe dirt, grit, and remaining oil from the seal mounting area. Any debris left behind can interfere with the new seal.
This assembly also had a separate plate behind the seal. It had a small crack, and we could not source a replacement in time. For this repair, I cleaned it and reinstalled it with the crack facing upward. That was a compromise specific to this situation, not a general instruction to reuse damaged parts.
Drive the Seal in Squarely
A seal driver is ideal, but a large socket can work if it contacts the seal’s outer rim evenly. Do not drive against the flexible inner lip.
- Position the new seal in the correct direction.
- Start it by hand, keeping it as flat and square to the bore as possible.
- Place the driver or socket against the outer rim.
- Use controlled, even taps to move it into place.
- Check frequently that the seal is going in straight.
Our seal started slightly crooked, with the bottom farther in than the top. If that happens, stop immediately rather than continuing to hammer it in at an angle.
I used a flat-ended punch to gently tap the high side of the metal rim until the seal was level, then finished with the large socket. Keep the punch away from the sealing lip.
On this housing, the seal seats against a stop. As it reached that stop, it stopped moving and the hammer sound became higher pitched. Confirm the required installation depth for your axle rather than assuming every seal should be driven in until it bottoms out.
6. Replace Oil-Soaked Brake Shoes and Inspect the Bearing
With the seal installed, it is tempting to put everything back together. But those oil-soaked brake shoes are still a problem. I would rather replace them than try to clean saturated friction material and trust it afterward.
Keep the Drum Brake Parts Organized
Before removing any springs, take clear photos of the brake assembly. Then lay out the parts in their installed arrangement as you remove them. Between the pictures and the organized parts, you have a useful reference for reassembly.
Keep your safety glasses on. Drum brake springs store a lot of tension and can fly loose during removal. I used pliers because my drum brake tools were packed away, but the correct brake tools make the job easier.
After removing the shoes and hardware:
- Clean all gear oil from the backing plate so it cannot contaminate the new shoes.
- Apply a thin coat of suitable lubricant to the six raised shoe contact points. I used copper anti-seize on this assembly.
- Keep lubricant off the brake friction surfaces.
- Reinstall the shoes, springs, and self-adjuster in their correct positions.
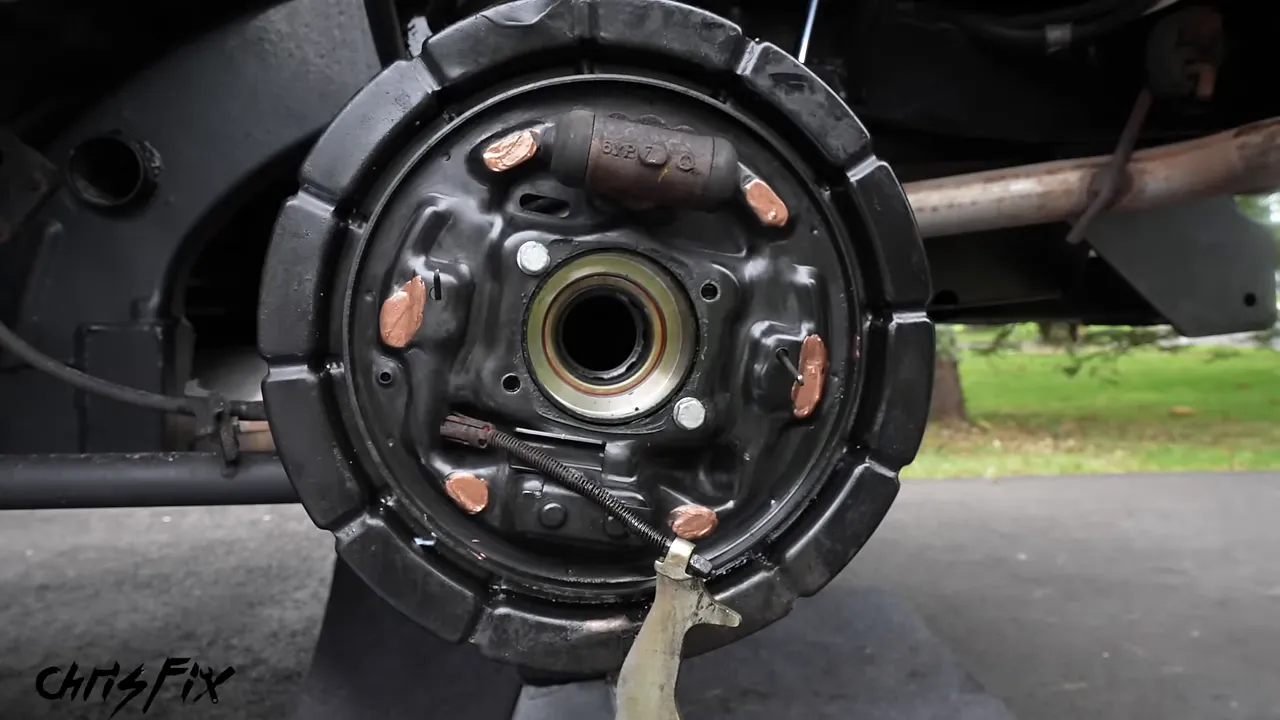
On this Suzuki, reassembly started with the front shoe, followed by the rear shoe, the lower spring, the self-adjuster, and the upper spring. Use your photos and the service procedure for your brake design rather than treating that order as universal.
Check the Rear Wheel Bearing While the Axle Is Out
The axle-mounted wheel bearing is accessible now, so this is a good opportunity to inspect it. Check for roughness, grittiness, and play.
Our bearing felt solid, had no noticeable play, and did not feel gritty, so we reused it. I also packed it with fresh high-temperature grease during this repair.
Replacing this bearing is a separate operation. The pressed-on bearing and retaining components may need to be carefully cut and split for removal, then the new bearing pressed into place. That work requires the correct procedure and equipment so the axle shaft is not damaged.
7. Reinstall the Axle Without Damaging the New Seal
The new seal can be damaged before the vehicle ever moves if the axle splines scrape across it during installation. Support the shaft and keep it centered.
- Guide the splined end through the middle of the seal without resting the shaft’s weight on the seal lip.
- Slide the axle inward carefully until the splines engage the differential.
- Align the four retaining studs with the backing plate holes.
- Seat the axle assembly far enough for the retaining nuts to start correctly.
For this repair, I applied medium-strength threadlocker to the retaining threads. These fasteners hold the axle assembly in place, so correct installation is critical. Follow your vehicle’s requirements for thread treatment and fastener reuse.
Snug the four nuts gradually, alternating between sides so the assembly seats evenly. Then torque them to the manufacturer’s specification in a crisscross pattern. There is no numerical retaining-nut torque provided here, so look it up for your axle.
Install the Drum and Wheel
Refit the brake drum and rotate it by hand. You want slight shoe drag, not heavy resistance. On this assembly, the self-adjuster takes care of further adjustment during normal operation once the initial fit is correct.
Install the wheel, start the lug nuts by hand, and tighten them evenly. Finish by torquing them to the vehicle’s specification in a star pattern.
Repeat the same repair on the opposite side if needed. On this Suzuki, both sides were leaking and both sets of brake shoes were oil-soaked, so we replaced both axle seals and both sides’ shoes.
8. Refill the Differential with the Correct Gear Oil
Do not move the vehicle with the differential empty. With both axle assemblies back in place, remove the temporarily installed fill plug and refill the differential.
Check the owner’s manual or service information for the correct oil viscosity and specification. This Suzuki called for 80W-90 gear oil and took a little over two quarts during the refill.
A hand pump makes it possible to get the oil into the fill opening, although pumping thick 80W-90 gives your arm a workout.
For this axle, the fill-level indication is gear oil beginning to weep from the fill hole. Keep the vehicle positioned as required by its service procedure so the level is accurate.
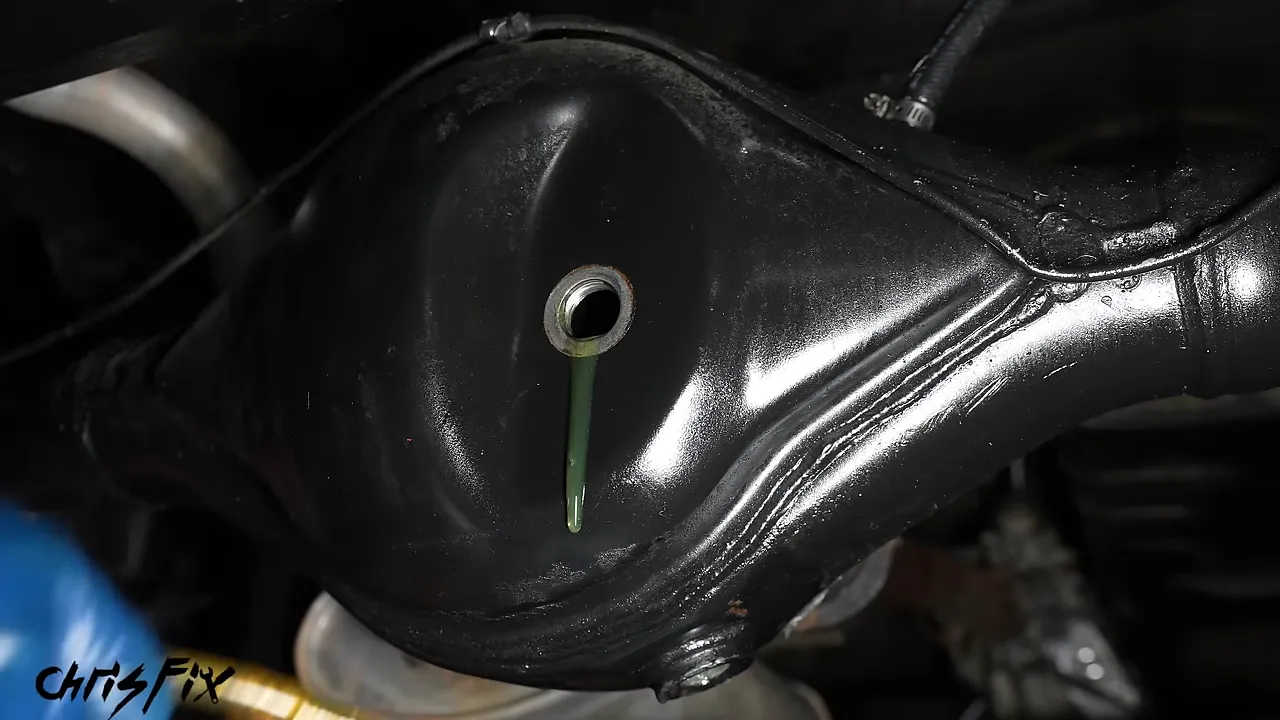
Reinstall the fill plug and wipe away the spilled oil. The fill plug on this Suzuki also takes 18 ft-lb. Use your own vehicle’s specification.
Finally, lift the vehicle just enough to remove the jack stands, lower it slowly to the ground, and remove the wheel chocks when it is safely parked.
A Leak-Free Axle and a Road Trip Back on Track
This repair was more than swapping two seals. The important details were removing the fill plug before draining, pulling the shafts without damaging the splines, installing each seal squarely, replacing contaminated brake shoes, and carefully guiding the axles back through the new seals.
The next day, about 200 miles later, Henry made it to the car show and reported that both rear axle seals were still dry. No more gear oil dripping down the wheels, and no fresh leaks for the judges to find.
That is the goal: fix the source of the leak, take care of everything the leaking oil affected, and put the axle back together correctly.


