Fifteen laps. That is how long our first Lemons endurance race lasted before the BMW’s engine let go and the car ended up on a flatbed. Not exactly the race weekend we had planned!
This time, the goal is to finish a full 16-hour endurance race. That means more than dropping in another engine and hoping for the best. We need testing, better engine monitoring, easier driver changes, properly installed safety equipment, and a bunch of small improvements that help keep the car on track.
Here is how we took the lessons from that first failure and used them to prepare our budget BMW for another shot.
Key Takeaways
- Test the car hard before race weekend so mechanical and driver-access problems surface early.
- Oil-pressure and oil-temperature gauges provide information that was missing before our first engine failure.
- Emergency access, a functional cutoff switch, and sealed firewall openings deserve priority during preparation.
- Small improvements to wheel changes, weight, and aerodynamics can add up during a long endurance race.
Table of Contents
- Start With a Running Engine, Then Put It Through a Real Test
- Build an Exhaust You Can Hear Without Blowing the Budget
- Make Getting Out of the Car Easier
- Install a Battery Cutoff Switch and Test the Shutdown
- Give the Team a Proper Livery
- Add Oil Pressure and Oil Temperature Gauges
- Convert the BMW From Lug Bolts to Wheel Studs
- Close the Firewall Openings With Steel
- Install a Heel Plate for Better Pedal Control
- Remove Weight to Offset the Safety Equipment
- Improve Aerodynamics With Polycarbonate Rear Windows
- Change the Oil for Our Track Conditions
- Bring a Backup Engine, but Keep the Build’s Purpose in Mind
- Ready for 16 Hours, Not Just 15 Laps
Start With a Running Engine, Then Put It Through a Real Test
The original engine had 240,000 miles on it. We replaced it with a 140,000-mile junkyard engine from a BMW X5. With that installed, the car started right up, idled smoothly, and drove great.
But starting in the driveway does not prove an engine can handle endurance racing. One of our biggest lessons was that every driver needs seat time before race weekend. We need to learn the car, push it under track conditions, and find problems while there is still time to fix them.
So we headed to Raceway Park for four hours of testing. Each driver took a turn, got comfortable with the BMW, and worked it hard. The idea was simple: if something was going to fail, we wanted it to happen during testing, not 15 laps into the race.
Eventually, we heard a ticking noise. Fortunately, the diagnosis was collapsed hydraulic lifters, which we attributed to the oil thinning out under sustained track use. We were running 5W-40, the stock specification for this car, and decided to change our oil strategy before the race.
That is exactly why a test day matters. It gives you a chance to discover both mechanical problems and things that make the car difficult to use.
Build an Exhaust You Can Hear Without Blowing the Budget
The stock exhaust was too quiet for what we wanted. To change that, we found full-length stainless steel headers on eBay for just $100. On a build with a $500 performance budget, that price makes a big difference.
We kept the remaining stock exhaust, but the rear muffler had already been cut off at the track. Removing it saved roughly 20 to 30 pounds and made the car much louder.
To finish the system, I ran new tubing through the space where the muffler used to sit, welded the joints into one leak-free assembly, and welded on an exhaust hanger. The extra length sticking down from the hanger was trimmed afterward.
The final layout used twin round tips tucked under the rear bumper. That was option D in our exhaust-tip poll, and it won by a long shot. The finished result looks awesome!
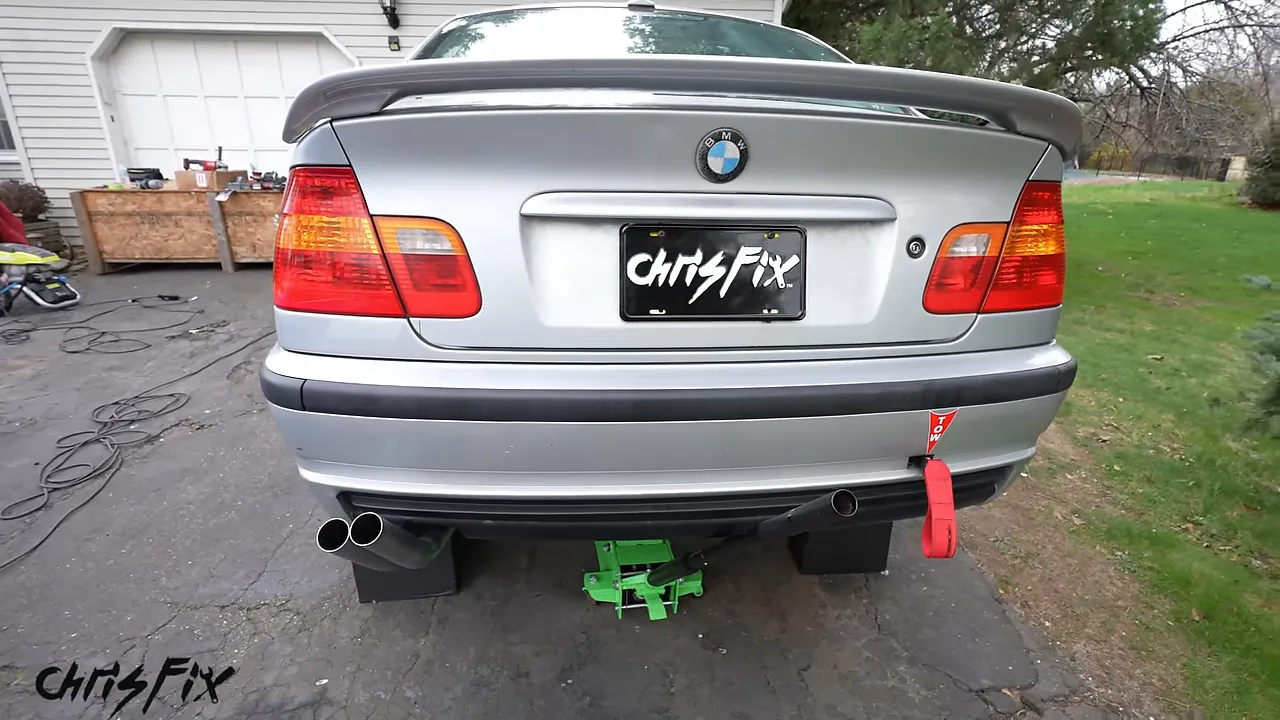
Now, here is the funny part: at the test day, I realized the exhaust did not actually sound all that great. It was mostly just loud. But being able to hear the car was the point, so it did the job.
Make Getting Out of the Car Easier
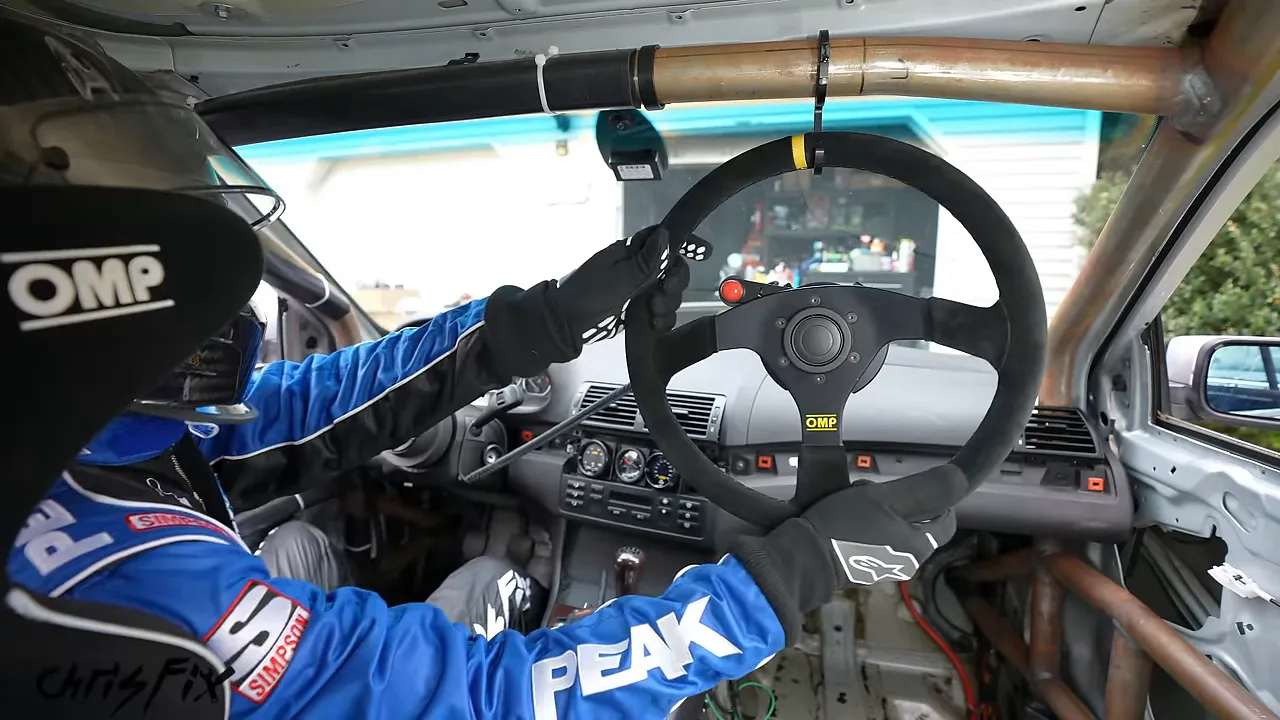
Testing exposed another problem: there was not much room between the stock steering wheel and the roll cage. Getting into the seat was awkward, and getting out was not much better.
That is inconvenient during a driver change, but it is much more serious if there is a fire or another emergency. A quick-release steering wheel gives us room to move.
Quick-Release Steering Wheel Installation Overview
This is a race-car modification, not a recommendation to remove safety equipment from a street car. Airbag removal requires the vehicle manufacturer’s safety procedures, and the steering components need to be installed to their specified requirements.
- Remove the airbag using the appropriate procedure and disconnect its electrical connectors.
- Loosen and remove the steering wheel retaining bolt, then pull off the stock wheel.
- Install the hub adapter, apply medium-strength threadlocker to the retaining bolt, and torque it to specification.
- Bolt the quick-release adapter to the hub, tightening the fasteners in a crisscross pattern so it seats evenly.
- Attach the removable half of the quick release.
- Bolt on the steering wheel, again tightening evenly in a crisscross pattern.
The threadlocker matters because we do not want vibration loosening the hub bolt. With everything installed, the wheel comes off quickly and opens up a lot more space in front of the driver.
Install a Battery Cutoff Switch and Test the Shutdown
A race-car kill switch needs to do more than disconnect the battery while leaving the engine running. Our technical inspection requires the engine to shut down quickly when the switch is operated.
We mounted the switch on the driver’s side where two people can reach it: the driver strapped into the seat and a track worker standing outside the car.
The installation involved cutting the appropriate cables, making proper crimps on the heavy-gauge wiring, routing the cables to the switch, and securing everything so vibration would not create reliability problems.
I also made a mounting bracket from a paper template. That bracket holds the battery cutoff and fire-suppression controls together in an accessible location.
The important part is the functional test. After starting the engine and checking that it ran normally, we held it above 3,000 rpm and operated the cutoff switch. The engine stopped immediately, and the car lost electrical power.
That gave us the result we needed for our inspection test. Simply fitting a switch is not enough. The complete shutdown system has to work.
Give the Team a Proper Livery
Last year, we got the sponsors onto the car, but the overall design was pretty basic. Even on a budget Lemons car, I wanted something better.
The new professionally designed livery follows our team theme: The Soapy Wooder Racers. It combines turquoise, silver, and black graphics with the race number and properly arranged sponsor logos, including eBay Motors and Peak Performance.
My favorite detail is the roof graphic, which uses the Soapy Wooder design from my spray bottles. It gives the whole car a consistent theme instead of looking like we added decals wherever there happened to be room.
The livery does not solve an oil-pressure problem, but it definitely makes the car look ready for the job!
Add Oil Pressure and Oil Temperature Gauges
Our first engine failure was traced to a spun bearing, with low oil pressure believed to be the cause. This time, we wanted actual oil-pressure and oil-temperature readings instead of guessing what was happening inside the engine.
We installed a three-gauge panel intended to display:
- Oil temperature.
- Oil pressure.
- Coolant pressure.
For the oil sensors, we used the factory oil-pressure sensor port behind the oil filter housing. An oil sensor manifold lets us add the two new sensors while retaining the original BMW sensor.
How We Mounted the Oil Sensors
- Remove the original oil-pressure sensor.
- Fit the sensor manifold at that location using its banjo bolt and copper crush washers.
- Thread the new oil-pressure sensor and the smaller oil-temperature sensor into the manifold by hand.
- Tighten the manifold assembly so the crush washers seal.
- Reinstall the original sensor in the remaining port and snug the sensors with a wrench.
- Connect the gauge wiring harnesses to the new sensors.
With the engine running at approximately 3,000 rpm, we saw an oil temperature of 191°F and oil pressure of approximately 53 psi. Those are readings from this particular test, not universal targets for every engine.
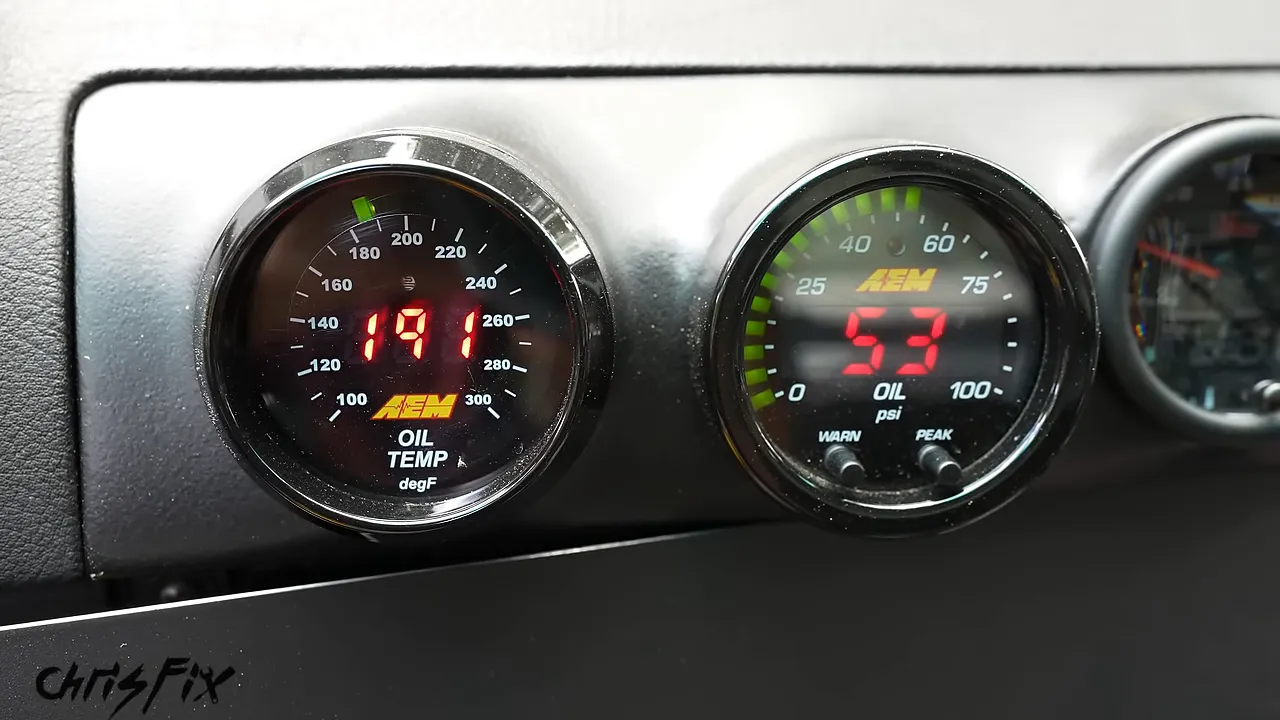
The coolant-pressure gauge was mounted, but it would not be operational for this race. We could not get the correct adapter in time to install its sensor in the radiator. The oil gauges were our priority, and both were working.
Convert the BMW From Lug Bolts to Wheel Studs
BMW’s lug-bolt setup makes a quick wheel change more awkward than it needs to be. Once all the bolts are removed, there are no studs left to guide the wheel back into place.
You have to hold the wheel up, center it on the hub, align the holes, and start a bolt. If you rotate the wheel, you can rotate the hub too. It works, but it is not especially quick or easy.
A wheel-stud conversion solves that problem. The studs stay in the hub, the wheel slides over them, and lug nuts secure it.
Why the Studs Count Toward the Budget
For our build, I treated wheel studs as a performance item because the purpose was faster wheel changes and more time completing laps. They counted toward the $500 budget.
Safety equipment, such as the roll cage and brakes, was excluded from that performance budget under the rules we were working with. Every $10 over the limit meant one penalty lap, so inexpensive parts mattered.
We found a BMW-compatible set of grade 10.9 studs for about $50. If you are planning your own build, check the current requirements with 24 Hours of Lemons rather than assuming every item will be classified the same way.
Installing the Studs
- Identify the short threaded end that screws into the hub.
- Apply a small bead of high-strength red threadlocker to that end.
- Thread each stud fully into the hub by hand.
- Torque each stud to its specified installation torque. For our particular studs, that was 25 lb-ft.
- Slide the wheel onto the studs and install the lug nuts.
- Torque the lug nuts to specification in a crisscross pattern.
- Allow the threadlocker to cure before a test drive.
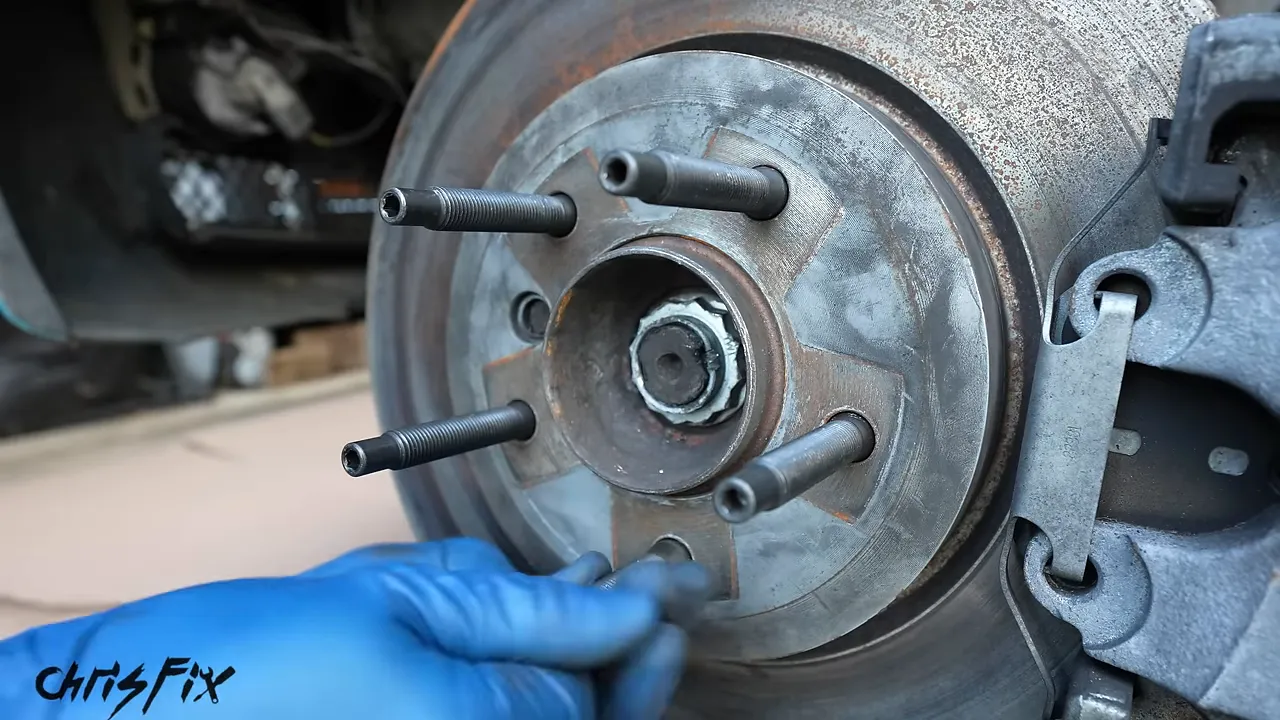
High-strength threadlocker helps keep these studs from backing out unintentionally and typically requires heat for removal. Follow the stud manufacturer’s instructions for your own hardware, including torque and curing requirements.
With the studs installed, lining up the wheel is much easier. It is a small change, but small improvements add up over an endurance weekend.
Close the Firewall Openings With Steel
One safety concern was a large firewall opening covered by a plastic piece that barely did the job. That was not the barrier I wanted between the engine compartment and the driver in an engine fire.
I removed the plastic and used it as a template to cut a steel blockoff plate.
Removing the air-conditioning system also left a separate opening in the firewall. We welded that hole shut and painted the repair to prevent rust. Then we installed the larger steel plate to close off the remaining gap.
The result is a much more substantial barrier than the original plastic cover. Weight reduction should not mean leaving openings between the engine bay and the cockpit.
Install a Heel Plate for Better Pedal Control
Stripping the interior creates problems you do not notice when the factory carpet is installed. In our BMW, removing the foam and carpeting exposed a large drop in the driver’s floor.
Near the clutch and brake, there was very little flat surface for a driver’s heel. Your foot could drop off the raised section instead of resting comfortably beneath the pedals.
I found an E46 heel plate listed for $100, offered $75, and the seller accepted.
Check Fitment Before Drilling
Although the plate was made for an E46, it did not fit our all-wheel-drive model perfectly. The transmission tunnel has a different shape to make room for the transfer case.
The fix was straightforward: trim the corner of the heel plate to clear the hump, then test-fit it again.
Mount the Plate With Rivet Nuts
- Remove the test-fitted heel plate and drill the two mounting holes in the floor.
- Vacuum up the drilling debris.
- Paint the exposed metal around the holes to help prevent corrosion.
- Fit a rivet nut into each hole and set it with a rivet-nut tool.
- Reinstall the heel plate and tighten its mounting bolts.
- Reinstall the throttle pedal and confirm that it snaps into place securely.
Rivet nuts give you threaded mounting points without welding nuts to the floor. The finished plate creates a stable place to rest your heels and makes controlling the pedals more comfortable.
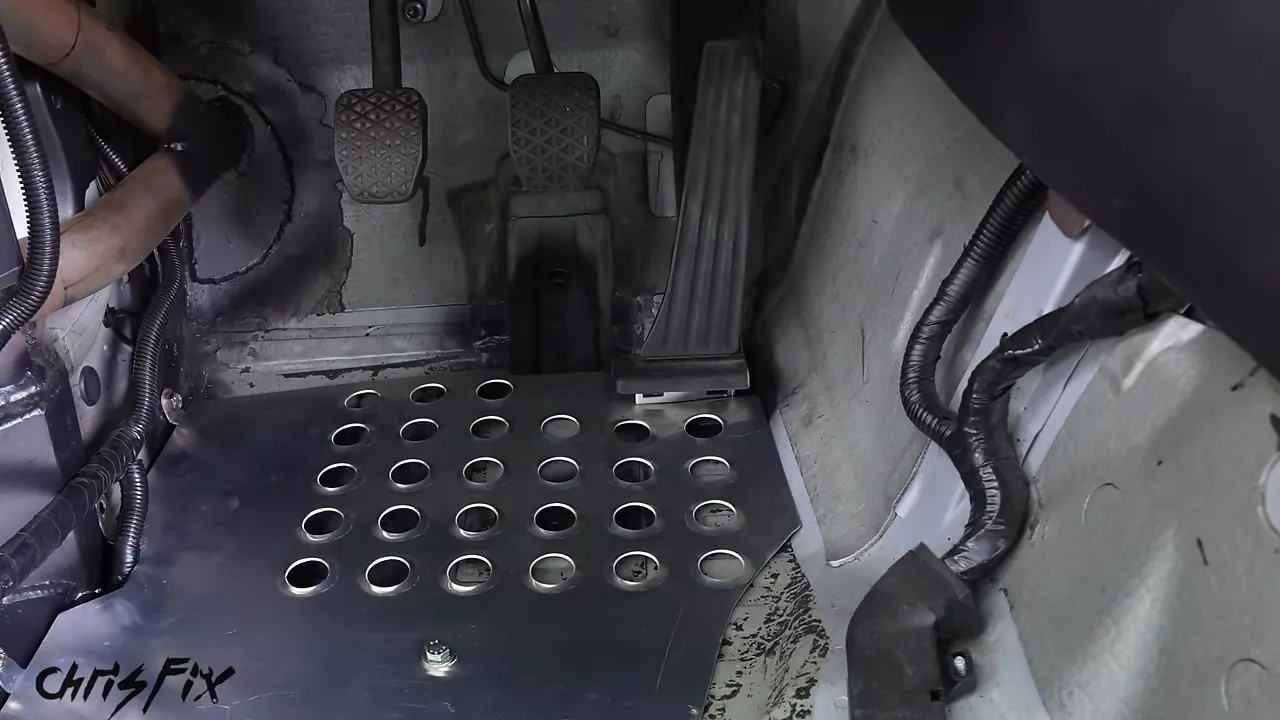
I specifically checked that the throttle pedal had snapped into place and was not moving. That detail is worth remembering, even though the later race outcome is a separate story.
Remove Weight to Offset the Safety Equipment
Weight reduction is kind of like getting free horsepower. You are not increasing the engine’s output, but you are reducing what it has to move.
Here is what we removed or changed during this round of preparation:
- Door window glass: approximately 40 pounds removed.
- Window motors and regulators: approximately 15 pounds removed.
- Air-conditioning components: approximately 40 pounds removed.
- Additional sound deadening: approximately 20 pounds removed.
- Exhaust changes: approximately 50 pounds saved by replacing roughly 30-pound stock manifolds with 10-pound headers and removing the roughly 30-pound muffler.
- Wheels: approximately 20 pounds saved by switching from 23-pound stock wheels to 18-pound Konig Countergrams.
The total was 185 pounds. That was almost exactly the weight of our roll cage and fire-suppression system, so these changes roughly offset those safety additions.
Sell Removed Parts to Help the Budget
The $100 headers counted as a performance upgrade, but replacing the original manifolds also gave us something to sell.
I listed the old exhaust manifolds for $500, and they sold in a day. Apparently, I might have priced them a little low!
Under the budget accounting we were using, that sale gave us another $500 to work with and helped keep the build away from penalty laps. Keeping track of removed parts can be just as important as finding a good deal on replacements.
Improve Aerodynamics With Polycarbonate Rear Windows
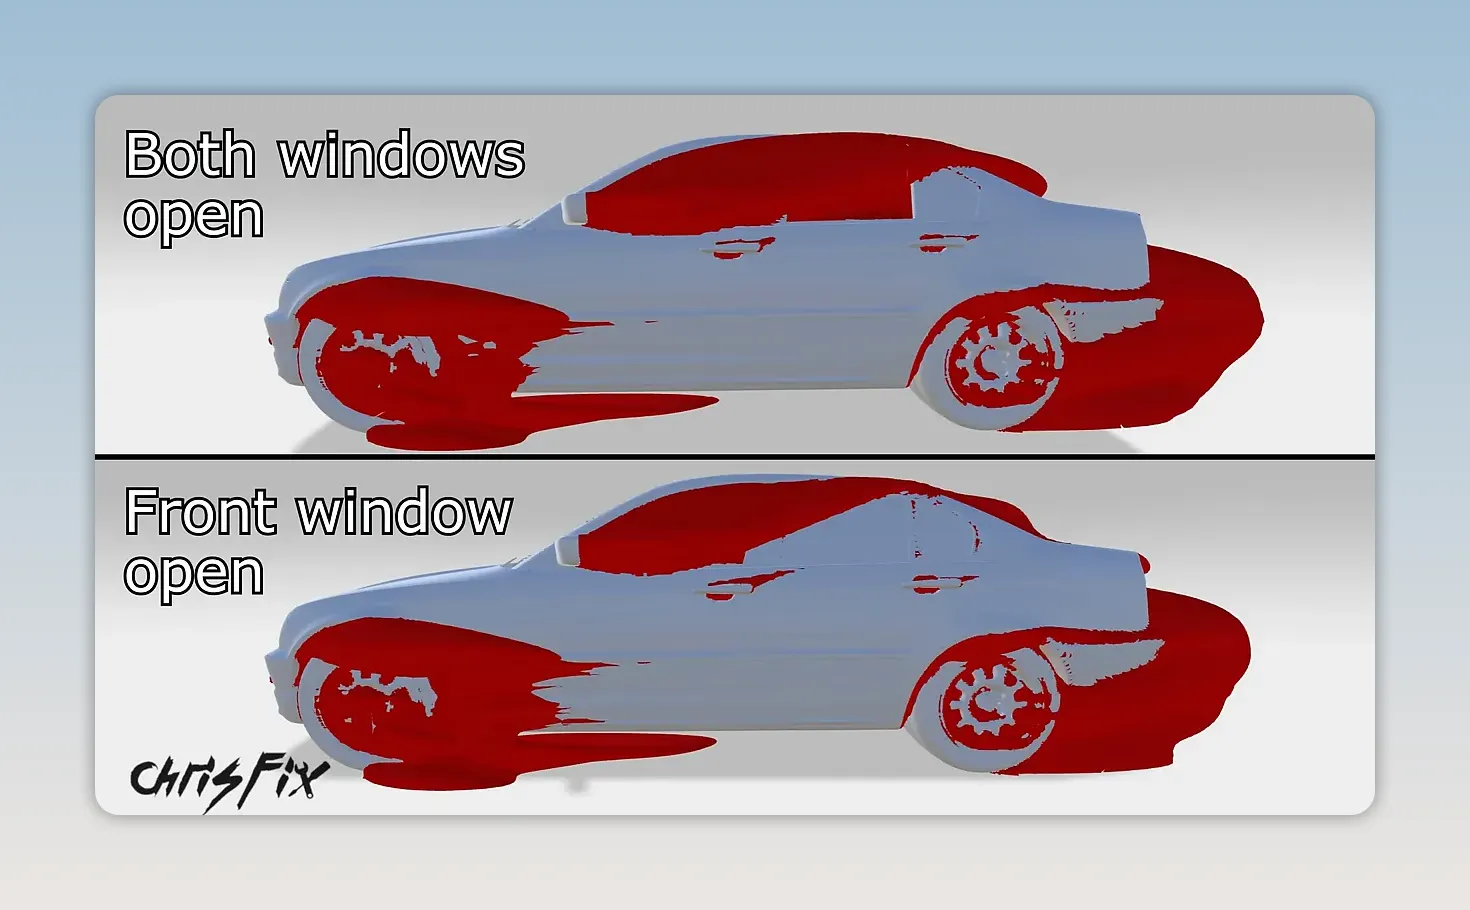
Removing all the side glass saves weight, but open window areas can affect airflow. Several people pointed out that leaving the rear side windows open could create drag, and they were right.
AirShaper ran two aerodynamic models of our Lemons BMW:
- Front and rear side windows open.
- Front side windows open, rear side windows closed.
The model with both openings exposed showed more disrupted airflow toward the rear of the car. That added drag and reduced the effectiveness of the rear spoiler.
Closing the rear side windows produced a smaller drag coefficient and less lift. In other words, the model indicated a better aerodynamic result without changing the front window openings. The gains were not huge, but over a 16-hour race, every little bit counts.
Why We Used Lexan Instead of Glass
Under the requirements for this car and event, we could not reinstall the tempered side glass. The laminated front windshield stayed in place, and the driver’s side window opening had to remain clear for emergency access and escape.
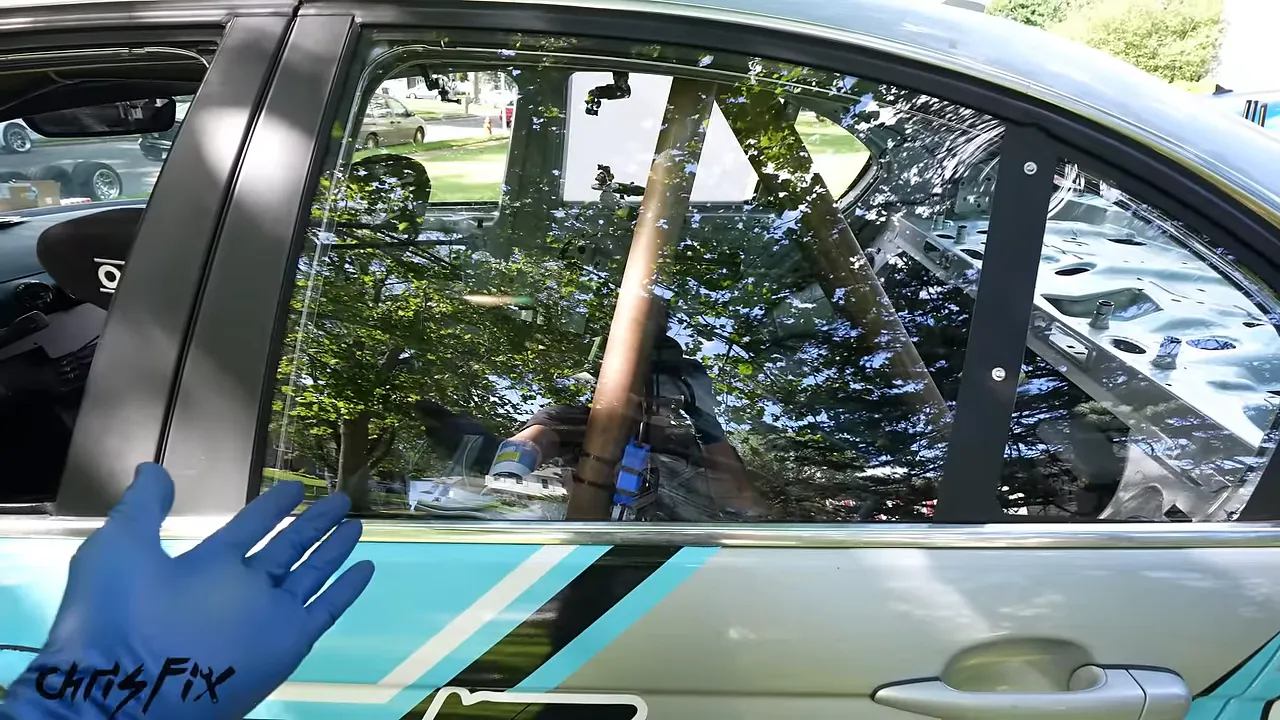
The rear side openings were different. Because this is a sedan, we could close those off with an allowed polycarbonate panel, commonly called Lexan. Unlike tempered glass, this material does not shatter into the same small pieces.
I found the rear window panels listed for $125 and negotiated the price down to $100.
Installing the Rear Window Panels
- Fit the panel into the channel where the original glass sat.
- Tuck its upper edge beneath the weatherstripping to form a seal.
- Tighten the two screws at the support pillar.
- Tighten the two screws at the lower window channel.
- Remove the protective shipping film after installation.
Peeling off that protective film is the best part. What starts as an opaque-looking panel becomes clear, and the car gets both rain protection and the aerodynamic improvement we were after.
Change the Oil for Our Track Conditions
One of the last jobs was also one of the most important: drain the 5W-40 and replace the filter.
Our explanation for the original engine failure was that the oil became hot and thinner under race conditions. Combined with wear in the 240,000-mile engine, we believed that led to insufficient oil pressure and a spun bearing. The failure escalated quickly enough to destroy the number-two piston and connecting-rod assembly.
For the replacement engine, we chose fully synthetic 10W-60. The goal was to retain more viscosity at elevated operating temperatures during prolonged hard use. We also installed a brand-new oil filter.
This was our response to this BMW’s history and test-day symptoms, not a blanket recommendation that every track car needs 10W-60. Oil selection needs to suit the engine and its operating conditions. Thicker oil is not a substitute for a mechanically healthy engine or working oil-pressure monitoring.
For our preparation, the oil change and the new gauges worked toward the same goal: give the replacement engine a better chance of surviving, and give the driver useful information about what is happening.
Bring a Backup Engine, but Keep the Build’s Purpose in Mind
Just before we finished preparing the car, a crate arrived from Elite Motorworks. Inside was our backup BMW M54 engine, built by Jamie.
It had been stripped to the bare block and rebuilt with factory upgraded parts. The focus was reliability, not making more power.
As tempting as it was to install it immediately, that would have pushed us way beyond the $500 limit and missed the whole point of our Lemons build. So the junkyard engine stayed in the car, and the rebuilt engine became our backup in case a swap was needed.
Ready for 16 Hours, Not Just 15 Laps
Our preparation was not about one magic part. It was about fixing the weaknesses we had already discovered.
We tested the replacement engine, gave every driver experience, improved emergency access, verified the kill switch, added oil gauges, simplified wheel changes, closed firewall openings, improved the pedal area, removed weight, and addressed the rear-window aerodynamics.
That is the approach I wanted for this car: learn from the failure, fix the shortcomings, and keep the improvements within the spirit of a budget endurance racer.
With the BMW packed into the trailer, the preparation was done. Now came the real test: making it through the entire 16-hour race.


