A good first car should be safe, reliable, affordable to own, and practical enough for everyday life. Good fuel economy, useful cargo space, and a few nice options certainly help. But even the right car can leave a new driver stranded if its maintenance has been neglected.
That is why buying the car is only the beginning. The next step is working through it systematically, finding problems, catching up on service, and making sure the safety equipment actually works.
For this project, I bought a fully loaded 2013 Ford Escape Titanium with about 130,000 miles. It was going to Nazarea, Bella, Bentley, and Kevin Montrond through Building Homes for Heroes. After losing their father, Army Sergeant Alberto Montrond, during a rescue mission in Afghanistan, the family also lost their grandmother and mother. Nazarea became the legal guardian, and the charity provided a mortgage-free home.
With Bella and Kevin becoming first-time drivers, I wanted to give the family more than transportation. I wanted to take care of the maintenance now so they could concentrate on school, work, and driving safely.
What You'll Learn
- Scan all supported vehicle systems and diagnose faults before replacing parts.
- Use vehicle-specific specifications when servicing fluids, spark plugs, batteries, and brakes.
- Inspect tires, spare pressure, cooling airflow, and open recalls before calling a car ready.
- Finish maintenance with leak checks and a road test to catch problems a checklist cannot reveal.
Table of Contents
- Choose a First Car You Can Afford to Maintain
- Start With a Maintenance Checklist and a Safe Work Area
- Reduce Cabin Heat With Appropriate Window Tint
- Scan Every System, Then Diagnose What You Find
- Change the Engine Oil and Filter
- Service the Sealed Automatic Transmission
- Test and Replace the Coolant
- Replace the Spark Plugs and Verify the Gap
- Test the Battery Before Buying a Replacement
- Replace the Engine Air Filter
- Investigate Turbo Noise and Underboost Instead of Ignoring Them
- Restore Clear Vision With New Wipers and Washer Fluid
- Replace the Cabin Air Filter
- Hardwire a Dash Camera Without Leaving Loose Wires
- Clean the Radiator, Condenser, and Intercooler
- Service the Brakes Properly, Including the Fluid
- Check Every Tire, Especially the Spare
- Check the VIN for Open Recalls
- Finish With a Road Test and Investigate Any Vibration
- A Maintained First Car, Ready for Its New Family
- Helping More Families Through Building Homes for Heroes
Choose a First Car You Can Afford to Maintain
I like small SUVs as first-car candidates because they offer a useful combination of passenger room, cargo space, and everyday practicality. Vehicles such as the Honda CR-V, Toyota RAV4, Mazda Tribute, Buick Encore, and Ford Escape were all part of my search. That does not mean every example is a good buy. Condition and service history matter.
My search started with two filters:
- Maximum purchase price: $8,000. Your budget might be different. My own first car was a 1992 Cadillac DeVille because that was what we could afford.
- Maximum mileage: 150,000 miles. That was my shopping cutoff, not a guaranteed reliability limit. In my experience, more wear-related repairs tend to appear around that mileage.
I used AutoTempest to search listings across multiple sites, including eBay Motors, Cars.com, and TrueCar, with tools for broadening searches on Craigslist and Facebook Marketplace. Comparing more listings makes it easier to recognize a deal instead of settling for the first nearby car.
The Escape appealed to me for its crash-test performance, potential fuel economy of around 30 mpg, and insurance-cost considerations. Always check those details for the exact year, configuration, and driver rather than assuming every version is identical. The IIHS vehicle ratings database is a useful additional resource when comparing safety performance.
I found this Escape in a nearby no-reserve eBay auction and won it for $7,750. Its lot asking price had been $11,995, a difference of more than $4,000. There can be room between the advertised price and what a car actually sells for.
The listing claimed everything worked. As you will see, that was not quite the case. A seller's description is a starting point, not a substitute for checking the car.
Start With a Maintenance Checklist and a Safe Work Area
When you are doing this much work, a checklist keeps small but important items from getting forgotten. I made a free first-car maintenance checklist covering the inspections and service items used here.
The overall plan was to:
- Scan the car and repair faults.
- Service the fluids, filters, spark plugs, and battery.
- Restore visibility and install a dash camera.
- Inspect cooling airflow, brakes, and tires.
- Complete outstanding recalls and finish with a road test.
The capacities, gaps, torque values, and procedures below describe this particular Escape. Check the owner's manual and service information for your exact vehicle before using them. A maintenance checklist tells you what to inspect, but it does not replace model-specific repair instructions.
For the fluid work, I put the front on ramps and supported the rear on jack stands so the car was approximately level. Use the specified lifting and support points, work on a firm surface, secure the vehicle against movement, and never get underneath a car supported only by a hydraulic jack. Before going underneath, verify that the car is stable.
Reduce Cabin Heat With Appropriate Window Tint
Because this car was headed to Florida, I started with ceramic window tint. The goal was not simply darker glass. It was reducing the heat and ultraviolet exposure coming through it.
The shop's meter showed roughly 80% visible light transmission through the original front side glass, with readings of about 63% UV rejection and 80% infrared rejection. After the ceramic tint was installed, the tested window measured about 35% visible light transmission, 100% UV rejection, and 99.1% infrared rejection on that meter.
Those are measurements from this particular glass, film, and tester, not a promise that every tint will perform the same way.
The installation process was straightforward in principle, but the shop made the details look easy:
- Select the vehicle's window patterns and machine-cut the film.
- Mask the felt window-channel material so loose fibers cannot get trapped behind the tint.
- Clean the glass thoroughly.
- Apply installation solution so the film can slide into position.
- Align the film, squeegee out the liquid, and wipe it clean.
The rear windows received ceramic film over the factory privacy glass, producing approximately 20% final visible light transmission. The shop also applied a very light ceramic film to the windshield.
Check current local tint laws before choosing film, especially for the windshield. Legal requirements depend on window position, vehicle classification, and jurisdiction. Darkness alone also does not tell you how well a film rejects heat.
Tronix Autosports in Toms River donated the tint work after learning where the car was going. That was an awesome contribution to the project.
Scan Every System, Then Diagnose What You Find
The first mechanical check was a full-system scan using a Bluetooth OBD2 scanner. The diagnostic port on this Escape is below the steering wheel. With the scanner connected and the ignition in the run position, I selected a scan of all supported modules.
This matters because an engine-only scan can miss faults in the ABS, airbags, body electronics, and other systems.
The initial scan found no engine or transmission codes, but it did identify three rear-of-car problems:
- A nonworking third brake light.
- Faulty license plate lighting.
- An unavailable reverse camera.
Diagnose the Third Brake Light Before Replacing It
The normal brake lights worked, but the high-mounted light did not. After carefully releasing its retaining clips with a plastic trim tool, I disconnected the electrical connector and checked it with a multimeter.
With the brake pedal pressed, the connector had just under 12 volts across its power and ground terminals. That supported replacing the lamp assembly rather than guessing at a wiring repair.
I transferred the washer-fluid hose, connected the new light, and tested it before snapping it fully into place. Simple diagnostics, simple fix.
Repair the License Plate Lights and Reverse Camera
One license plate light flickered on when tapped, while the other stayed out. I removed the housings and replaced the old incandescent bulbs with compatible LED replacements, then tested both sides.
The reverse camera was loose, had moisture behind its lens, and was missing its mounting bracket. Rather than buying an expensive complete trim assembly just to get the bracket, I found the needed piece at a junkyard.
With the new camera connected and properly mounted, the display showed the rear image again, including the parking-sensor information. I rescanned the car to verify that the original faults were resolved.
Repair the cause and verify the result. Clearing codes alone does not fix anything.
Change the Engine Oil and Filter
This Escape called for six quarts of 5W-30 oil, and I used full synthetic oil appropriate for the engine. Quality oil is especially important in a turbocharged engine, where the turbo also depends on the lubrication system.
- Position a drain pan and loosen the oil drain plug.
- Finish unthreading the plug by hand. Keeping slight inward pressure on it until the threads release helps control the initial flow.
- Let the oil drain, then reinstall the plug to the specified torque. The value used here was about 15 ft-lb.
- Remove the oil filter, using a filter wrench if necessary.
- Check that the old rubber gasket did not remain on the engine's filter mounting surface.
- Lubricate the new filter gasket with clean oil and install the filter according to its instructions.
- Add the specified oil, reinstall the cap, and briefly run the engine.
- Shut the engine off, allow the oil to settle, and check the dipstick on level ground.
I like prefilling an oil filter when its orientation and the applicable instructions allow it. That is a personal practice, not a universal requirement. Lubricating the gasket and avoiding overtightening are the important basics.
I also wrote the current mileage on the filter. Keep a dated service record as well, so the next oil change is based on mileage and time rather than memory.
Service the Sealed Automatic Transmission
A sealed transmission is not necessarily unserviceable. This one has no dipstick, but it does have a drain plug, a top fill opening, and a fluid-level check plug.
Make sure you can remove the fill plug before draining the transmission. Finding out the fill plug is seized after the fluid is gone is a problem you can avoid.
The old fluid was very dark, so I performed a drain and fill:
- Confirm access to the fill opening and identify the drain and level-check plugs.
- Drain the fluid into a suitable container.
- Reinstall the drain plug without overtightening the aluminum case.
- Add the correct transmission fluid through the top fill opening.
- Bring the transmission to the specified checking conditions.
- With the vehicle securely supported and the brake held, cycle through the selector positions as required.
- Check and adjust the level using the manufacturer's level-check procedure.
About four to five quarts drained out, and I initially added approximately four and a half quarts before adjusting the final level.
The critical detail is the checking procedure. Use the specified transmission-fluid temperature, vehicle position, and engine-running condition. A normal engine temperature gauge does not establish the exact transmission-fluid temperature. Adding a guessed amount and calling it finished can leave the transmission overfilled or underfilled.
This was a drain and fill, not a replacement of every drop inside the transmission.
Test and Replace the Coolant
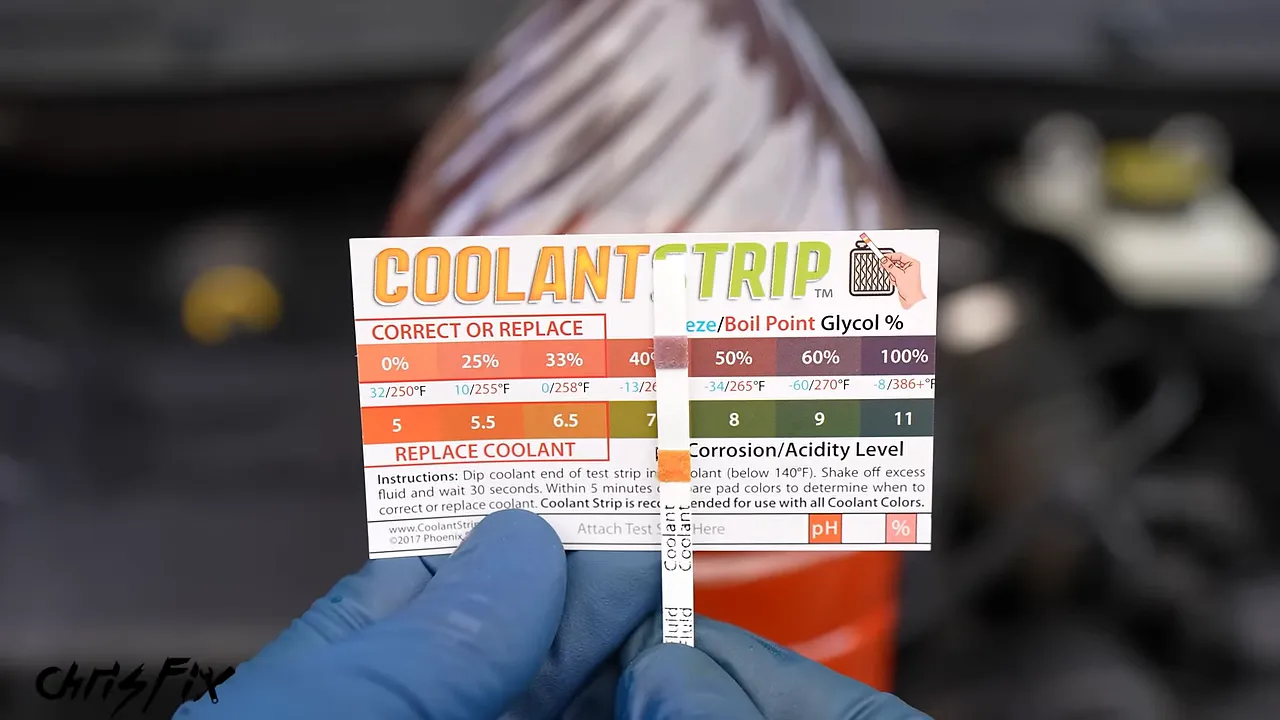
Coolant can look clean and still need attention. The old coolant in this car had the expected color and no obvious contamination, but a test strip showed it was becoming acidic.
The strip checked two things: antifreeze concentration and acidity. Its concentration was close to the desired 50/50 mix, but the acidity result helped confirm that replacing coolant was worthwhile.
Only open a cooling system when it is cold. A hot system can be pressurized and release scalding coolant.
For this drain and fill, I removed the cold reservoir cap, attached clear tubing to the radiator drain outlet, and opened the drain valve. The tubing helped direct the coolant into a container without making a mess. As soon as draining was complete, I closed the valve so I would not accidentally pour new coolant straight through it.
I selected coolant listing the appropriate Ford application and specification. Do not choose antifreeze by color alone or casually mix different chemistries.
Make Room and Remove Trapped Air
The wiper cowl blocked access for a spillproof funnel, so I removed the wiper arms, upper cowl, lower plastic panel, and the necessary reservoir mounting fasteners. That also opened up access for the spark plugs and battery, making it a useful time to combine jobs.
With the correct funnel adapter installed, I refilled the system and ran the engine according to the bleeding procedure. Bubbles rose into the funnel as trapped air escaped. Once the system was warm and the bubbling stopped, I removed the funnel and secured the reservoir cap.
Hot cabin heat was another useful check that coolant was circulating through the heater core. After the system cools, recheck the level and inspect for leaks.
This service replaced roughly half the coolant, not all of it. I suggested about 50,000 miles as a maintenance reference for this kind of drain and fill, but use your vehicle's specified time and mileage interval.
Replace the Spark Plugs and Verify the Gap
With the cowl removed, the four ignition coils were accessible under the engine cover. One intake tube also needed to move so I could reach a coil bolt.
After removing the coil bolts and lifting the coils, I vacuumed around the spark plug wells. You do not want loose dirt falling into a cylinder when a plug comes out.
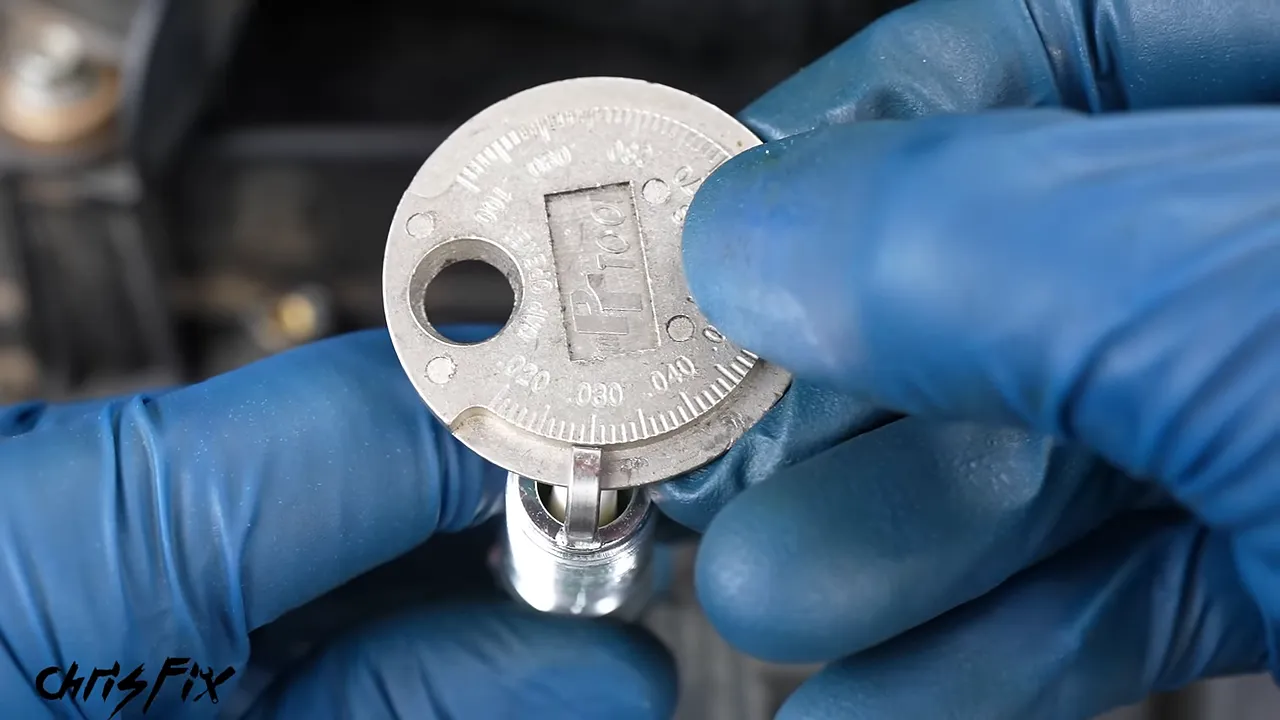
The old plugs looked reasonably clean, without obvious oil fouling or overheating. Their gaps measured around 0.033 to 0.034 inch, compared with the 0.030-inch specification used for this engine. With about 130,000 miles on the car and uncertain service history, replacing them made sense.
Here is the detail worth remembering: check new spark plugs, even when they are sold as pregapped. One new plug measured about 0.045 inch. I carefully corrected it with a dedicated gap-adjustment tool.
- Match the replacement plug to the exact engine specification.
- Measure and, where permitted by the plug manufacturer, adjust the gap without damaging the fine-wire electrode.
- Follow the plug manufacturer's instructions about thread coatings and anti-seize.
- Use only a thin amount of dielectric grease on the ceramic or boot contact area as appropriate.
- Start each plug by hand to avoid cross-threading.
- Torque to the correct specification. The value used here was 9 ft-lb.
Finally, I seated the coils, tightened their fasteners, and reconnected the intake tube. Worn plugs can contribute to rough running and lost efficiency, but replacing good plugs is not a guaranteed horsepower upgrade.
Test the Battery Before Buying a Replacement
A reliable first car needs a healthy starting battery. I connected a battery tester, selected the flooded lead-acid battery type, and entered its rated 590 cold-cranking amps.
The result showed a good battery with 100% reported health. For a normal maintenance job, that battery could have stayed in service.
Because this was a special project, I installed a lithium starting battery with a restart-reserve feature. The original weighed 30.8 pounds, compared with 13.2 pounds for the lithium replacement, saving about 18 pounds.
The reserve feature is designed to retain enough energy for restarting after a low-voltage shutdown. A remote allows it to be activated without reaching the battery beneath the cowl. It is a useful backup feature, not a guarantee against every no-start condition.
For battery replacement, use a battery approved for the vehicle and follow its installation requirements. On a conventional negative-ground vehicle, disconnect the negative cable first and reconnect it last. Keep tools from bridging a positive terminal to the body.
I cleaned and dried the battery tray, installed the replacement, secured both terminals, and tightened the hold-down bracket. The battery should not move around, especially during a collision.
Replace the Engine Air Filter
The engine air filter was easy to reach once the four airbox-cover screws were loosened. The old filter was heavily dirty and looked like it had been there a long time.
Before installing the replacement, I vacuumed the airbox and cleaned its dirty surfaces, keeping debris and moisture away from the clean intake path. Once everything was dry, the new filter went in and the cover screws were tightened evenly.
A clean filter is only useful if it seals properly. Make sure its edges are seated and the housing closes correctly.
Investigate Turbo Noise and Underboost Instead of Ignoring Them
While the engine was running for the cooling-system service, I heard a metallic rattle near the turbocharger. A later scan also showed a new P0299 underboost code.
That code does not automatically mean the turbocharger needs replacing. In this case, the rattle and excessive movement in the wastegate helped identify the problem.
The wastegate controls exhaust flow around the turbo's turbine. When its mechanism is worn and does not seal as intended, exhaust can bypass the turbine and reduce boost response. The old assembly had obvious play; the new assembly did not.
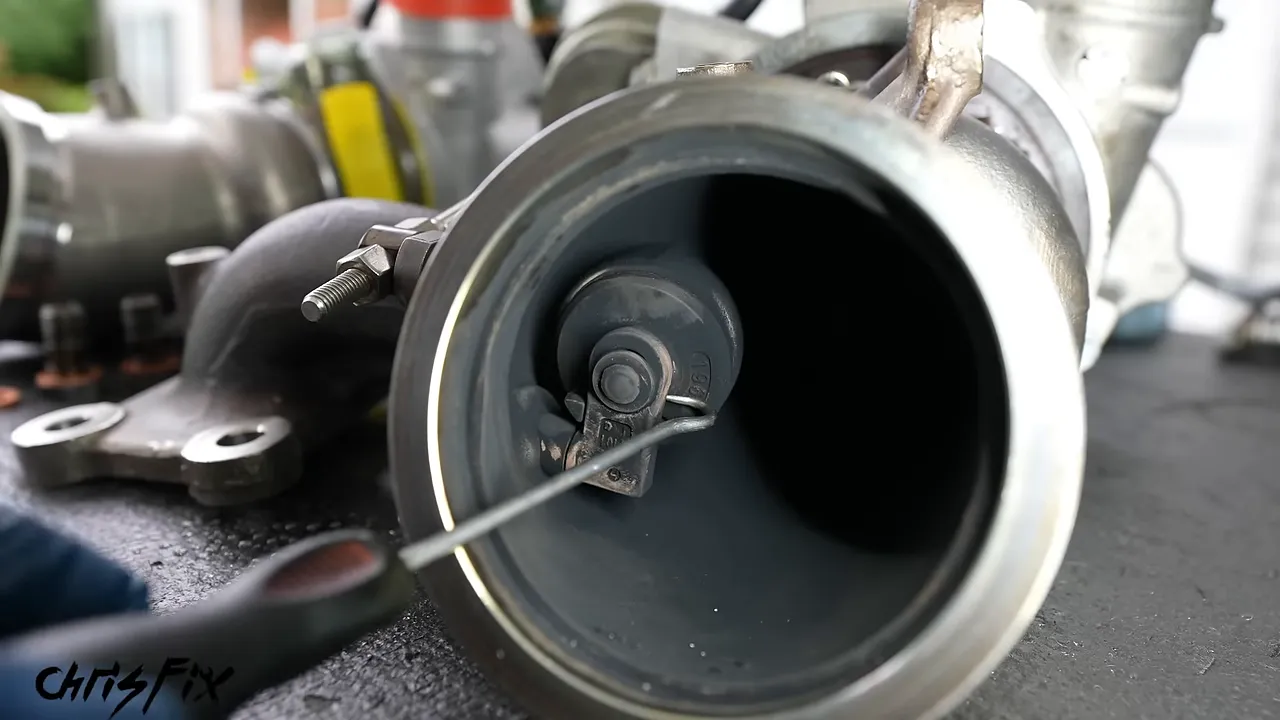
This was an unexpected repair, roughly a six-hour job rather than a quick maintenance item. I replaced the turbo and supporting installation hardware because I did not want to hand the family a car with a known expensive problem.
After installation, I warmed the engine, checked operation, and inspected the oil and coolant connections for leaks. Whenever those lines have been disconnected, that follow-up inspection matters.
The lesson is not to replace a turbo as preventive maintenance. It is to investigate a new noise or fault before assuming the car is ready.
Restore Clear Vision With New Wipers and Washer Fluid
The old wiper blades were falling apart, so they were replaced before the arms went back on. The new silicone blades attached with the appropriate adapters.
This Escape has small alignment marks on the windshield showing the parked blade positions. I aligned each blade with its mark, installed the arm, and tightened the retaining nut to the specified 20 ft-lb before replacing its trim cap.
I then topped off the washer reservoir with bug-cleaning windshield wash suited to the car's Florida destination. Choose washer fluid appropriate for your climate, including the freeze protection you need.
The automatic wipers are a nice feature, but they still depend on good blades, correct alignment, and washer fluid.
Replace the Cabin Air Filter
The cabin air filter sits beneath the passenger-side glove box on this Escape, behind trim and a small Torx-secured cover. Access is cramped, and the old filter needed some careful maneuvering to come out.
It was loaded with pollen and road debris and had visible mold-like contamination. That is not something I wanted the family breathing through.
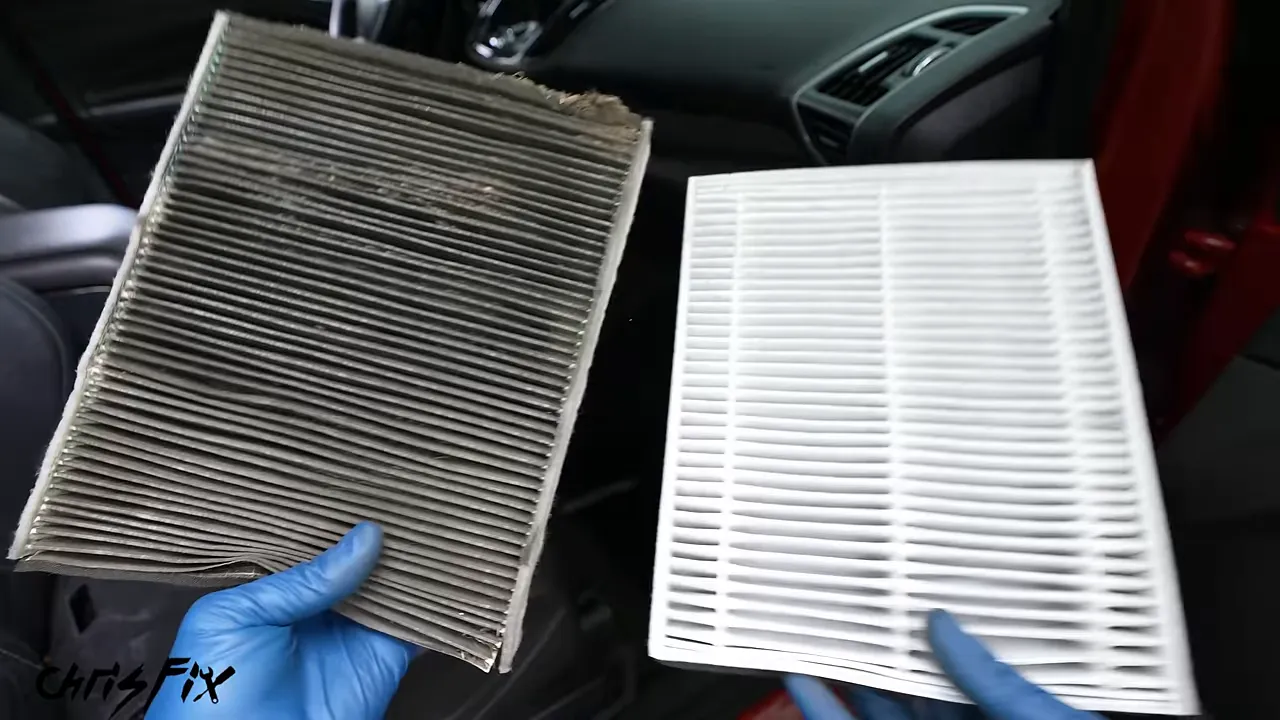
I vacuumed the filter housing and surrounding carpet before installing the replacement, which had an antimicrobial coating. Follow the housing's airflow direction and the replacement filter's arrow, rather than assuming the arrow always points up.
Slide it in without crushing the pleats, then reinstall the cover and fastener. The engine air filter and cabin air filter do different jobs, so checking one does not take care of the other.
The fuel filter on this car is part of the fuel-pump assembly rather than a separate routine replacement item. The accessory belt had also been replaced recently, so it did not need another replacement.
Hardwire a Dash Camera Without Leaving Loose Wires
I consider a dash camera a really useful addition for a new driver. A recording can help document a collision or another incident, although its usefulness depends on what the camera actually captures.
Instead of using a power-outlet adapter with a cable hanging across the dashboard, I installed a compatible hardwire kit at the passenger-side fuse box.
Find a Suitable Switched Power Source
The goal here was for the camera to turn on with the car and shut off when the car was off.
- Set a multimeter to DC volts.
- Connect the black probe to a suitable bare-metal ground.
- Probe the fuse test points with the ignition off.
- Identify a suitable circuit with no power in that state.
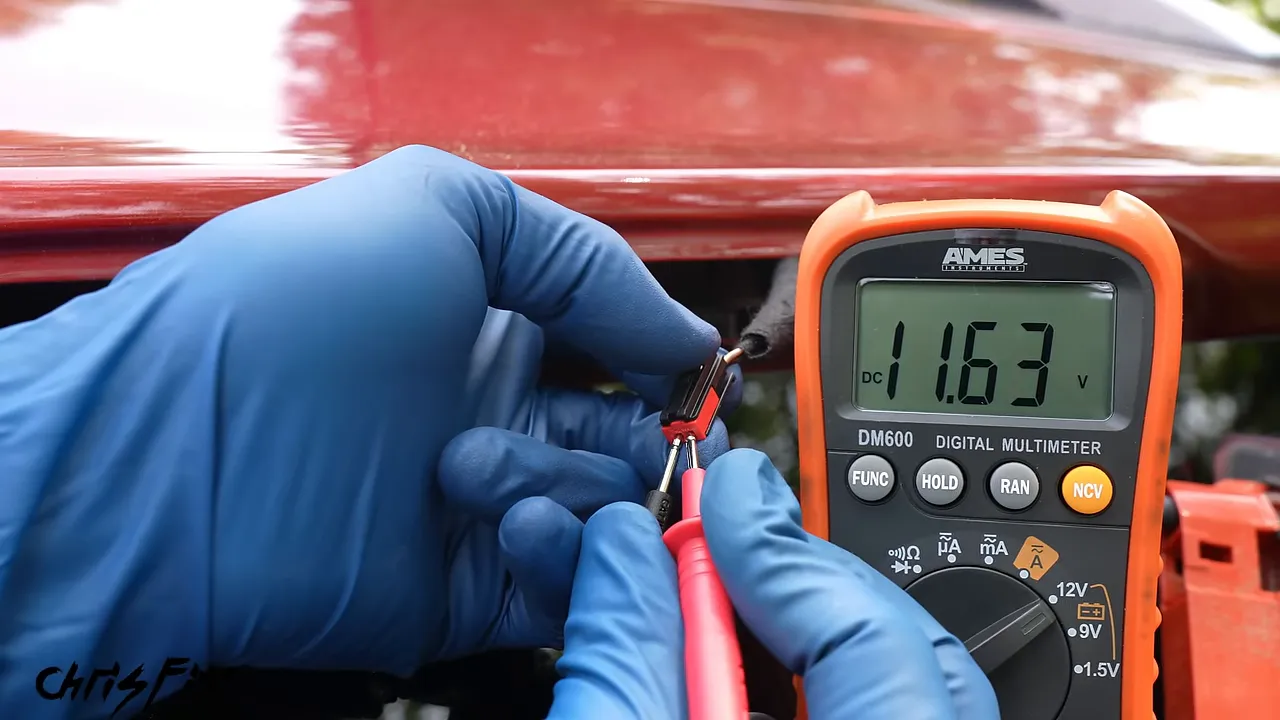
- Turn the ignition on and confirm that the circuit now receives approximately 12 volts.
On this Escape, the selected position had a 7.5-amp fuse. That is not a universal fuse location or dash-camera fuse recommendation. Identify the circuit, confirm it is suitable, and avoid interfering with safety-critical systems.
I installed the original fuse in the appropriate fuse-tap position and connected the hardwire kit's positive wire. The kit's ground wire attached securely to a suitable metal grounding point. Use the correct fuse-tap orientation and separate camera fuse specified for the installation.
Hide the Cable and Aim the Camera
I routed the cable from the glove-box area toward the passenger-side A-pillar, then along the headliner to the rearview mirror. A plastic trim tool helped tuck it neatly into place.
Keep wiring clear of curtain airbags and their deployment paths. Do not blindly push a cable behind pillar trim without understanding what is behind it.
The compact camera mounted near the mirror, clear of the windshield's black dotted area. Before pressing the adhesive mount into place, I checked the live image to make sure it was level and properly aimed.
The camera and hardwire kit used for this project cost about $100 together at the time. The recorded footage included speed and location, giving the family a useful additional record without cluttering the cabin with wiring.
Clean the Radiator, Condenser, and Intercooler
During a drive, I noticed the coolant-temperature gauge sitting slightly higher than expected. Looking behind the bumper revealed a cooling-airflow problem: leaves and road debris had collected around the intercooler, air-conditioning condenser, and radiator.
There was even a trapped bird. A quick surface cleaning was not going to take care of this mess.
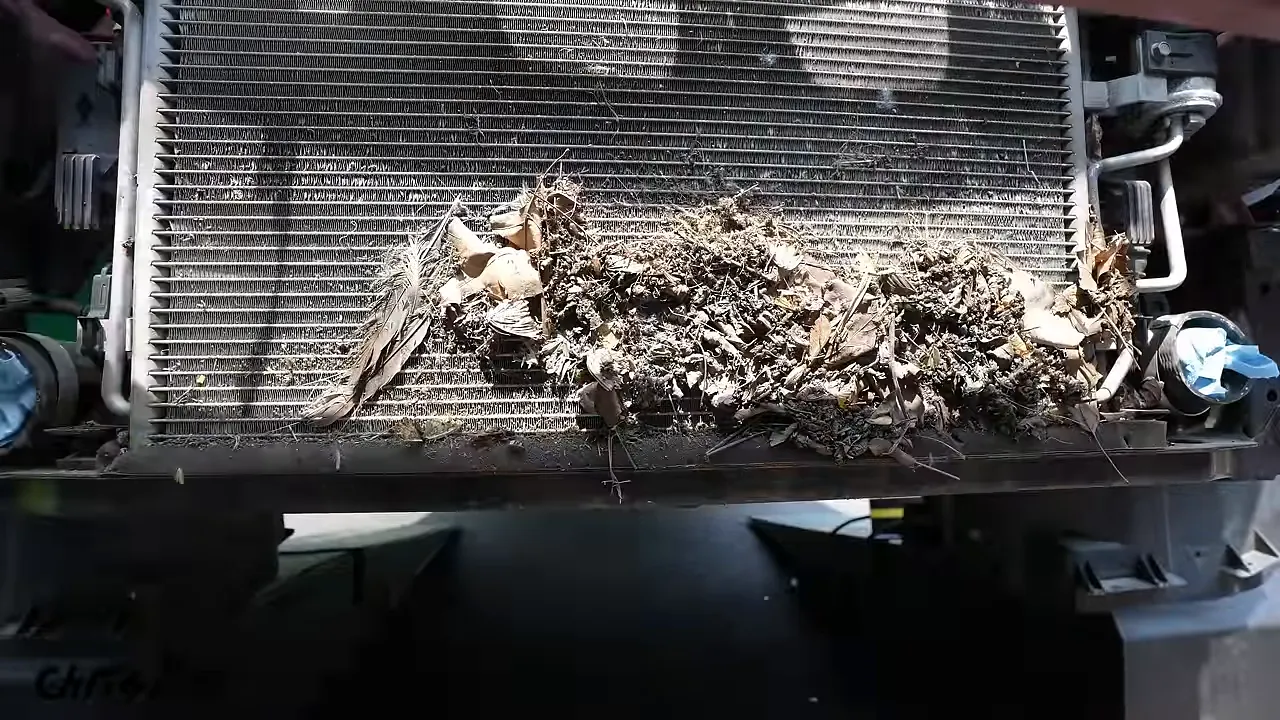
I removed the necessary front components and intercooler for access, covering the open intake connections to keep dirt out. Then I carefully removed the debris and rinsed through the fins with a hose.
Use gentle pressure. Bending the thin fins restricts airflow, which defeats the purpose of cleaning them. The same care applies to the intercooler: clean each section without damaging it.
After cleaning, I removed the protective rags from the intake piping, reinstalled the intercooler, and refitted the air ducting.
With the bumper cover already off, I also replaced both cracked fog-light assemblies. Combining access-dependent jobs saves time, provided you still verify each repair before reassembly.
Service the Brakes Properly, Including the Fluid
For the family car, I replaced the pads and rotors at all four wheels and flushed the brake fluid. I selected galvanized, mechanically attached pads meeting the intended original-equipment requirements.
Brake work is safety-critical. Use the exact service procedure, fastener specifications, piston-retraction method, and bleeding sequence for your car. If you cannot confidently verify the finished work, get qualified help before driving.
Replace the Pads and Rotors
The rear brake service showed the main steps:
- Remove the caliper retaining spring and required caliper fasteners.
- Support the caliper so it does not hang from the brake hose.
- Remove the pads, caliper bracket, and old rotor.
- Clean rust from the hub mounting face so the new rotor sits flat.
- Prepare the new rotor according to its manufacturer's instructions. These rotors needed their protective coating cleaned from both faces with brake cleaner.
- Install the rotor and caliper bracket.
- Use the specified thread treatment and torque for the bracket bolts. The rear bracket bolts here were tightened to 70 ft-lb.
- Retract the piston using the correct tool and method. These rear pistons required simultaneous turning and pressure.
- Install the pads with their friction material facing the rotor.
- Clean and lubricate the guide pins with an appropriate rubber-compatible brake lubricant.
- Reinstall and torque the caliper fasteners, then fit the retaining spring.
A rusty hub face can contribute to rotor runout and brake pulsation. Sticking guide pins can prevent the caliper from moving freely. These little details make a big difference.
Use only the lubricant and application points approved for the brake components. Keep all grease and anti-seize off the friction material, rotor braking surfaces, and wheel studs.
Flush and Bleed the Brake Fluid
The old fluid was much darker than the fresh fluid. More importantly, brake fluid absorbs moisture over time. That moisture lowers its boiling point and can contribute to internal corrosion. Under high heat, boiling fluid can create vapor and seriously reduce braking performance.
I attached clear tubing at the bleeder and refreshed the fluid at each wheel while keeping the master-cylinder reservoir supplied with the specified fresh fluid.
Never let the reservoir run dry. Introducing air can turn a straightforward fluid service into a more involved bleeding job. Use the manufacturer's bleeding order and a proper pressure, vacuum, two-person, or suitable one-person method. An open bleeder with an unsecured hose is not a complete bleeding setup.
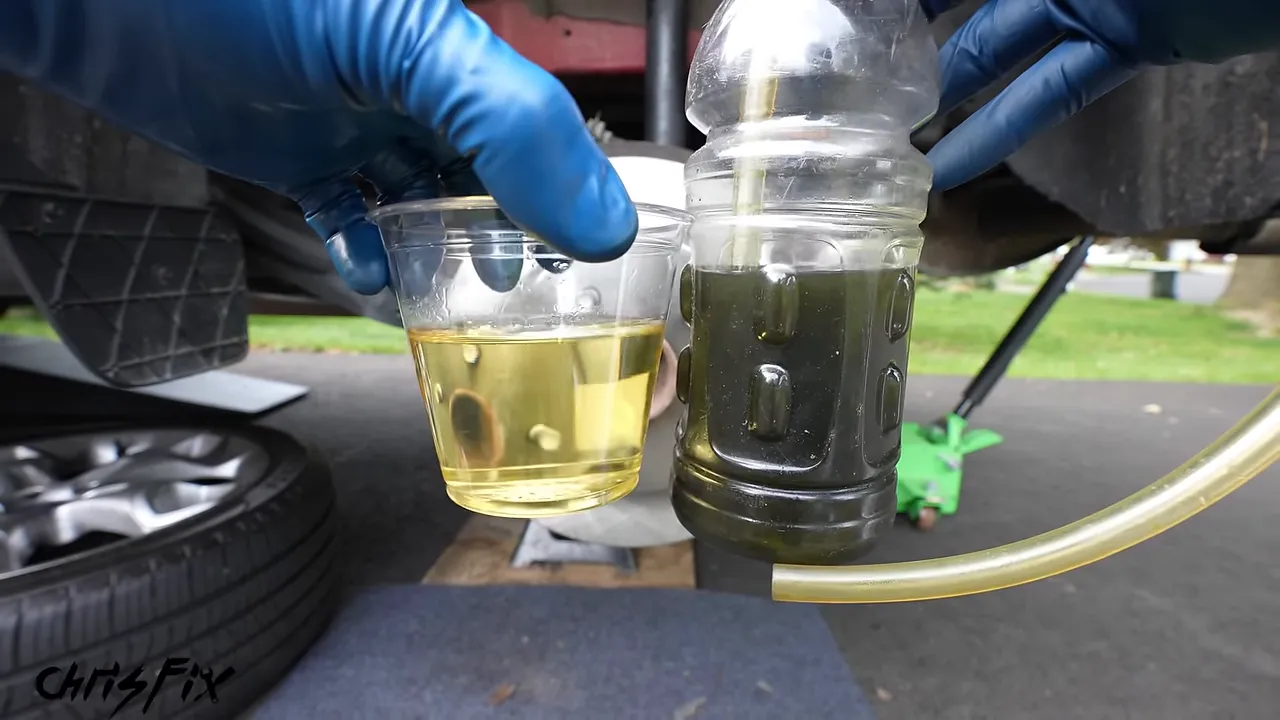
After finishing all four corners, confirm that the bleeders are closed, the fluid level is correct, there are no leaks, and the pedal is firm. Restore normal pad contact with the pedal before moving the car, then follow the pad and rotor manufacturer's bedding instructions.
Check Every Tire, Especially the Spare
Fresh brakes are only as useful as the tires connecting the car to the road. I started with the one tire people forget: the spare.
It had only 6 psi. That is basically a flat tire waiting for the moment you need it most. I inflated this temporary spare to its specified 60 psi.
Use the pressure specified for your own spare. For the road tires, use the vehicle's recommended cold pressures, not the maximum pressure molded into the tire sidewall.
Read the Tire Date Code
Find the DOT marking and the four-digit manufacturing date code. On this car, 2422 meant the tire was manufactured during the 24th week of 2022.
Age matters even when tread remains. I treat tires around six years old as needing closer attention and would not keep using tires more than ten years old. Follow the vehicle and tire manufacturers' age recommendations, and inspect for cracking, damage, and deterioration.
Check Tread Depth and Wear Across the Whole Tire
A quarter gives a quick tread reference. Insert it with George Washington's head upside down. If the tread reaches only about the top of his head, you are around 4/32 inch, a useful warning point for declining wet-weather performance rather than a universal legal limit.
Check multiple grooves across the width and at several points around the tire. You want adequate depth and an even wear pattern, not one worn shoulder or a worn center.
The Escape's road tires were relatively new, had plenty of tread, and showed even wear, so replacement was unnecessary. For additional inspection guidance, NHTSA's tire-safety resource covers pressure, aging, and tire care.
Check the VIN for Open Recalls
A car can run beautifully and still have an unresolved safety defect. Enter its VIN into the NHTSA recall lookup and check for incomplete recalls.
This Escape had two open recalls:
- Door latches: A defective latch could allow a door to open while driving.
- Shift-cable bushing: A damaged or missing bushing could prevent the transmission from actually entering Park even when the selector indicated Park.
I took the car to Ford for the recall repairs. The technician replaced the defective shift-cable bushing and installed the retaining cap, then replaced the affected door-latch mechanism.
The recall work was completed at no charge. Do not assume a previous owner already had it done. Check the VIN and arrange any open repairs with the appropriate dealer.
Finish With a Road Test and Investigate Any Vibration
Once the Escape arrived in Florida, my friend Jamie noticed a slight steering-wheel shimmy at highway speed. He brought it to Elite Motorworks and road-force balanced all four tires.
Road-force balancing adds a loaded roller to the balancing process, helping assess how the tire and wheel behave under simulated road load. The equipment also recommended wheel positions to reduce pull.
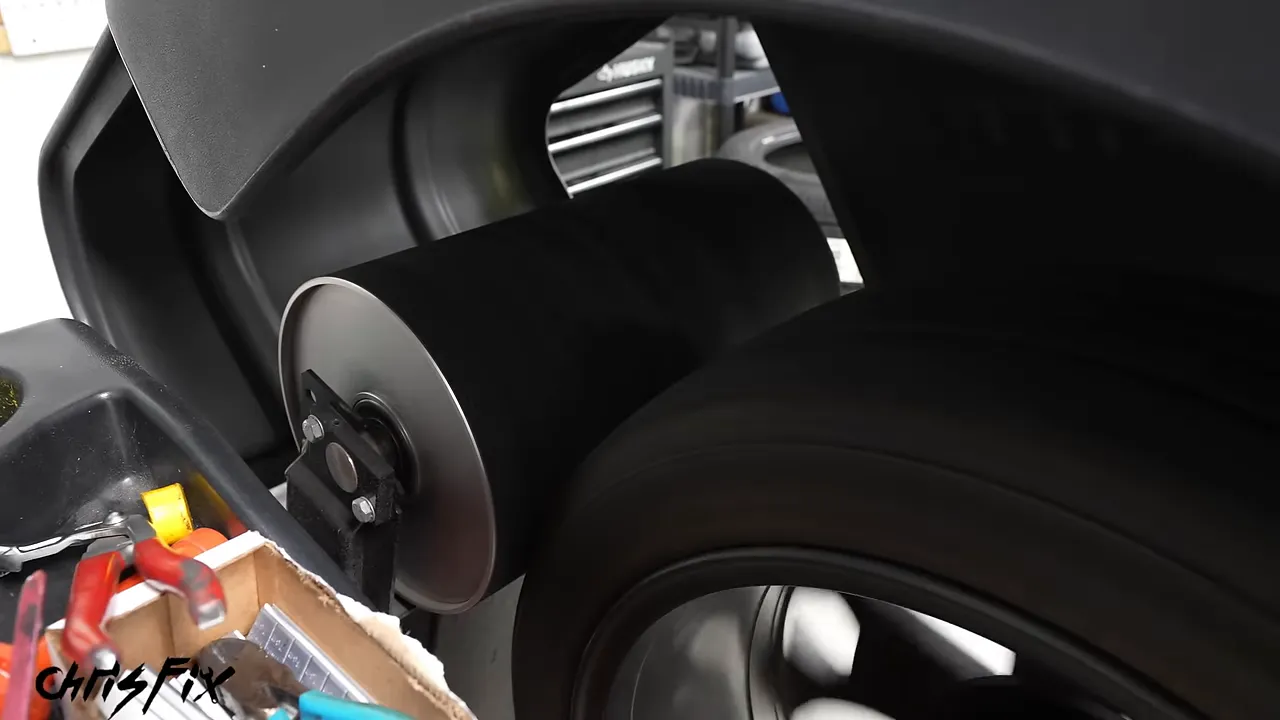
After balancing, the steering wheel was smooth on the follow-up drive.
That final road test matters. A scan tool and a completed checklist do not tell you everything about how a car feels at highway speed. Listen for noises, pay attention to temperature, check braking behavior, and investigate anything that is not right.
A Maintained First Car, Ready for Its New Family
By delivery day, the Escape had fresh fluids, filters, spark plugs, brakes, wipers, working lights, a functioning reverse camera, a hardwired dash camera, a tested and upgraded battery, a repaired turbo, clean cooling components, completed recalls, and balanced wheels.
I also packed a Tang Tools toolkit with screwdrivers, pliers, wrenches, sockets, ratchets, and other useful tools. The idea was to help the family save money on future repairs and maybe discover a new hobby along the way.
They thought I was visiting for an interview. While we talked inside, the Building Homes for Heroes team brought the Escape into the driveway and added a big bow.
Then I learned something I had not expected: their Kia Soul had suffered a major engine failure just two days earlier, leaving their only car undrivable. The timing gave me goosebumps.
Handing over the keys was incredible. They explored the push-button start, heated seats, navigation, dual-zone climate control, panoramic sunroof, and hands-free liftgate. I made sure they had two keys, too, because losing a key is a problem I remember from being a first-time driver.
All the repairs led to that moment, but the approach works for any first car: inspect it, diagnose problems, catch up on maintenance, verify safety systems, and test the finished result. You do not need every optional upgrade used here. You do need to know the condition of the car you are trusting.
Helping More Families Through Building Homes for Heroes
The support extended beyond the car. PEAK donated $10,000 to Building Homes for Heroes, Tavarish contributed another $10,000, and I donated $30,000 to help more families.
The organization provides mortgage-free homes, modifies homes for severely wounded veterans and first responders, and supports families of those who made the ultimate sacrifice. At the time of this project, I highlighted its 100% charity rating and reported that 95 cents of each donated dollar went directly toward its cause.
If learning to maintain your own car has helped you save money and you are able to spare a few dollars, helping another family is an awesome way to put some of those savings to work.
|


