A quick release steering wheel does more than make your track car look like a race car. When you have a roll cage, a fixed bucket seat, and all your racing gear on, removing the steering wheel can make a huge difference in how easily you get in and out.
In this BMW, the cage door bars and halo racing seat leave very little room to move. With the stock wheel in place, getting into the seat means feeding one leg in at a time and shifting your body around the wheel. Getting out is just as awkward. That is not what you want if you need to exit quickly.
The installation involves three main components: a vehicle-specific hub adapter, a quick release, and a steering wheel. I’ll cover how they fit together, how to retain a working horn, and how to add a steering-wheel-mounted radio button without letting its cable tangle around the column.
What You'll Learn
- Keep the factory airbag in a street car originally equipped with one.
- Match the hub, quick release, and wheel for vehicle fitment and bolt-pattern compatibility.
- Preserve clock-spring alignment and insulate horn connections throughout the installation.
- Test steering movement, release engagement, horn operation, and cable clearance before finishing.
Table of Contents
- First, Know When a Quick Release Is Appropriate
- Parts and Tools You Need
- Choose the Right Steering Wheel Before Installing It
- 1. Center the Steering and Disconnect the Battery
- 2. Remove the Factory Airbag
- 3. Identify the Horn Circuit
- 4. Remove the Original Steering Wheel
- 5. Install the Hub Adapter
- 6. Wire and Mount the Quick Release
- 7. Mount the Wheel and Connect the Horn Button
- 8. Add a Steering-Wheel Push-to-Talk Button
- 9. Investigate Any Clicking or Binding
- 10. Fit a Wheel Hanger and Complete the Final Checks
First, Know When a Quick Release Is Appropriate
If your street car came with an airbag, do not remove it to install a quick release steering wheel. The airbag is part of the car’s overall crash-protection system. Removing it can leave you without protection the vehicle was designed to provide.
You can still have a custom steering wheel while retaining the factory airbag. Examples include custom upholstery, carbon-fiber trim, stitching, and a reshaped rim. The custom wheels I have for the Del Sol and DriftStang retain their stock airbags, and one also incorporates an RPM display.
A dedicated track car is a different application. In this BMW, the roll cage, racing seat, six-point harness, helmet, and head-and-neck restraint are intended to work together as a racing safety system. A quick release makes sense as part of that complete setup, not as a substitute for an airbag in an otherwise stock street car.
An older car that never had an airbag is another possible application, but component quality and proper installation still matter. For more background on factory restraints, see NHTSA’s airbag safety information.
Parts and Tools You Need
Most of this job uses common hand tools. The important part is buying compatible components and having the correct installation specifications before you start.
The three main components
- Hub adapter: Fits the splines on your vehicle’s steering shaft. This must match your specific application. I’m using a Momo hub adapter for the BMW E46.
- Quick release assembly: Connects the hub adapter to the removable wheel. This installation uses an NRG quick release with horn contacts.
- Steering wheel: Must have a bolt pattern that matches the wheel side of the quick release.
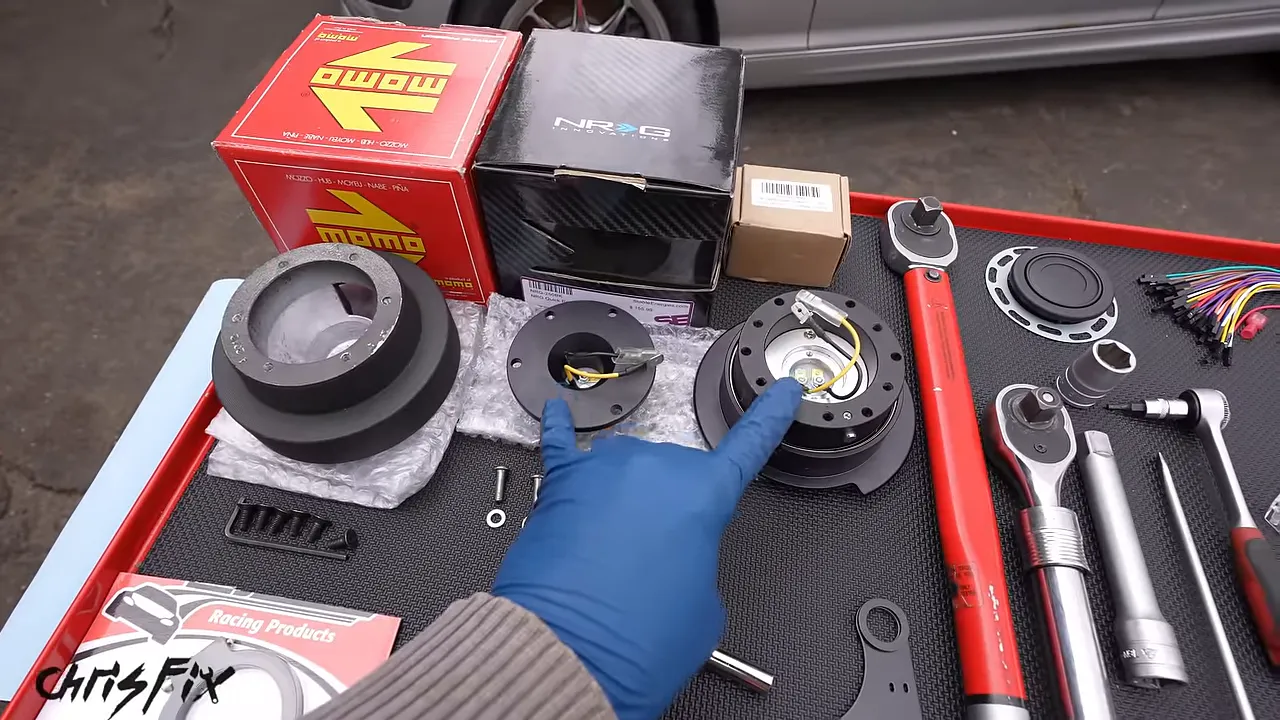
Tools and installation supplies
- Safety glasses.
- Ratchet, sockets, and the appropriate drivers for your fasteners.
- Torque wrench.
- Flathead screwdriver and electrical tape for protecting trim.
- Medium-strength threadlocker, where specified for the installation.
- Wire cutters, wire strippers, and a crimping tool.
- Insulated male and female blade connectors.
- Suitable pin connectors for the horn connection at the clock spring.
- Liquid electrical tape, used here to help retain the horn pin connectors.
- A steering wheel puller if your original wheel requires one.
For the optional radio button, you will also need the button, a mounting plate, its washer and jam nuts, zip ties, and a drill for the cable-routing attachment. A roll-cage-mounted wheel hanger gives the removed wheel somewhere convenient to go.
Do not cheap out on the steering wheel. At the time of this installation, there was no general FIA or SFI steering-wheel certification to rely on, so choosing a reputable manufacturer was especially important. My friend ThatDudeinBlue had a wheel break while pulling on it during removal. A steering wheel should not come apart that easily.
I chose an OMP wheel because it is a known racing brand, and I already use its racing seat and fire-suppression equipment. The point is not that every wheel must be the same brand. It is that this is a critical control, not just an interior accessory.
Choose the Right Steering Wheel Before Installing It
Five things determine whether a wheel works well in your car: material, shape, diameter, dish, and bolt pattern.
1. Material: suede or leather
For wheel-to-wheel racing, I want a grippy surface, so I’m using suede. Drifting is different because you sometimes need the rim to slide through your hands as the steering returns. Leather offers a combination of grip and slip that I prefer for that application.
2. Shape: round or flat-bottom
A round wheel is a good choice for most applications, especially when you regularly rotate the wheel more than 180 degrees. A flat-bottom wheel can provide extra leg clearance in a tight cockpit.
There is enough legroom in this car once the wheel is installed, so I’m sticking with a round wheel.
3. Diameter: clearance and leverage
The stock wheel measures 380 mm across, while the aftermarket wheel is 350 mm. The smaller rim takes up less space and can feel more responsive because your hands travel a shorter distance around the rim for the same steering-shaft rotation.
A smaller wheel does not change the steering rack’s ratio. It does reduce leverage, so steering effort increases. That matters especially if you do not have power steering. A larger wheel provides more leverage and may suit an application where you prefer less sensitive-feeling hand inputs, such as high-speed straight-line driving.
4. Dish: where the rim sits relative to you
Dish is the distance between the wheel’s mounting surface and its grip surface. A deep-dish wheel moves the rim closer to the driver than a shallow-dish wheel mounted on the same hardware.
That is important with a fixed racing seat. This seat is bolted to the chassis and does not slide, so wheel dish helps determine the final reach.
- Sit fully back in the seat.
- Extend your arms over the top of the wheel.
- Check that the rim meets your arms around the wrists.
- Hold the wheel at nine and three and check for a comfortable bend in your elbows.
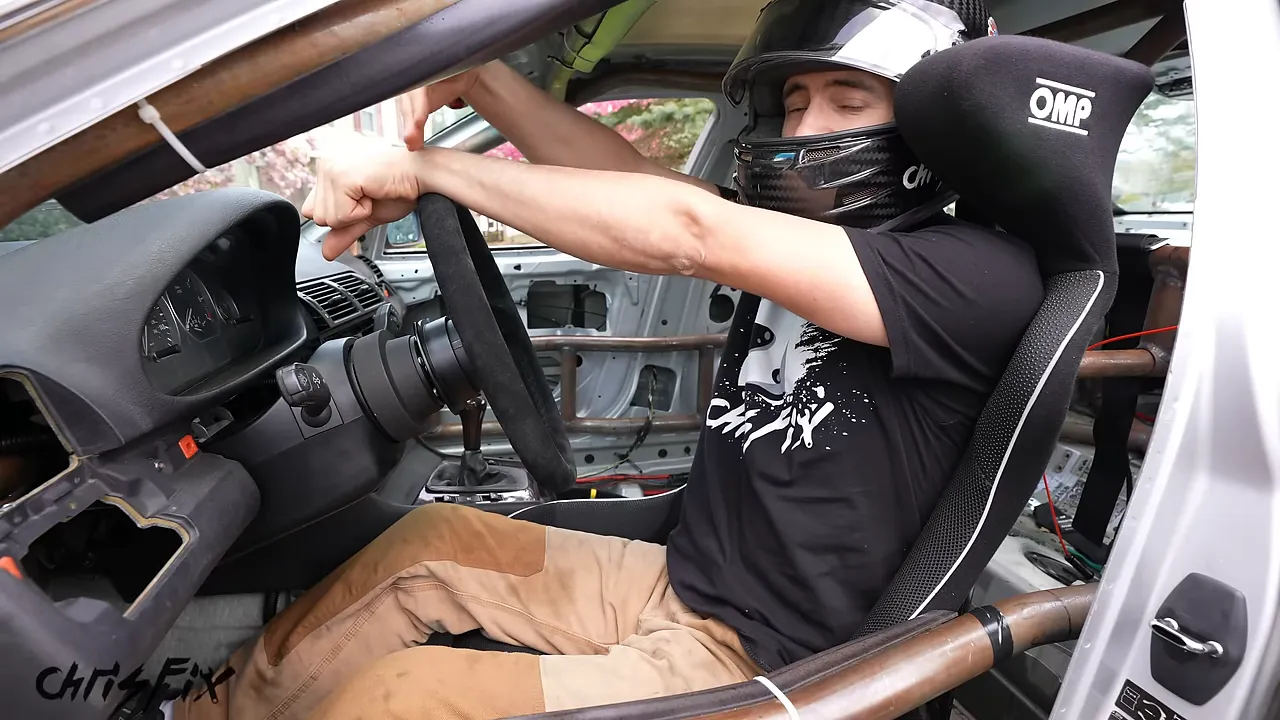
You do not want your arms locked straight, and you do not want your elbows tucked tightly into your body. The deep-dish wheel puts the rim too close to me in this car. The shallow-dish wheel gives me the better position.
5. Bolt pattern: make all the interfaces match
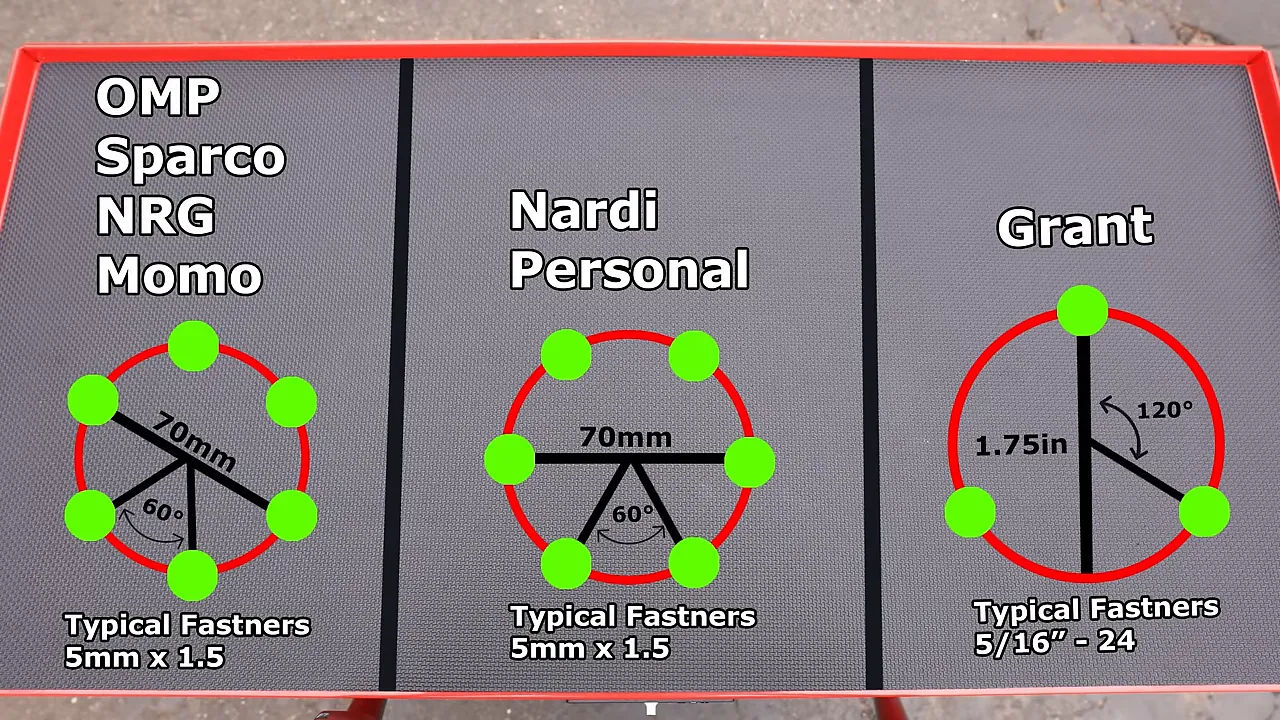
Not every aftermarket wheel uses the same bolt pattern. The wheel must match the removable side of the quick release, and the column side of the quick release must match the hub adapter.
Common patterns include the six-bolt patterns associated with OMP, Sparco, NRG, and Momo; the different six-bolt pattern associated with Nardi and Personal; and the three-bolt Grant pattern. Check the actual specifications of your parts rather than assuming that the same number of holes means they fit.
1. Center the Steering and Disconnect the Battery
Before removing anything, straighten the steering wheel and verify that the front tires point straight ahead. This gives you the reference you need to install the new hub without leaving the wheel crooked.
On this BMW, I turn the key to the run position to straighten the steering, remove the key, and move the wheel slightly until the steering lock engages. That keeps the wheel from moving accidentally. Follow your vehicle’s service procedure for holding the steering during fastener removal.
Next, disconnect the battery’s negative cable. The terminal nut on this car takes a 10 mm tool. Move the cable aside so it cannot accidentally contact the battery post.
The waiting period used here before airbag removal is 15 to 20 minutes, allowing stored energy in the system to discharge. Use the airbag disabling procedure and waiting time specified for your vehicle. Do not assume disconnecting the battery makes an airbag immediately safe to handle.
2. Remove the Factory Airbag
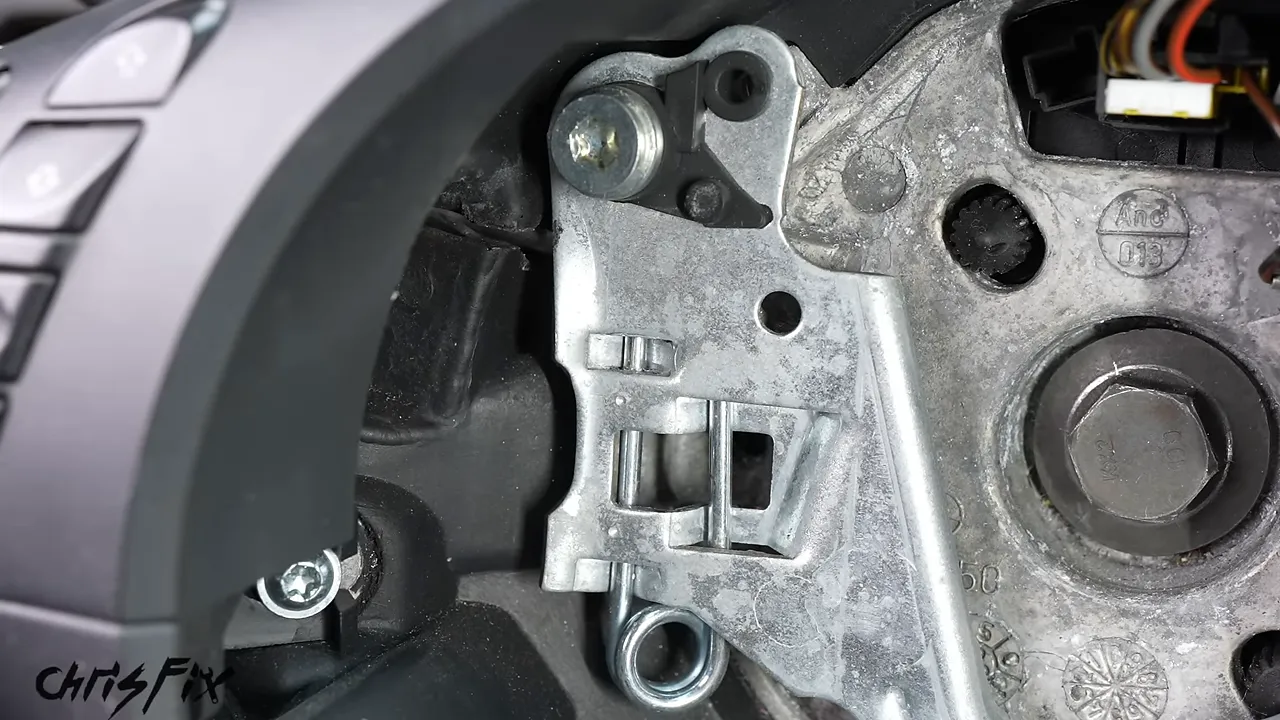
Airbag retention differs between vehicles. The BMW uses spring clips, while the Toyota example uses screws behind small trim covers.
BMW spring-clip removal
- Locate the access hole on each side of the steering wheel.
- Insert a flathead screwdriver through one hole and push against the retaining spring.
- Ease that side of the airbag outward.
- Repeat on the other side while supporting the airbag.
- Lift the small locking retainers on the airbag connectors, then disconnect the plugs.
The screwdriver moves the spring sideways to release the airbag. You are releasing a retainer, not trying to pry the airbag out by force.
Screw-retained airbag removal
On the Toyota, small plastic covers hide the retaining screws. Wrapping the screwdriver tip in electrical tape helps protect the plastic while lifting those covers.
Loosen the screw on each side, then carefully lift the airbag out. Some screws are captive and remain in the wheel after they are fully loosened. Release the connector locks before unplugging the airbag, and disconnect any separate ground lead required by that assembly.
Place the removed airbag with its padded deployment side facing upward, never face down. Keep it in a secure location and continue treating it as a live safety device. Facing it upward reduces the risk of the entire module being propelled if it deploys unexpectedly; it does not make accidental deployment harmless.
3. Identify the Horn Circuit
Before removing the original wheel, work out how its horn switch operates. In this BMW, pressing the airbag pushes a metal plate against another contact, closing the horn circuit.
Two wires connect to those contacts. Tracing them through the original wheel’s harness identifies a brown-and-orange wire and a brown-and-black wire at adjacent end positions in the connector.
Those colors and pin locations apply to this BMW, not every car. Confirm your vehicle’s wiring before making connections. Do not guess at pins in a connector that also carries airbag wiring.
For this installation, I use breadboard-style pin connectors to connect to the identified horn terminals at the clock spring. During a brief powered test, touching the two horn jumper ends together sounds the horn, confirming the circuit.
That test is only for the positively identified horn wires, never the airbag terminals. Keep powered testing separate from disassembly, and return the vehicle to its specified disabled state before continuing work around the restraint wiring.
On this simple two-terminal horn switch, the two jumper colors do not determine polarity. The button simply joins the two sides of the circuit when pressed.
4. Remove the Original Steering Wheel
Disconnect the remaining electrical plugs from the wheel. The BMW’s center retaining bolt takes a 16 mm socket. Remove it, then gently wiggle the wheel and pull outward to slide it off the shaft.
Behind it is the clock spring, which carries electrical connections between the stationary column and rotating wheel.
Do not rotate the clock spring with the wheel removed. Its internal wiring has a limited range of movement. Losing its centered position can damage those wires when the steering is turned later. The BMW has locking clips that hold it in position, but other vehicles may not.
If the wheel needs a puller
Some wheels will not slide off by hand. The DriftStang is an example that requires a steering wheel puller.
- Leave or reinstall the center fastener a few threads into the shaft, as appropriate for the puller setup.
- Select the puller bolts that fit the wheel’s threaded extraction holes.
- Install the correct center attachment so the puller presses against the protected shaft end or fastener.
- Start the mounting bolts by hand to prevent cross-threading.
- Tighten the puller’s center screw until the wheel releases.
- Remove the puller and center fastener, then lift off the wheel.
The puller applies force through the wheel’s intended extraction points instead of relying on hard pulling against the rim.
5. Install the Hub Adapter
Connect the horn jumper wires before installing the hub because access to the clock-spring connector becomes much tighter afterward. On this BMW, the jumpers connect to the two identified adjacent horn pins.
I add a small amount of liquid electrical tape around the jumper connections to help hold them in place. The connectors must already fit securely; the coating is an additional retention measure.
- Feed the horn wires through the center of the hub adapter.
- Find the hub’s top marking.
- Align that marking straight upward while the front wheels remain straight.
- Slide the hub fully onto the shaft splines.
- Apply medium-strength threadlocker to the retaining bolt as specified for this installation.
- Start the bolt by hand, then torque it to the vehicle’s specification.
The center-bolt specification used on this BMW is 46 ft-lb. That is not a universal steering-wheel torque value. Use the specification and fastener requirements for your car.
6. Wire and Mount the Quick Release
The back of the quick release has two horn leads with blade connectors. Fit matching insulated terminals to the jumper wires coming through the hub.
- Cut off the unused jumper ends.
- Strip enough insulation for the new terminals.
- Insert each wire fully into its connector and crimp it.
- Pull on each wire to check the crimp.
- Connect the matching terminals to the quick release’s horn leads.
Give those crimps a proper pull test. A connection that looks good but slips off the wire is not finished.
Check that all conductive metal is covered. You do not want the terminals touching each other or grounding against the hub. Tuck the wiring inside without pinching it between the mounting faces.
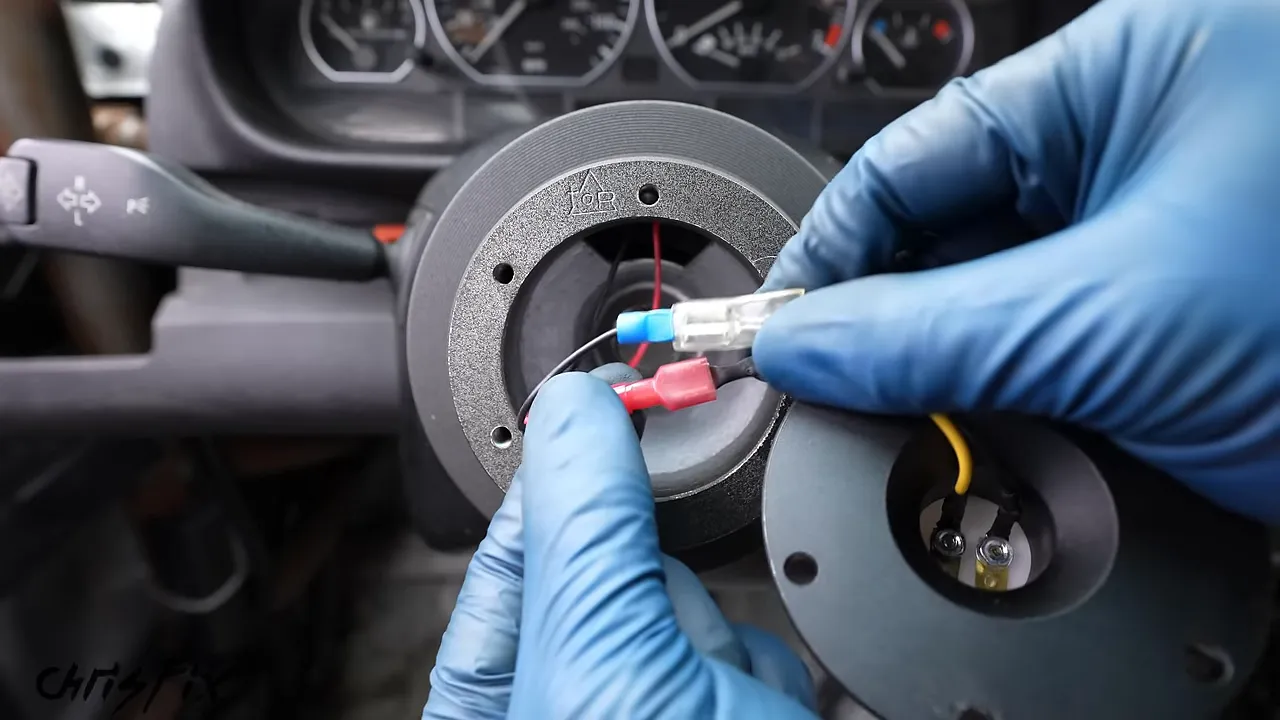
Align the quick release’s top indicator with the top of the hub. This installation uses six M5 × 16 mm screws, which were purchased separately because they did not come with this quick release.
That length fits this combination of components. Verify the required hardware for yours, especially if you add brackets or other parts to the stack.
Apply medium-strength threadlocker where specified, start all six screws by hand, and tighten them progressively in a crisscross pattern. Use the component manufacturer’s tightening requirements rather than simply making the screws as tight as possible.
Fit the removable half of the quick release, aligning its indicator with the column-side indicator. Confirm that it locks securely. Operate the release collar to check that it detaches as intended.
7. Mount the Wheel and Connect the Horn Button
If you are adding a push-button bracket, position it before mounting the wheel. Here, the bracket sits between the steering wheel and the removable quick-release half.
Align the holes, start all six screws by hand, and tighten them in a crisscross pattern so the wheel seats evenly. Use the specified hardware and threadlocker for the assembly.
The horn button has two male terminals. One quick-release lead already has a matching female connector, but the other needs its male terminal replaced with a female terminal.
- Cut off the mismatched terminal.
- Strip the wire and crimp on the correct insulated female connector.
- Pull-test the crimp.
- Push both connectors securely onto the horn button.
- Carefully fit the horn button into the wheel’s center opening.
For this two-terminal button, either horn lead can connect to either terminal. Once the assembly is complete and it is safe to restore power, reconnect the battery and test the horn. Then remove and reinstall the wheel to verify the quick release works too. Beautiful!
8. Add a Steering-Wheel Push-to-Talk Button
A wheel-mounted button can control radio communications or serve as an input for equipment such as a line lock, nitrous system, or two-step. Here, it is strictly a push-to-talk button for the radio.
The old radio button was mounted on the shifter. That meant taking one hand off the wheel to talk to the pits. Moving it within thumb reach keeps both hands where I want them while racing.
Secure the button to its bracket
- Feed the button cable through the mounting bracket.
- Seat the button in the bracket.
- Slide the washer and both jam nuts over the cable.
- Tighten the first nut against the bracket.
- Hold the first nut while tightening the second nut against it.
- Zip-tie the cable to the bracket’s strain-relief holes.
The two nuts jam together to resist loosening. The zip tie prevents a pull on the cable from going directly into the button.
Connect and route the coiled cable
Disconnect the old button at the radio harness connection, plug in the new steering-wheel button, and tuck the stationary wiring behind the dash.
The coiled cable needs room to move with the wheel, but it must not loop around the wiper or turn-signal stalk. To control its path, I attach its stationary end below the steering column.
- Remove the lower steering-column trim by releasing its retaining clips.
- Drill two small holes in the selected lower corner of the removed trim.
- Feed a zip tie through the holes to create an attachment loop.
- Reinstall the trim and its clips.
- Use a second, smaller zip tie to secure the cable to that loop.
This makes servicing easier: I can cut the small zip tie to release the cable without removing the trim again.
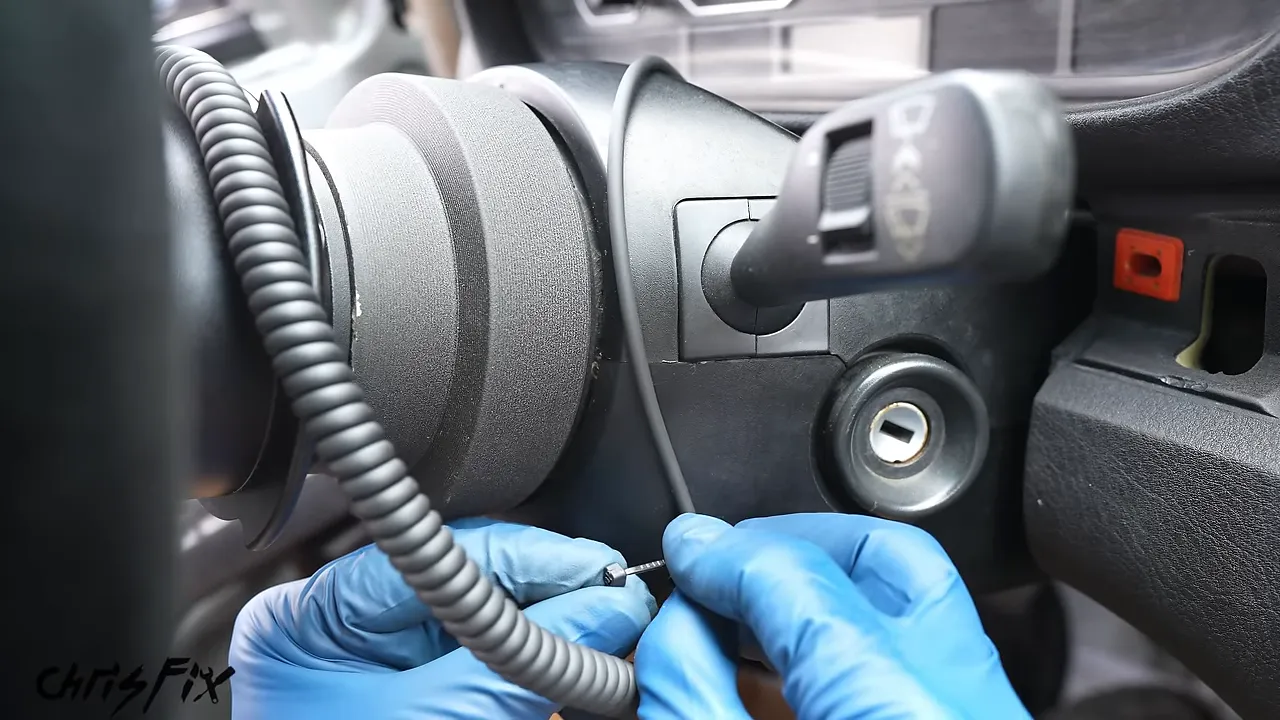
Turn the steering through its operating range and check the cable carefully. It should extend and wrap cleanly without snagging, pulling tight, or interfering with any controls.
9. Investigate Any Clicking or Binding
During the steering check, I hear a clicking noise. This is exactly why the job is not finished just because everything is bolted together.
After removing the wheel, quick release, and hub adapter, I find the cause: the BMW clock-spring locking clips. The factory wheel holds them down, but this aftermarket hub does not. They are interfering as the assembly rotates.
On this particular track-car setup, I remove the interfering clips, then reinstall the hub, torque the center bolt, reconnect the horn, and secure the quick release again.
Do not treat clip removal as a universal installation step. The important lesson is to investigate interference and confirm compatibility between the hub and clock spring. Keep the clock spring centered while it is exposed, and follow the requirements for your components.
After reassembly, the steering moves without that clicking noise, the cable stays clear of the stalks, and the horn still works.
10. Fit a Wheel Hanger and Complete the Final Checks
The last piece is a convenient place to store the wheel. The aluminum hanger clamps around the roll cage and is secured with two bolts. Position it where the wheel is easy to reach and does not obstruct your exit.
With the wheel removed and hung up, getting out of this car is much easier. There is no longer a fixed rim blocking my legs as I move past the cage bars. Getting back into the seat is easier too.
Before calling the installation finished, check the whole system:
- Alignment: The wheel is correctly oriented with the front tires straight.
- Fasteners: The center bolt and mounting screws are secured to the applicable specifications.
- Quick release: The wheel fully locks in place and releases correctly when operated.
- Horn: It works after the wheel has been removed and reinstalled.
- Steering movement: There is no clicking, binding, or interference.
- Cable routing: The radio cable stays clear of the stalks throughout steering movement.
- Driver fit: The wheel provides comfortable reach and elbow position.
- Exit clearance: The removed wheel and its cable do not obstruct getting out.
Finally, test the radio itself. In this car, the radio connects to the antenna, push-to-talk button, and helmet communication equipment. Set the car and pit radios to the same channel, press the wheel-mounted button, and confirm that the team can hear you and you can hear them.
That is the complete setup: a removable steering wheel, a working horn, a radio button within reach, and wiring that stays out of the way. The biggest improvement is not how it looks. It is the extra room you gain when you need to get out of a tightly packaged race car.


