A loud exhaust leak is more than an embarrassing noise. If exhaust fumes are getting into the cabin, you have a problem that needs to be fixed. The good news is that two common exhaust failures can be repaired at home without a welder: a rusted flange connection and a damaged flex pipe.
I’m going to walk you through both repairs using my pickup truck and Jaguar as examples. On the truck, we’ll cut out a badly rusted flange and replace it with a coupler and clamps. On the Jaguar, we’ll replace the entire exhaust section containing the leaking flex pipe with a bolt-on replacement.
The basic recipe is simple: find the leak, choose parts that fit, prepare the sealing surfaces, assemble everything evenly, and check your work with soapy water. Rusty fasteners are usually the toughest part, so I’ll cover those, too.
What You'll Learn
- Replace a severely rusted exhaust flange with a correctly sized coupler and clamps.
- Repair a failed flex pipe by installing a vehicle-specific bolt-on exhaust section.
- Prepare clean mating surfaces and tighten connections evenly to help prevent leaks.
- Check every repaired joint with soapy water for fresh bubbles from escaping exhaust gases.
Table of Contents
- Find the Exhaust Leak and Choose Your Repair
- Tools, Parts, and Safety Preparation
- Method 1: Repair a Rusted Exhaust Flange With a Coupler
- Method 2: Replace an Exhaust Section With a Leaking Flex Pipe
- Final Check: Confirm the Exhaust Repair Is Leak-Free
Find the Exhaust Leak and Choose Your Repair
A damaged flex pipe
A flex pipe allows movement in the exhaust system. Over time, that movement combined with rust can cause the flexible section or its connections to separate.
On my Jaguar, the damage is easy to spot. The braided covering is coming apart, the surrounding metal is rusty, and spraying soapy water around the leaking area produces bubbles as exhaust gases escape.
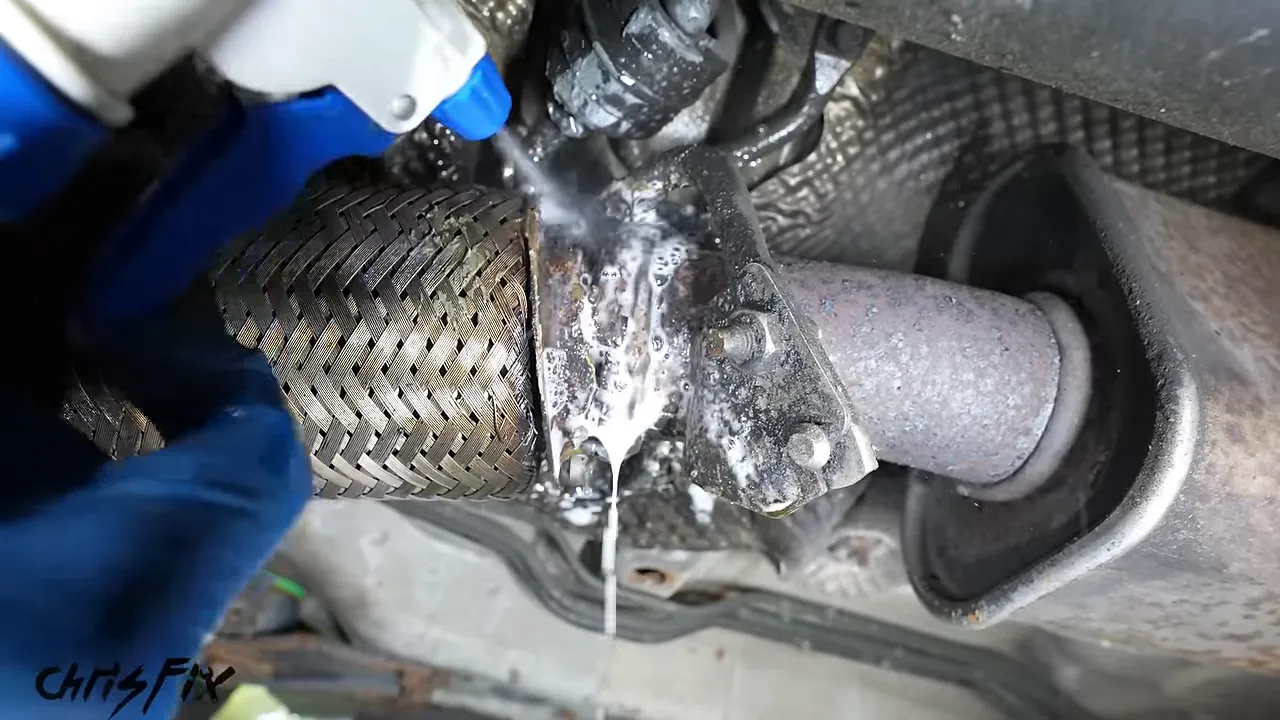
Rather than welding in a separate flex pipe, I’m using a vehicle-specific exhaust section that includes a new one. It connects at the existing flange, hanger, and rear slip joint.
A rusted exhaust flange
A flange is the bolted connection where two sections of exhaust meet. On my truck, both sides of that connection are so badly rusted that simply replacing the bolts or gasket is not going to fix it.
For this repair, I’ll remove the failed flange completely and bridge the remaining pipes with an exhaust coupler. A clamp on each end secures and seals the connection.
If only one side of your flange is damaged and the other side is still usable, a replacement flange repair section may let you cut just one pipe and retain the bolted connection. Choose the repair based on the condition of the metal, not just the location of the noise.
Tools, Parts, and Safety Preparation
You do not need a shop full of specialty tools, but a few extras make rusty exhaust work much easier.
- Common hand tools: Sockets, ratchets, wrenches, locking pliers, a hammer, a punch, and a screwdriver.
- A metal-cutting saw: A hacksaw works, while a reciprocating saw makes cutting exhaust tubing much faster.
- Penetrating fluid: Spray the fasteners you plan to remove a couple of days ahead of time.
- A suitable torch: Heat can help release seized fasteners and rusted slip joints when it is safe to use.
- Extractor sockets: Useful when rust has rounded off bolt heads.
- A digital caliper: Measures the outside diameter of the existing exhaust tubing.
- Sandpaper: Around 180 grit, or something more aggressive, for removing surface rust from the joining areas.
- An exhaust pipe expander: Optional, but helpful if a slip joint is slightly too tight.
- Repair parts: The correct coupler or replacement exhaust section, matching clamps, a gasket where required, and suitable replacement hardware.
- Soapy water in a spray bottle: Used to locate leaks and verify the repair.
- Protective equipment: Safety glasses and a dust mask for rust removal, plus a full face shield when using a cutoff wheel.
Start with an exhaust that is cool to the touch. You do not want to burn yourself while reaching around the pipes. If the vehicle needs lifting, use the correct lifting points, chock the wheels, and support it securely with properly rated ramps, stands, or wheel cribs. Never work beneath a vehicle supported only by a jack.
Heat and cutting tools need extra care underneath a car. Keep flames and sparks away from fuel lines, wiring, rubber components, and flammable materials. Do not apply a torch to wet penetrating fluid, and follow the product’s fire-safety instructions.
Run the engine only outdoors for the brief leak checks. Exhaust contains carbon monoxide, and smell is not a reliable way to judge safety. The CDC’s carbon monoxide guidance explains why vehicle exhaust must be taken seriously.
Method 1: Repair a Rusted Exhaust Flange With a Coupler
1. Measure both pipes before buying parts
Measure the outside diameter of the existing exhaust pipe. Place the caliper’s outside jaws around the tubing and check both sides of the failed connection. Do not assume the two pipes are the same size.
My truck has a 2-inch pipe on one side and a 2½-inch pipe on the other. That means I need a reducing coupler designed to slip over those two outside diameters, along with appropriately sized clamps.
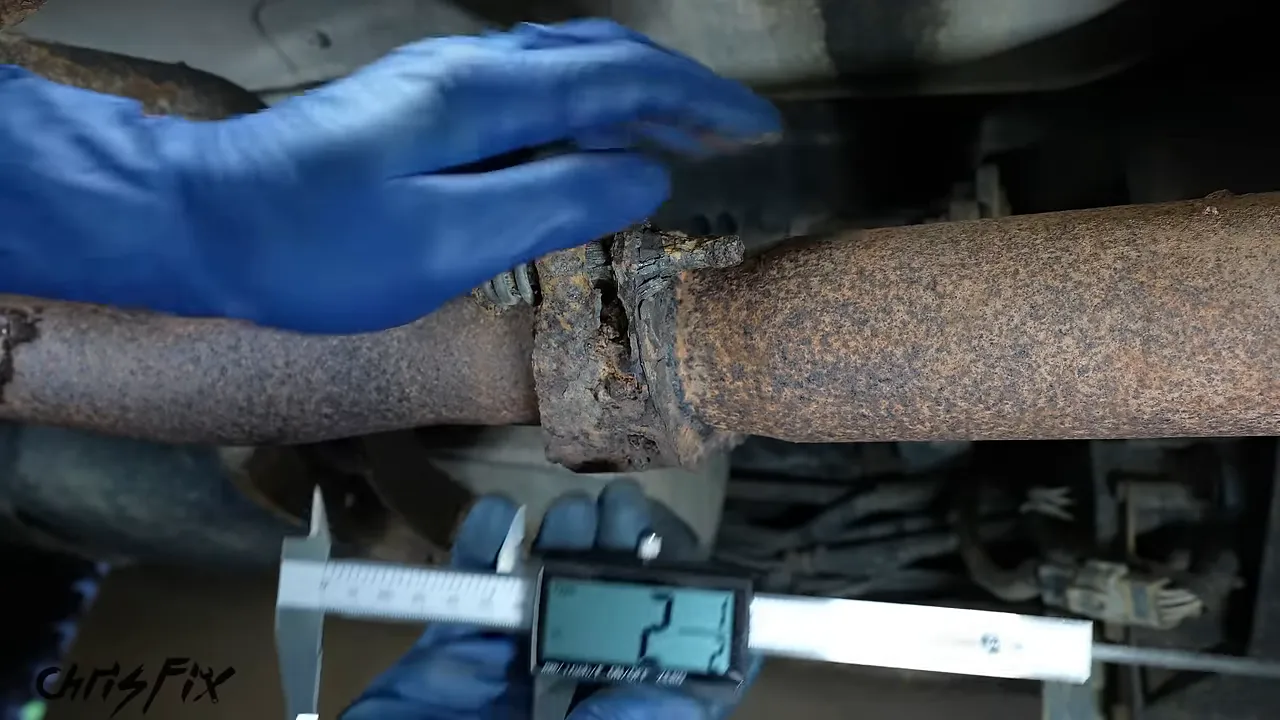
Check the coupler’s fitment description carefully. Its receiving ends need to fit over your existing tubing. Matching the numbers alone is not enough if the part is designed for a different type of connection.
2. Plan the cuts to preserve overlap
Hold the coupler beside the failed flange before cutting. You want to remove the damaged connection while leaving enough sound tubing on both sides for the coupler to overlap securely.
On this truck, the coupler is fairly short, so the cuts need to stay close to the flange. Cutting out too much pipe would leave too little engagement at the joints.
The flange bolts are in the way of those close cuts, so I’m removing them first.
3. Remove rusty or rounded fasteners
For the first bolt, locking pliers hold what is left of the nut while a socket turns the bolt head. Surprisingly, that one comes right out.
The second bolt is too rounded for a regular socket to grip. This is where an extractor socket set comes in handy. The sharp internal edges bite into the damaged fastener instead of relying on intact flats.
- Choose an extractor that fits tightly over the damaged head.
- Tap it onto the bolt head so it bites securely.
- Hold the nut with locking pliers.
- Turn the extractor to loosen and remove the bolt.
In this case, the regular socket was 15 mm, and a 14 mm extractor gave me the tight fit I needed. Your fastener may need a different size. Once it is removed, release the fastener from the extractor using the tool manufacturer’s recommended method.
4. Mark straight cuts and support the exhaust
Here’s a simple trick for cutting exhaust tubing straight: wrap tape evenly around the pipe and use its edge as a guide. Mark both sides of the flange before picking up the saw.
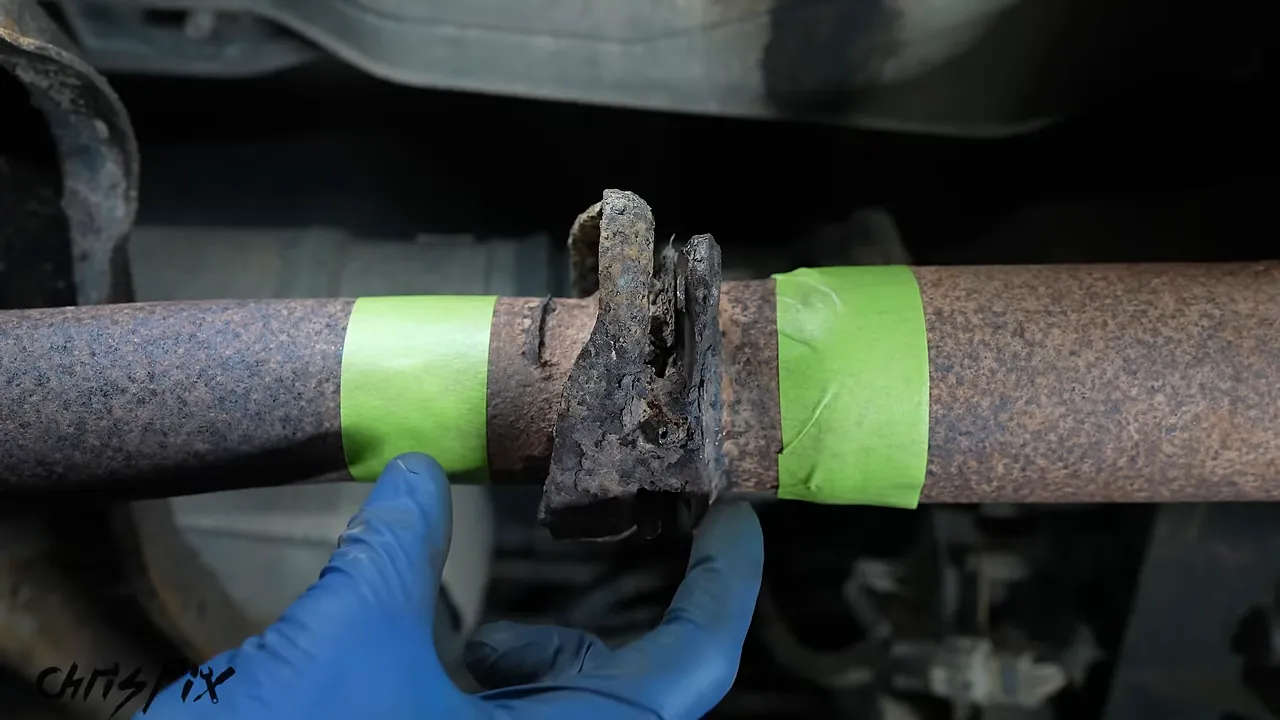
A hacksaw will do the job if you have enough room. In a tight space, removing and repositioning the blade can help you fit the saw around the pipe.
Cut most of the way through the first side, then support the exhaust before finishing the cut. I use a jack stand beneath the pipe so it cannot drop unexpectedly. Cut the other side and remove the old flange.
A reciprocating saw makes the second cut much quicker, but the goal is the same with either tool: a controlled, straight cut that preserves the tubing you need.
5. Clean the pipe surfaces and test-fit the coupler
Rust and rough surfaces make it harder to slide the coupler into place and harder to get a seal. Sand the outside of both pipes where the coupler will overlap.
Wrap the sandpaper around the tubing and pull it back and forth. This is an efficient way to clean a round surface. You want to remove loose rust and leave the joining areas smooth.
Test-fit the coupler on both pipes. It should be snug, but you should not have to damage anything to install it. If light tapping is necessary, place a block of wood against the end and tap the wood. Do not hammer directly on the thin edge of the coupler. That can bend it out of shape.
6. Install the coupler and tighten the clamps evenly
Slide the coupler over one pipe, then bring the other pipe into the opposite end. Make sure both ends have adequate overlap before securing the joints.
Position each clamp over the overlapped tubing near the end of the coupler. Keep the clamp studs pointing upward or to the side rather than down toward the road. Downward-pointing studs give obstacles something to catch.
- Install both nuts on the first clamp by hand.
- Tighten one nut a little, then the other.
- Continue alternating so the clamp compresses evenly.
- Repeat the process on the second joint.
- Follow the clamp manufacturer’s tightening specifications.
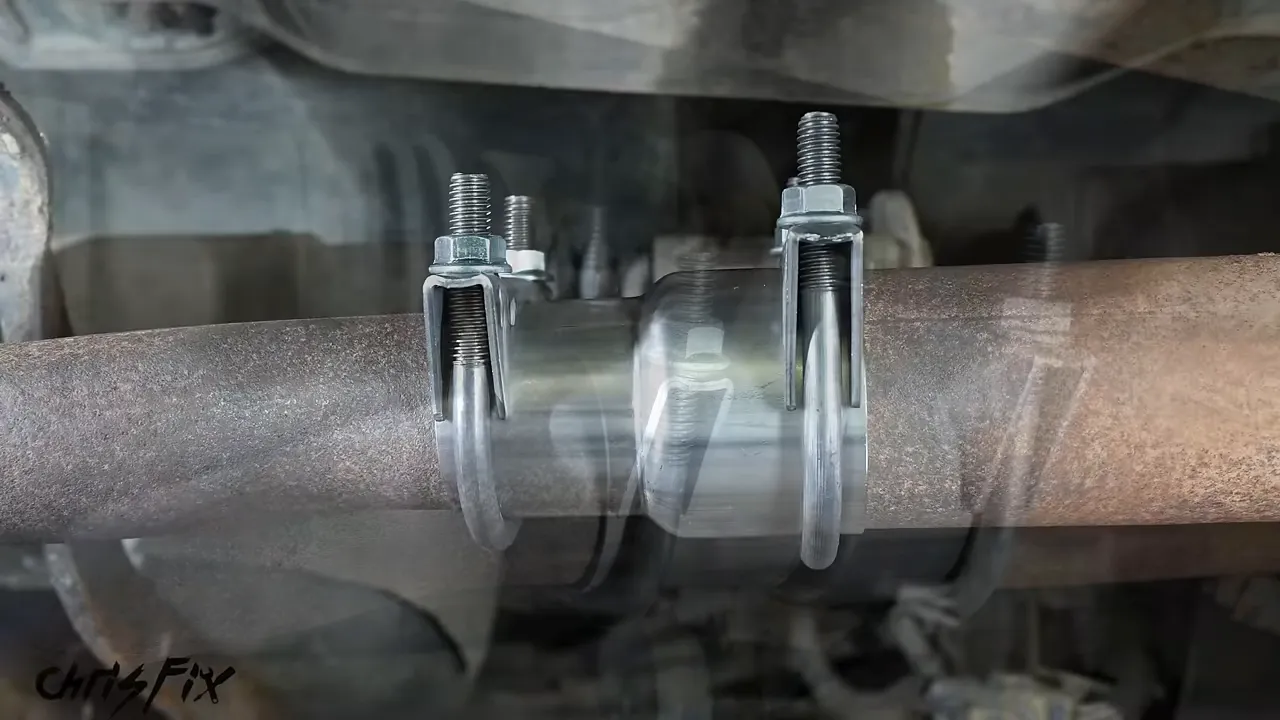
Beautiful. The failed flange is gone, the pipes are connected, and there is no welding involved. Now we need to prove that it seals.
7. Check both joints for leaks
Spray soapy water thoroughly around both connections, start the engine outdoors, and inspect the joints while keeping clear of hot and moving parts.
Look for fresh bubbles growing or repeatedly forming at a specific spot. Foam left behind by the spray alone does not establish that there is a leak.
On my truck, neither connection produces escaping-gas bubbles, and the exhaust is noticeably quieter.
What if the coupler still has a small leak?
A slightly out-of-round pipe or surface imperfections can leave a small leak even after clamping. First check the fit, overlap, surface preparation, and clamp placement.
If the joint needs sealant, use only a product specifically approved for that exhaust location and temperature. With the engine off and the exhaust cold, take the joint apart, apply the compatible sealant to the mating area as directed, and reassemble it.
The RTV approach described for this repair allows 24 hours before starting the engine. Follow your particular product’s application and curing instructions. Sealant is not a substitute for sound tubing, correct sizing, or adequate overlap.
Method 2: Replace an Exhaust Section With a Leaking Flex Pipe
For the Jaguar, I’m replacing the entire section that contains the damaged flex pipe. It is a vehicle-specific, bolt-on part, so there is no need to cut and weld a new flexible section into the old tubing.
My replacement cost about $100 at the time, compared with an approximately $300 exhaust-shop quote. That was roughly $200 saved on this particular job. Your parts and labor costs will depend on the vehicle and location.
1. Identify every connection before removing anything
On this car, the replacement section is held in place by:
- Two bolts at the front flange.
- A bolt at the exhaust hanger.
- A clamp at the rear slip joint leading to the muffler.
I put the front of the car on ramps, chocked the wheels, and supported the rear on wheel cribs to give myself working room. Use a support arrangement appropriate for your vehicle and equipment.
2. Free the rusted front flange bolts
The front fasteners are badly rusted, and there is not much room to work. Rather than fighting a bolt head that has almost disappeared, I start on the nut side, where the wrench has a better grip.
I had already applied penetrating fluid over the previous couple of days. An initial attempt to break the nut loose does not work, so heat is the next step, after making sure the area is safe for a torch.
Heating the nut helps break the rust bond and expands it enough to aid removal. On this repair, heating the nut until it is cherry red allows it to turn with a wrench. That means the hardware is extremely hot, so handle it accordingly.
Once the nut is removed, a hammer and punch drive the seized bolt out of the flange. Repeat for the second fastener, supporting the exhaust as the connection comes apart.
3. Release the hanger and rear clamp
Remove the hanger bolt, lift the exhaust off its mounting peg, and support the loose section on a jack stand. Do not leave its weight pulling on the remaining connection.
At the rear, the old clamp is so corroded that trying to unscrew it is not worth the effort. I cut the clamp instead, taking care not to cut into the pipe that stays on the car.
A hacksaw works here, too. If you use a cutoff wheel, wear safety glasses and a full face shield. Once cut, the rusty clamp may still need careful tapping and prying before it releases.
The slip joint is also rusted together. After safely applying heat to the outer pipe, I can wiggle the old exhaust section back and forth until it separates. Then the entire section comes out from under the car.
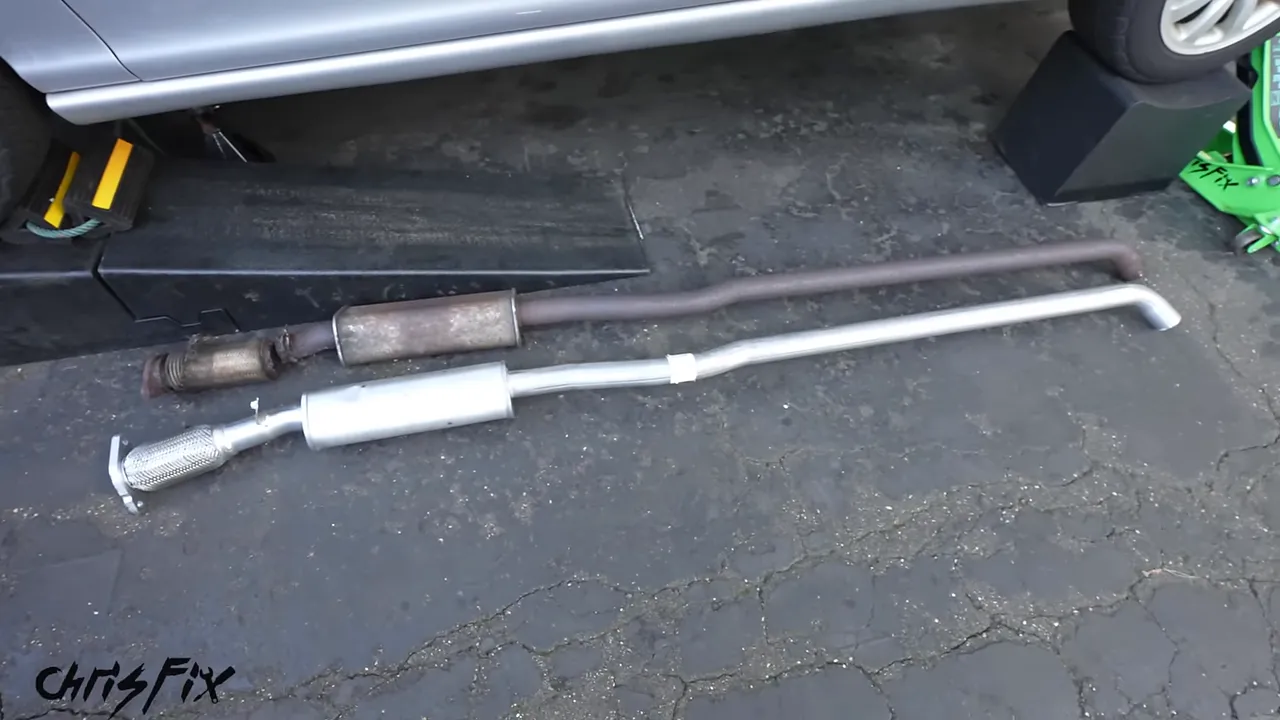
I couldn’t resist hearing both vehicles briefly with the exhaust disconnected. A loud exhaust can sound great, but that is not a repair step. The goal here is a complete, sealed system that keeps the exhaust where it belongs.
4. Install the rear slip joint first
Start installation at the rear because the new pipe needs to slide into the existing pipe leading to the muffler.
Sand the inside of the receiving pipe to remove loose rust. Try the fit before forcing it. On my Jaguar, the joint is still slightly too tight after cleaning, so I use an exhaust pipe expander.
- Insert the expander into the receiving pipe.
- Turn the tool’s drive with a ratchet to expand it gradually.
- Release and remove the tool.
- Test-fit the new pipe again.
Only expand the pipe enough to achieve the needed fit. After that small adjustment, the new section slides in properly.
Do not tighten the rear clamp yet. Leave that joint free to swivel while you lift and align the front flange. Locking the rear connection too early makes alignment much harder.
5. Prepare the front flange and install a new gasket
The remaining front flange is rusty and pitted, so sand its mating surface smooth before connecting the replacement section.
The original connection used a gasket, so I’m installing a new exhaust gasket. Replace the badly corroded hardware with suitable hardware of the correct size and specification.
Put the bolts through the flange and use them to hold the gasket in position. Bring the new exhaust flange into place and start the nuts by hand.
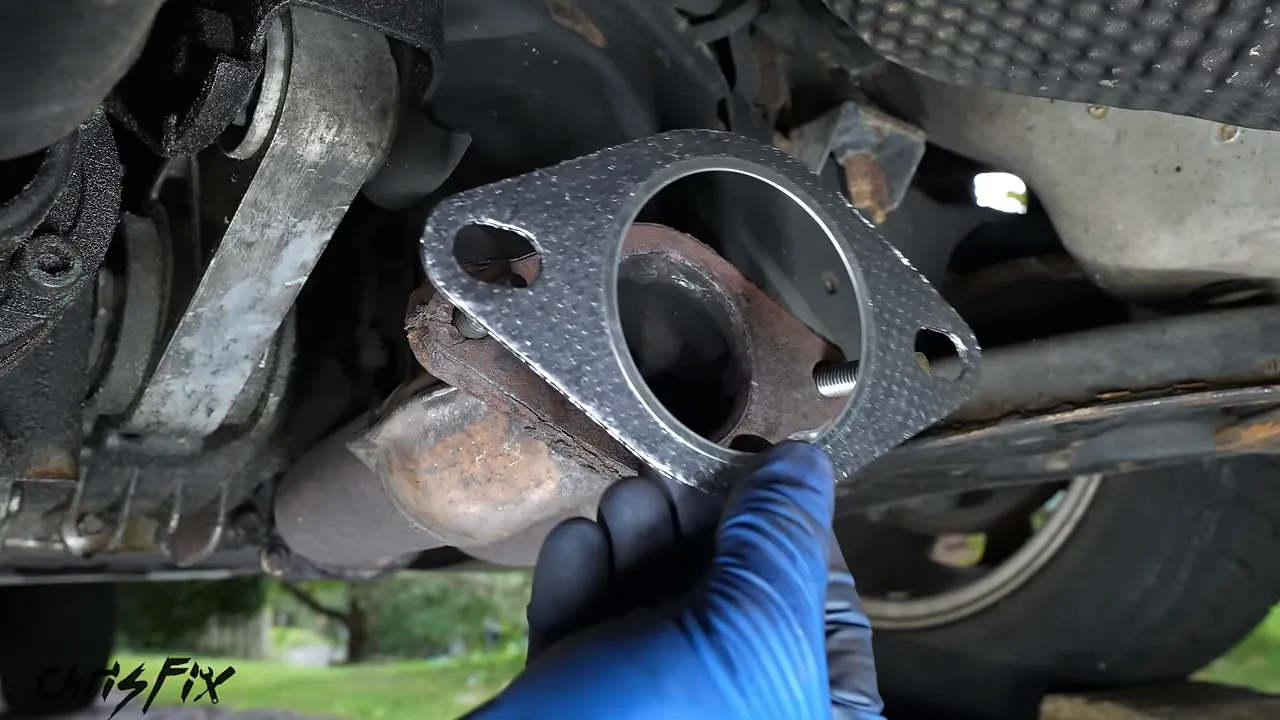
Tighten the nuts a little at a time, alternating between sides so the flanges draw together evenly. Follow the applicable tightening specification rather than trying to crush the gasket with excessive force.
6. Reattach the hanger, then secure the rear joint
With the front flange connected, lift the exhaust slightly and engage the hanger peg. Install and tighten the hanger bolt so the section is properly supported.
Now return to the rear slip joint. Check that the pipe is still inserted deeply enough and that everything is positioned correctly. Install the new clamp with its studs upward or to the side.
As with the truck repair, alternate between the two clamp nuts in small increments. Even compression helps the joint seal around its perimeter.
Final Check: Confirm the Exhaust Repair Is Leak-Free
Do not call the job finished just because everything is bolted together. Check every connection you disturbed.
- Spray soapy water thoroughly around the repaired joints.
- Start the engine outdoors.
- Inspect the rear slip joint for fresh, growing bubbles.
- Check the front flange and gasket the same way.
- Listen for any remaining exhaust leak noise.
On the Jaguar, both connections pass the bubble test, and I cannot hear the previous leak. The difference in sound is huge, and the fumes that had been entering the cabin are no longer noticeable. That said, absence of odor is not a substitute for checking the system.
The details that make these repairs work are correct sizing, sound metal, clean mating surfaces, adequate overlap, and even tightening. Whether you replace a failed flange with a coupler or install a complete bolt-on flex-pipe section, those fundamentals stay the same.
No welder, no more obnoxious leak noise, and a properly sealed exhaust. That’s a good result from a driveway repair.


