Dents, key marks, and scratched paint can make an otherwise good car look pretty rough. But with common hand tools, properly mixed body filler, and some patience, you can get that panel smooth again and refinish it at home.
The basic repair comes down to three steps: prepare the dents, fill them, and sand the filler level with the surrounding panel. Then comes primer, color, clear coat, and the finishing work that brings back the shine.
I’m working on a silver BMW with multiple dents across both doors. This is a driveway repair using spray cans and hand sanding, so the goal is a big improvement, not a promise of a flawless paint-booth finish. The preparation is what makes the difference.
What You'll Learn
- Choose between paintless dent repair and a filler repair that requires refinishing.
- Prepare bare metal, mix filler accurately, and block-sand the repair to restore the panel’s contour.
- Use glazing putty to correct small low spots and pinholes before painting.
- Refine cured clear coat with wet sanding, compound, and polish to improve the finish.
Table of Contents
- Choose the Right Dent Repair Method
- Tools, Materials, and Safety
- 1. Remove Trim, Clean the Panel, and Mark the Damage
- 2. Sand the Dents to Bare Metal
- 3. Mix and Apply the Body Filler
- 4. Block-Sand the Filler Level
- 5. Fill Pinholes and Low Spots with Glazing Putty
- 6. Prepare the Entire Panel for Paint
- 7. Mask Carefully and Choose the Correct Paint Color
- 8. Apply Primer, Base Coat, and Clear Coat
- 9. Wet-Sand the Clear Coat Smooth
- 10. Compound and Polish to Restore the Shine
- Reinstall the Trim and Inspect the Finished Repair
Choose the Right Dent Repair Method
Before you sand any paint off your car, decide whether the damage needs body filler at all.
Paintless dent repair for shallow dents
Paintless dent repair, often called PDR, can help with shallow dents that do not have sharp creases. A glue-pulling kit uses hot glue to attach a pulling tab to the panel. A slide hammer then pulls the dent outward.
If you pull too far, a plastic-coated hammer can gently tap the raised area back down. That sounds straightforward, but getting the metal even takes practice. It does not work equally well on every dent.
Body filler for dents that need refinishing
The dents on this BMW have sharp indentations and damaged paint. Even if the metal could be pulled back into shape, the paint would still need repair. For this job, I’m using professional-grade body filler to restore the surface contour, followed by glazing putty and paint.
Filler makes the surface level; it does not pull the underlying metal back into its original shape. Once sanded, it leaves a smooth but unfinished repair that needs to be sealed and painted.
Tools, Materials, and Safety
You do not need a shop full of equipment to do the sanding and filling. Here is what I used:
- Professional-grade body filler and its cream hardener.
- Two-part glazing putty for small low spots and pinholes.
- Plastic spreaders and a clean, nonabsorbent mixing surface.
- Sandpaper in 80, 180, 320, and 400 grit for the repair and paint preparation.
- Wet-sanding paper in 1000, 1500, 2000, 3000, and 5000 grit.
- A firm sanding block and a kitchen sponge to support the sandpaper at different stages.
- A plastic trim removal tool and replacement trim clips as needed.
- Soapy water, isopropyl alcohol, clean towels, and a tack cloth.
- Masking tape and masking material.
- Automotive primer, color-matched base coat, and automotive clear coat.
- Compound, polish, finishing polish, applicator pads, and microfiber towels.
An electric sander speeds up paint removal, and a dual-action polisher saves a lot of effort during finishing. I’m doing the repair by hand to show that the basic work is possible without those tools.
Protect yourself before you start
Wear eye protection and suitable particulate respiratory protection when sanding. An N95 dust mask is for sanding dust, not paint vapors or spray mist.
Painting requires protection appropriate to the exact coating. The 2K clear coat used here contains isocyanates, which are a serious inhalation hazard. Do not assume that a full-face respirator with organic-vapor cartridges makes spraying it safe. Check the product safety data sheet and its respiratory-protection requirements; supplied-air protection may be required. OSHA’s isocyanate guidance provides additional safety context.
A temporary canopy may reduce falling debris, but it is not a substitute for a properly ventilated spray area or appropriate protective equipment. If you cannot meet the coating’s safety requirements, finish the bodywork and have a qualified paint shop handle the spraying.
1. Remove Trim, Clean the Panel, and Mark the Damage
Because there are dents in several places, I’m refinishing both complete door panels. Removing the door molding makes it easier to sand and paint cleanly around that area.
Use a plastic trim tool to gently pry the molding away from the door. Old clips can be brittle, so expect that a few may break. Replacement clips are inexpensive, and fresh clips help the trim fit securely when it goes back on.
Clean before sanding. Dirt, wax, and oils on the paint should not get ground into the repair area. Wash the panel with a mild soapy-water mixture, wipe it clean, and let it dry.
Next, circle each dent. These marks are guides to keep the initial sanding localized, not hard boundaries that you can never cross.
A dent is usually wider than its deepest visible point. On the dent below the handle, the small central indentation is surrounded by a much broader area of displaced metal. Reflections from a striped dent board help reveal that distortion.
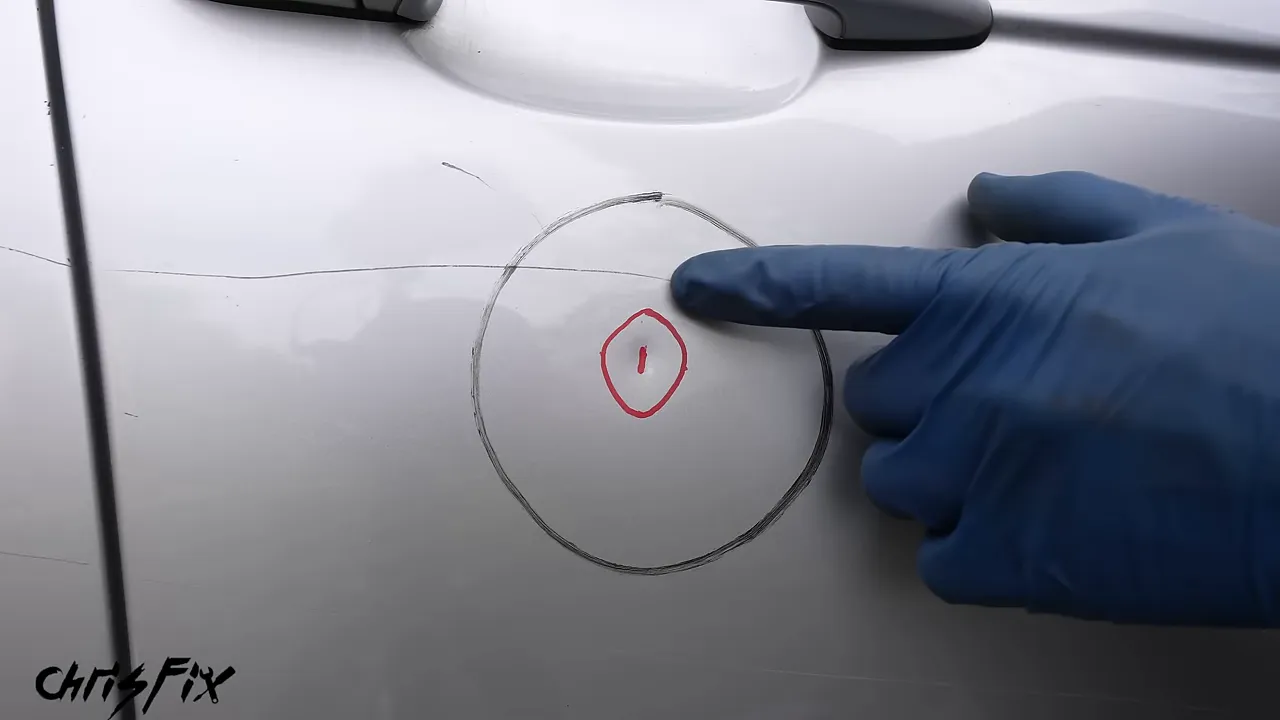
For these repairs, I want bare metal across the full dent and roughly another inch or two around it. That gives the filler a prepared surface beyond the depression and room to blend the repair into the panel.
2. Sand the Dents to Bare Metal
Start with 80-grit sandpaper. Focus on the dent and the immediately surrounding area rather than stripping the entire door.
For this paint-removal stage, wrapping the sandpaper around a kitchen sponge helps distribute pressure. Sandpaper held only under your fingertips creates concentrated pressure points, which can make the sanding uneven.
- Sand the paint away from the dent and the surrounding repair area.
- Check the bottom of the dent for paint that the supported paper has not reached.
- Use a fingertip behind the paper where necessary to remove paint from the deepest indentation.
- Feather the edges of the remaining paint into a smooth transition.
The shiny surface is bare metal. Do not stop while paint is still sitting in the deepest part of the dent. The filler used here is being applied to properly prepared bare metal, so that entire bonding area needs attention.
If the paper becomes clogged with sanding dust, tapping or flicking it can clear some of the buildup and help it cut again.
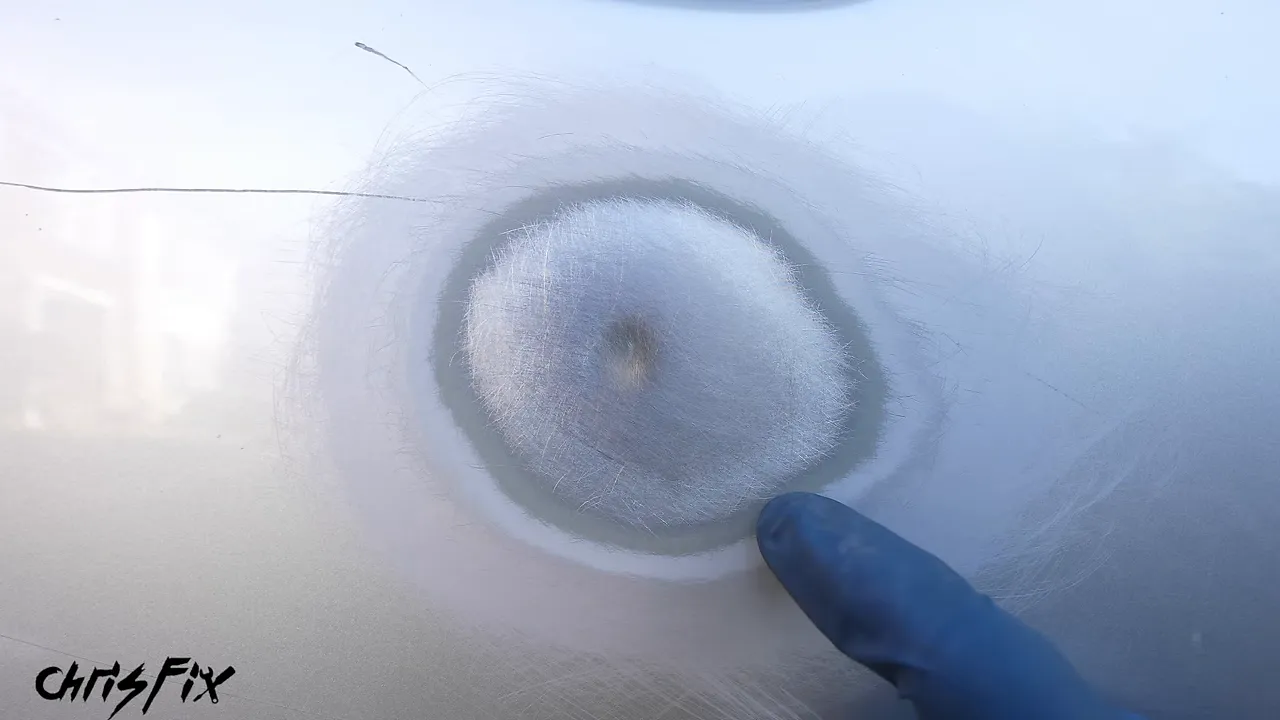
You will see the different layers around the repair: primer, color coat, and clear coat. Run your hand across that transition. It should feel smooth, without an edge that catches your fingernail.
Repeat this process on the other dents. I also sanded a slightly wavy area above the main damage, which turned out to need little more than smoothing.
Wipe away the sanding dust with isopropyl alcohol on a clean rag. Let the alcohol evaporate completely before applying filler. On this job, I allowed about 10 to 15 minutes.
3. Mix and Apply the Body Filler
Measure the filler and hardener
Stir the filler in its container to make its consistency uniform. Knead the cream-hardener tube as well, since its contents can separate during storage.
The Evercoat kit I used includes a mixing guide with circles for the filler and corresponding lines for the hardener. I chose the four-inch guide, and that batch covered the dents on both doors with some material left over.
Use the mixing instructions for your exact product. The circle-and-line method here belongs to this kit. Do not assume that drawing a circle and adding an arbitrary bead of hardener gives the right ratio for another filler.
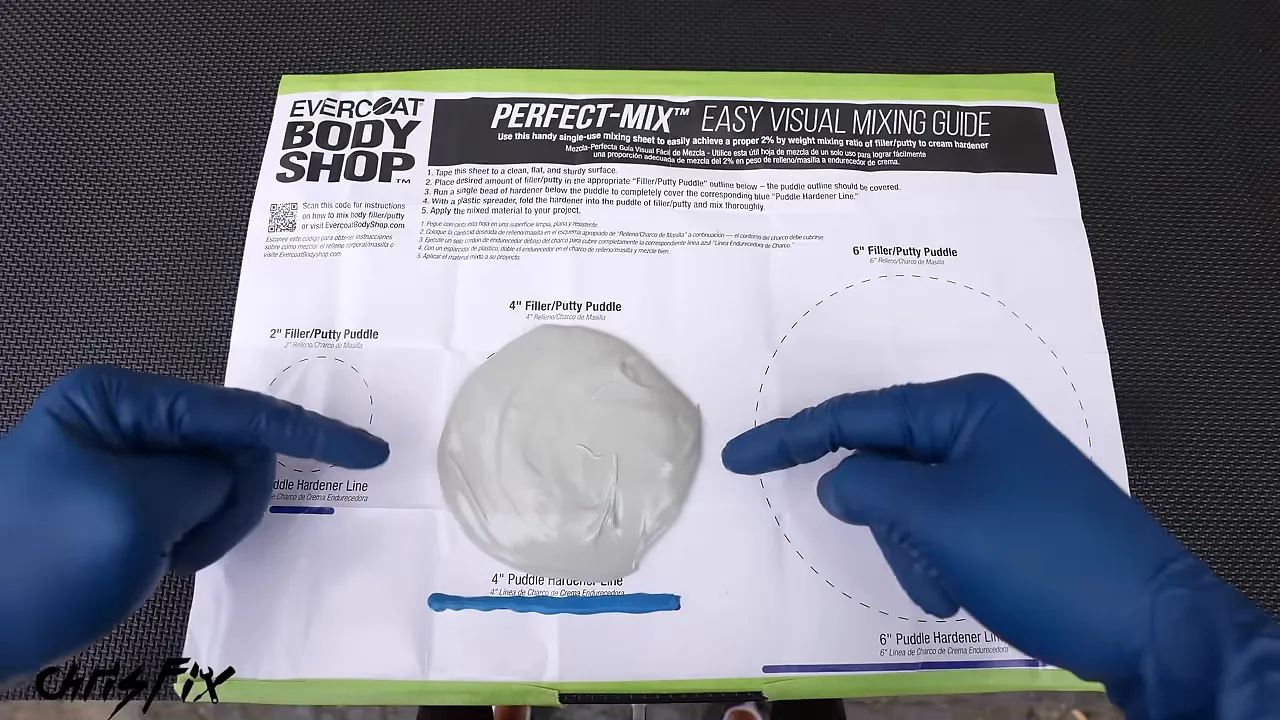
Start with a manageable batch. You can mix more later, but once the hardener is added, unused filler will cure whether it is on the car or on the mixing sheet.
Fold the mixture instead of stirring it
Use your spreader to scoop up the mixture and spread it back out. Repeat that folding motion until the color is uniform and there are no blue hardener streaks.
Stirring can introduce air bubbles that become pinholes in the repair. Folding and spreading help work the hardener through the filler while releasing trapped air.
Mixing took about 30 seconds with this product. Spread the mixed filler out rather than leaving it in a thick pile. The curing reaction produces heat, and more heat means less working time.
At about 70°F, this filler gave me roughly five minutes of working time. Temperature and product instructions matter, so have the panel and tools ready before mixing.
Press on a thin first layer, then build the contour
Start with a small amount of filler on the spreader. Press firmly across the bare metal to force a thin layer into the dent and surrounding sanding scratches. This wets the prepared surface with the filler’s resin and helps establish the bond.
Then add thin layers, pressing the material into the depression rather than trapping air underneath it. Build the repair just slightly higher than the surrounding panel.
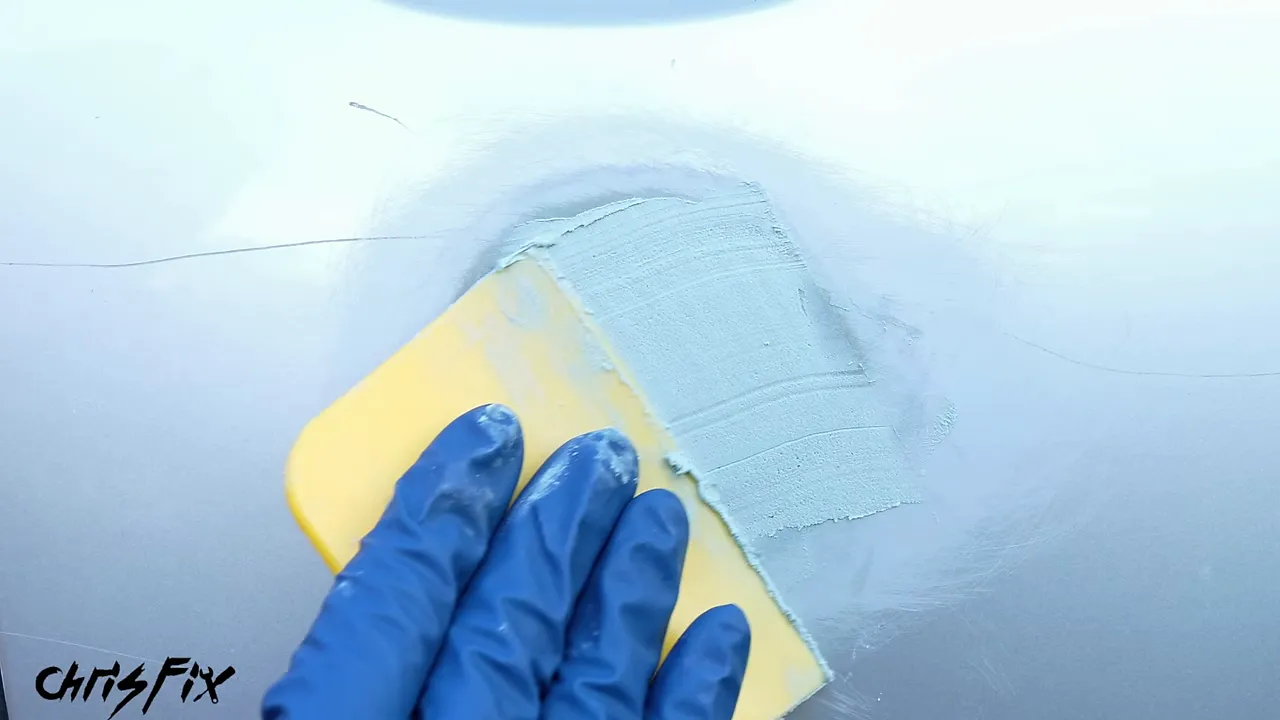
Keep the filler inside the prepared area as much as possible. Smearing it across undamaged paint creates extra sanding work. The same goes for piling it on too thickly.
The filler used here was ready to sand after about 15 minutes. Follow your product’s cure and sanding times rather than treating that as a universal rule.
A quick spreader-cleaning trick
With these flexible plastic spreaders, leaving a thicker clump of filler on the tool makes cleanup easier. After it hardens, flex the spreader and the cured material can pop off in one piece.
That is much easier than trying to remove a thin, stubborn film after it has cured.
4. Block-Sand the Filler Level
Now switch to a firm, flat sanding block. The sponge was helpful for stripping paint, but leveling filler calls for solid support. Your fingertips alone can sand little waves into the repair.
- Use 80 grit on the block to bring the filler down toward the surrounding panel.
- Sand in an X pattern, crossing the repair in different directions.
- Switch to 180 grit to refine the shape and remove the coarse sanding scratches.
- Feather the sanding into the surrounding paint.
On this full-panel repaint, I feathered the 180-grit sanding roughly 6 to 12 inches beyond the repair. The goal is a gradual transition, not a small smooth island surrounded by deep 80-grit scratches.
Close your eyes and slide your hand across the repair in several directions. You should not feel a bump, an edge, or a dip.
After this stage, some dents felt completely level, while a few still had small low spots. That is where glazing putty comes in. Wipe the panel clean so you can inspect it properly.
5. Fill Pinholes and Low Spots with Glazing Putty
Body filler establishes the main contour. The two-part glazing putty used here takes care of the smaller imperfections left behind, including shallow low spots and pinholes.
Start with a clean mixing surface
Do not mix putty over dried crumbs of body filler. Those little pieces can get dragged through the putty and spoil the finish.
A fresh mixing sheet is ideal. For this product, I also demonstrated making a replacement guide on cardboard and covering it with a clean plastic bag. The plastic provides a nonabsorbent surface while leaving the guide visible underneath.
Do not mix directly on bare cardboard. It can absorb components of the mixture and interfere with the intended ratio. Use the manufacturer’s measuring guidance for the product you have.
Apply, cure, and sand
Knead the putty and hardener, measure them, and fold them together until the color is consistent. As with the filler, spread the mixed material out and work within its available application time.
Press a thin first coat firmly into the filler to fill pinholes and establish contact. Then add enough putty to bring the low areas slightly above the surrounding surface. It does not need to form a thick blanket over every part of the repair.
After about 15 minutes of curing with this product, sand with 320 grit. Use long strokes that extend beyond the repaired spot instead of concentrating all the sanding in one small area.
Inspect the result carefully. I found one small nick after sanding, mixed a little more putty, filled it, let it cure, and sanded it again. Fixing that tiny flaw now is much easier than finding it after painting.
6. Prepare the Entire Panel for Paint
Once the repairs feel level, sand every area that will receive paint. For these doors, that means the whole outer panel.
- 320 grit: Sand the panel evenly and smooth the repaired areas.
- 400 grit: Refine the sanding scratches for the paint system used here.
- Inspection: Look for obvious deep scratches and correct them before proceeding.
Paint will not magically hide rough preparation. If a scratch is clearly visible now, do not count on the color coat to make it disappear. Follow the preparation requirements of your chosen primer and paint system.
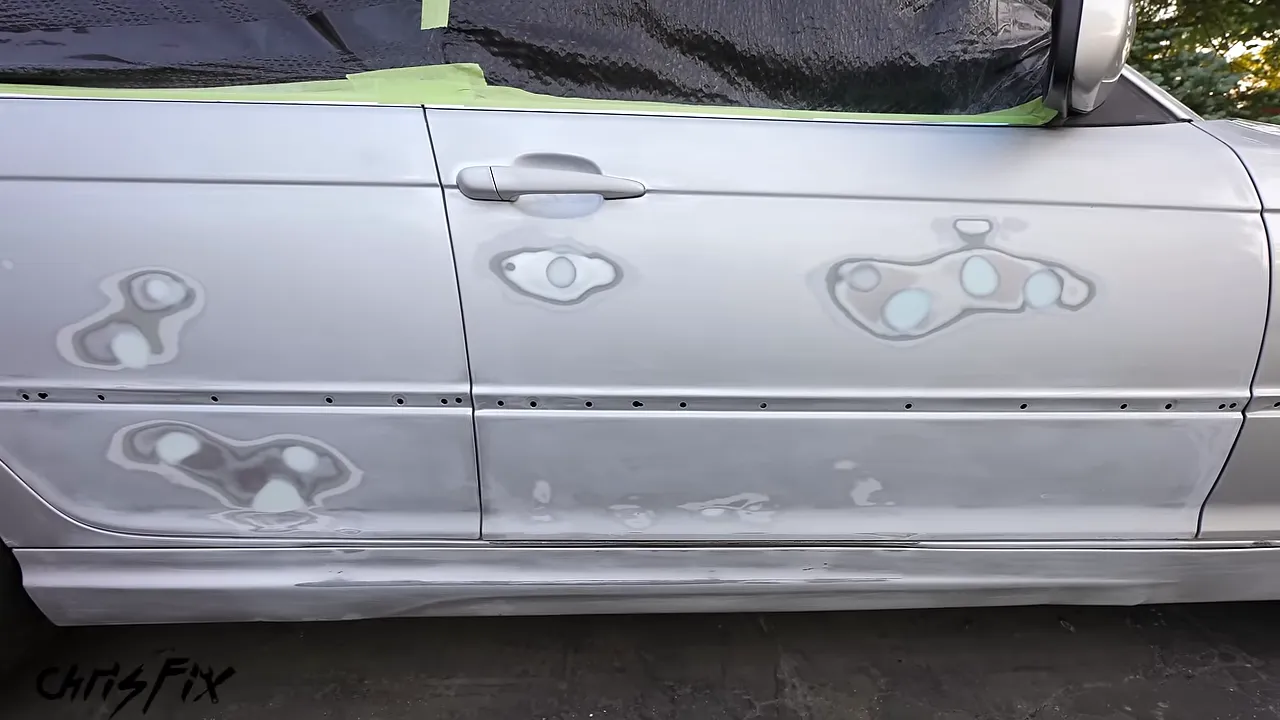
Remove the dust from the panels and the surrounding work area before setting up for paint. I used a leaf blower at this stage, followed by a final alcohol wipe on the panels. Do this before spraying, not while wet paint is exposed.
7. Mask Carefully and Choose the Correct Paint Color
Anything you do not want painted needs to be covered: adjacent panels, glass, wheels, and trim.
Take your time with tape lines. Around the upper door trim, I tucked the tape underneath the edge so paint could reach the door surface beneath it. That small detail makes a cleaner-looking repair than stopping the paint short of the trim.
I used a temporary canopy to reduce debris falling onto the doors. Outdoor painting still has limitations, though. Dust and pollen can reach the finish despite your preparation.
Immediately before priming, lightly wipe the panel with a tack cloth to pick up settled dust. Do not scrub it against the surface.
Find the factory paint code
The base coat supplies the car’s color, so order it using the paint code rather than choosing a silver that looks close.
Many cars list paint information on a door-jamb label. On this BMW, the label is in the engine bay on the driver-side shock tower. Its color is 354 Titan Silver Metallic.
A factory color code is the starting point for matching the paint. It does not turn an outdoor aerosol repair into a guaranteed invisible match.
8. Apply Primer, Base Coat, and Clear Coat
Read every can’s instructions before spraying. Coat thickness, flash time, application temperature, sanding requirements, and recoat windows vary by product. The three-coat sequence below describes the products used on this repair.
Primer: cover the exposed repair areas
Apply automotive primer over the bare metal and filler. This covers the exposed repair and provides a suitable foundation for the next coating.
- Apply a light first coat over the repaired areas.
- After the specified flash time, add a second coat and feather it farther into the surrounding area.
- Apply the final coat as directed to complete coverage.
Base coat: build the color gradually
Start spraying just off the panel, move smoothly across it, and keep the can at a consistent distance and speed. The first coat should be light. Do not try to make the door fully silver in one pass.
Because this is metallic paint, shake the can as directed during use to keep the metallic material suspended. Uneven application makes an even-looking finish harder to achieve.
I applied three coats with the required time between them. Three cans barely covered both doors, so for a similar project I would plan on about two base-coat cans per door-sized panel, while checking the product’s stated coverage.
Clear coat: build gloss without runs
The 2K aerosol clear used here has a separate hardener chamber inside the can. Its activation cap fits onto the bottom, where pressing the mechanism releases the hardener. Shake thoroughly according to the label before spraying.
This two-part coating offers the hardness and chemical and UV resistance that make it useful for automotive refinishing, but its safety requirements are critical. If you do not have the required spray environment and protective equipment, have this stage done professionally.
For this clear, I applied three smooth, even coats. They went on wetter than the base coats, with the final coat wet enough to form a glossy surface but not so heavy that it ran.
I then let the clear dry for 24 hours before finishing. Use your clear coat’s specified sanding and polishing schedule, since drying conditions and coating systems differ.
9. Wet-Sand the Clear Coat Smooth
Spray-can clear can leave a mixture of smooth areas and rough texture. On this repair, a little pollen also landed in the finish. That is the reality of working outside.
Wet sanding levels the clear coat’s texture, and compound and polish refine the resulting scratches. It also removes clear coat, so work carefully rather than treating repeated sanding as harmless.
For this hand-finishing process, I used the following progression:
- 1000 grit.
- 1500 grit.
- 2000 grit.
- 3000 grit.
- 5000 grit.
Spray the panel generously with soapy water and wrap the wet-sanding paper around a sponge. Keep the surface lubricated, sand side to side and up and down, then wipe away the residue before moving to the next grit.
Repeat the wetting, sanding, and wiping process at each stage. The finer grits progressively refine the previous scratches. Going all the way to 5000 grit makes the next steps more manageable by hand.
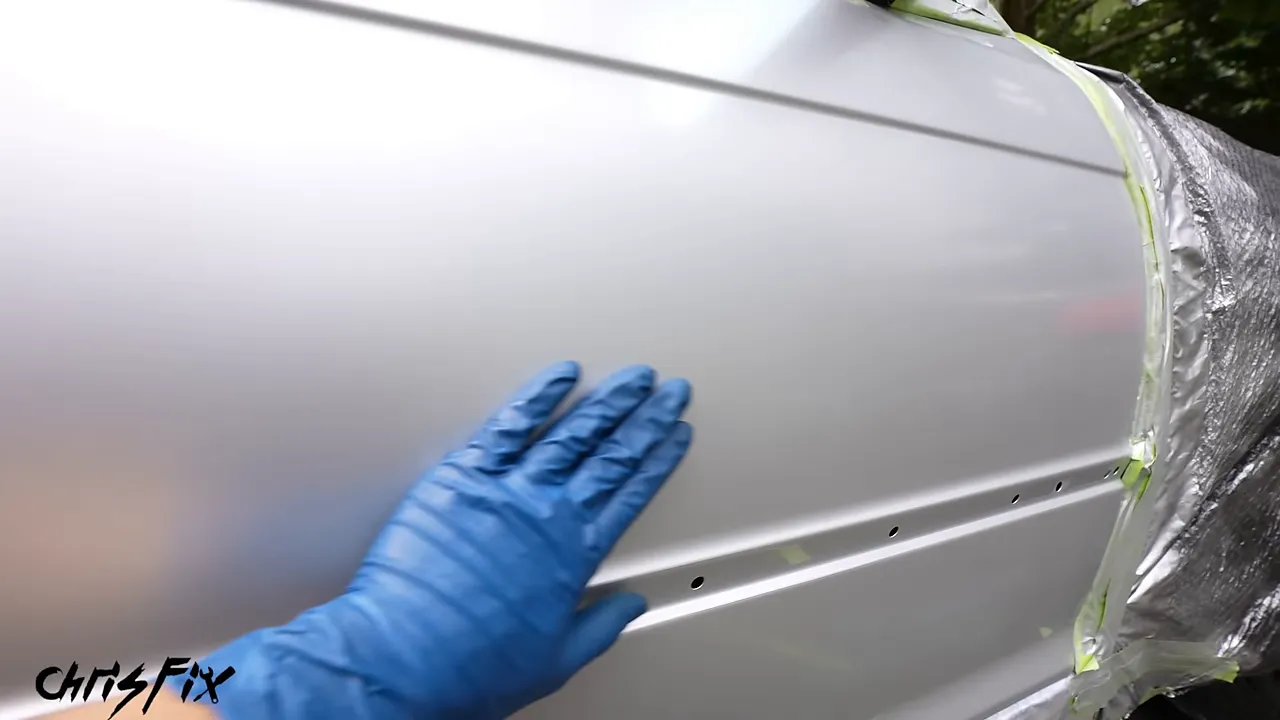
At the end, the panel should have a uniform, hazy appearance without obvious individual scratches. It will look almost matte. That is not the finished result, so do not panic when the gloss disappears.
10. Compound and Polish to Restore the Shine
Compounding removes the fine sanding marks. Polishing then refines the surface further. I used a three-stage system: Auto Magic PC1 compound, PC2 polish, and PC3 finishing polish.
A dual-action polisher makes this work much easier and can improve the final gloss. Doing a complete door by hand takes real time and elbow grease.
Compound with PC1
Put a small amount of compound on the applicator pad. Work it over the panel in tight, overlapping circles with medium-heavy pressure, following the product’s directions.
Overlap your passes so you do not leave untreated patches. Once finished, remove the residue with a clean microfiber towel. The door should already look much shinier than it did after wet sanding.
Refine with PC2
Use a clean side of the pad for the next polish. Work across the entire door with the same overlapping motion, then wipe away the residue.
Finish with PC3
Use a fresh pad for the fine finishing polish. I worked this stage with medium pressure and tight circles to bring out the final shine.
If sanding marks remain, more refinement may be needed. Remember that sanding and compounding remove material, so do not keep repeating aggressive steps without considering how much clear remains.
Reinstall the Trim and Inspect the Finished Repair
With the finishing work complete, reinstall the molding using sound clips. I fitted new trim to finish the doors, pressing the clips into place along the panel.
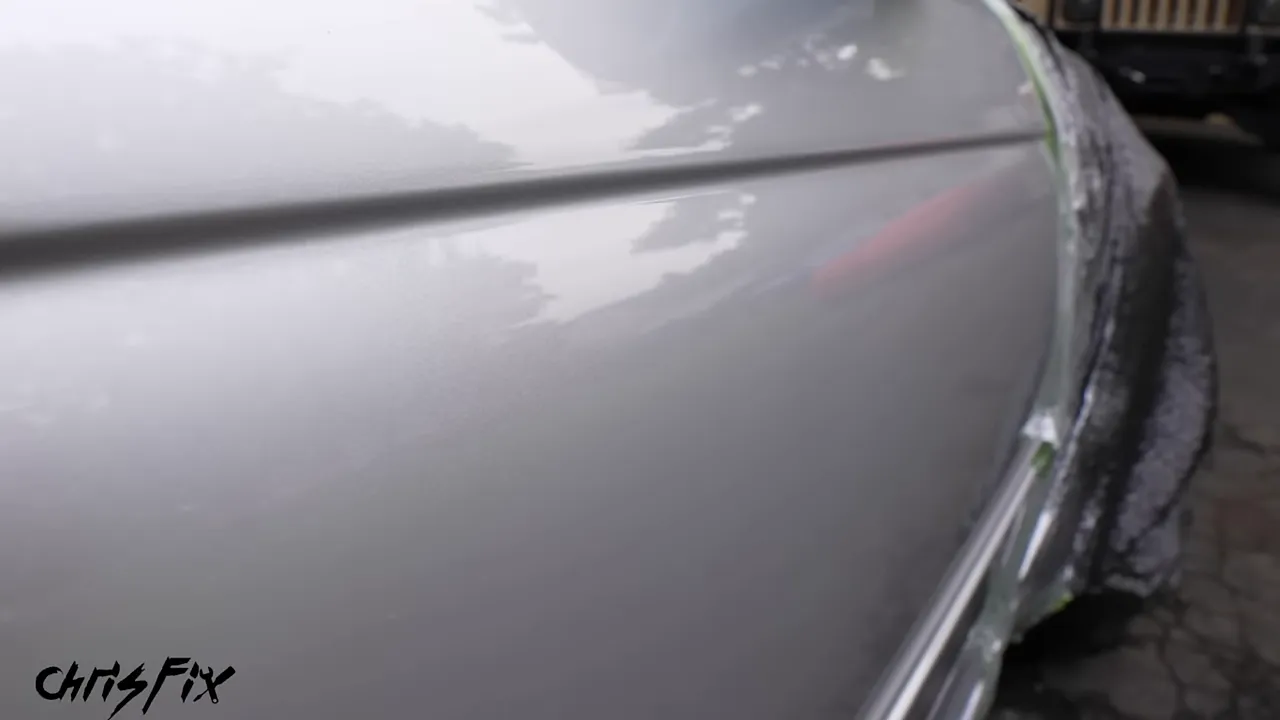
Is the result perfect? No. But compared with the dents, key marks, and scratches we started with, the improvement is huge. The repaired areas are smooth, the door has its shine back, and the work was done with common hand tools.
These repairs also prepared the car for its Soapy Water Racers livery. A wrap does not replace good bodywork: dents underneath would still distort the finished surface. I mentioned about two weeks as a wait before wrapping fresh paint, but the correct wait depends on the paint and wrap systems. Follow their cure requirements rather than rushing it for a deadline.
The biggest lesson is to finish each stage before moving on. Remove the paint where the filler needs to bond, mix accurately, apply thin layers, block-sand the contour, and correct small flaws before painting. The shine at the end starts with the preparation underneath it.


