A little paint bubble around a wheel well might not look like a big deal, but that is the time to fix it. Once rust starts spreading underneath the paint, a small spot can turn into missing metal and a much bigger repair.
The good news is that some exterior body-panel rust can be repaired at home with sandpaper, patch mesh, body filler, and spray paint. You do not need a welder or a shop full of special tools. What you do need is patience, especially during rust removal and sanding.
I’m working on a rusted rear wheel arch, including a few small holes and a damaged corner next to the bumper. The process has four main parts: remove the rust, apply filler, sand the repair smooth, and paint it. Then we will wet sand and polish the clear coat to bring back the shine.
What You'll Learn
- No-weld filler repairs are for cosmetic panel damage, not structural corrosion or crumbling metal.
- Remove rust and protect both sides of the panel before building the exterior repair.
- Use reinforced filler for the base, then finishing filler and progressively finer sanding for shape.
- Careful masking, light paint coats, and cured-clear finishing make the repair blend more smoothly.
Table of Contents
- First, Decide Whether the Rust Can Be Patched
- Tools and Materials You’ll Need
- Step 1: Remove the Rust and Prepare Both Sides
- Step 2: Apply Fiberglass Filler, Then Finishing Filler
- Step 3: Shape and Smooth the Repair
- Step 4: Prime and Paint the Panel
- Wet Sand the Cured Clear Coat
- Polish the Paint to Bring Back the Shine
First, Decide Whether the Rust Can Be Patched
Rust commonly starts along the lower body and around wheel wells. A rock chips the paint, exposes the metal, and gives corrosion a place to begin. Fixing that damage early is much easier than rebuilding a panel later.
My family’s 1995 Ford Windstar, which has more than 300,000 miles, is a good example of both ends of the problem. One small rust spot is manageable. Another section of the lower panel is so badly corroded that I can break pieces off by hand.
Metal that crumbles away needs replacement, not a layer of filler. That means cutting out the damaged material and installing replacement sheet metal, rather than using this no-weld method.
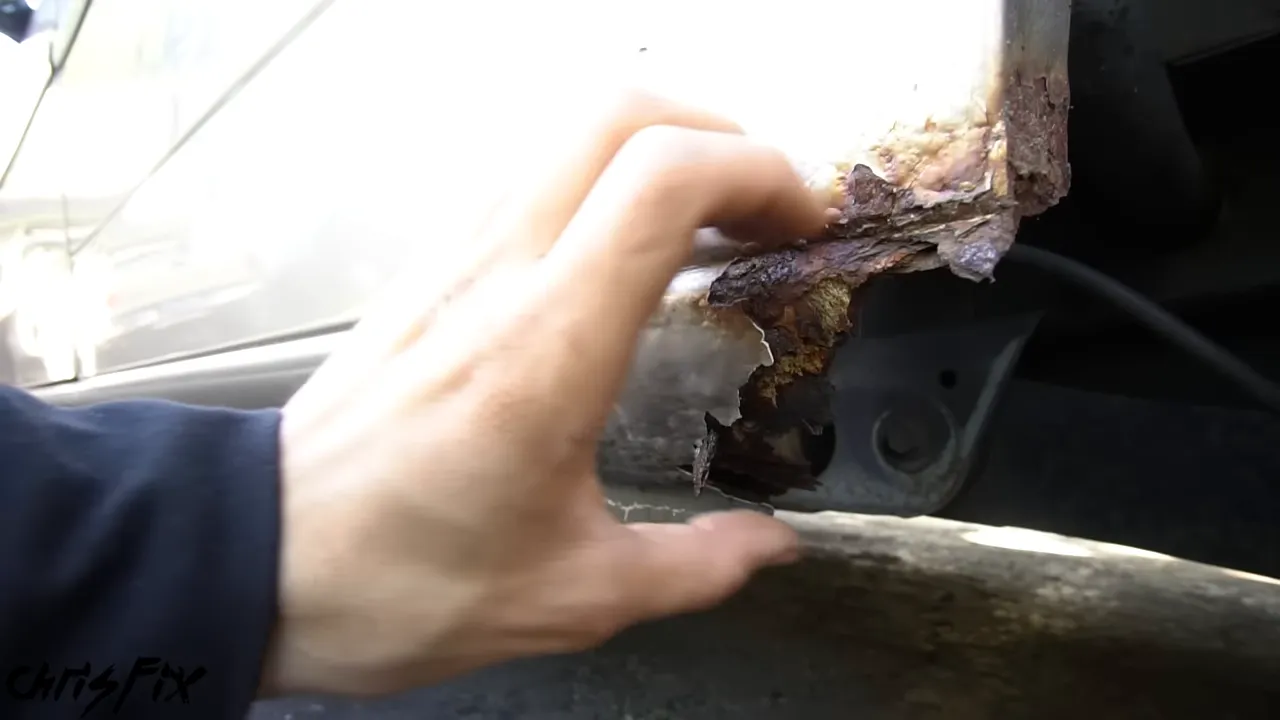
The repair here is an exterior cosmetic patch. Mesh and fiberglass filler can support and rebuild the surface, but they do not replace the structural function of sound steel. Do not use this method to repair structural corrosion or safety-critical mounting areas. If you are unsure what the rust affects, have the vehicle inspected before proceeding.
Tools and Materials You’ll Need
The supply list looks bigger than it really is. Most of it falls into three groups: sanding supplies, filler, and paint.
- Safety equipment: eye protection, gloves, and respiratory protection appropriate to the sanding dust and coating products.
- Cleaning supplies: rubbing alcohol or a compatible adhesive remover, clean towels, microfiber towels, and soapy water.
- Sanding supplies: a sanding block and abrasives in 80, 180, 320, and 600 grit, followed by wet-sanding abrasives in 1500, 2000, 3000, and 5000 grit.
- Repair materials: adhesive body patch mesh, fiberglass-strand filler, finishing body filler, the specified hardeners, and glazing and spot putty.
- Application tools: flexible spreaders, a nonabsorbent mixing surface, scissors, a small hammer, and a screwdriver.
- Coatings: rust converter or rust reformer, rubberized undercoating, filler primer, color-matched base coat, and compatible clear coat.
- Masking and finishing supplies: masking paper, automotive masking tape, a sponge, and polish.
- Access equipment: a jack, jack stands, and the tools needed to remove the wheel if backside access requires it.
A drill with a rust-removal disc or sanding attachment can speed up the work. An angle grinder with an appropriate flap disc or wire brush is another option. Neither is necessary here; I’m doing the bodywork by hand so the process stays accessible.
An electric polisher is also optional, although it makes the final polishing much easier.
Do not treat a dust mask as protection against paint vapors. Follow each product’s label and safety data sheet for ventilation and respiratory protection. The OSHA respiratory protection guidance provides additional background on choosing protection for different airborne hazards.
Step 1: Remove the Rust and Prepare Both Sides
Clean Before You Sand
Start by wiping down the repair area with rubbing alcohol or a compatible adhesive remover. This removes wax, dirt, and oil before the sandpaper has a chance to grind those contaminants into the exposed metal.
Move nearby plastic trim or bumper sections out of the way where practical. The plastic bumper is not rusting, and there is no reason to damage its good paint while sanding the steel panel above it.
Sand Down to Bare Metal
Start with 80-grit sandpaper on a sanding block. A lower grit number means a more aggressive abrasive: 40 grit is coarser than 80, while 1000 grit is much finer.
The goal is not just to flatten the bubbling paint. Remove the loose paint and corrosion until you reach clean, bare metal. Rust left under the repair can continue spreading, and the filler used here needs a properly prepared bare-metal surface.
Sand roughly an inch beyond the visible rust into clean metal so you can check the edges of the damage. At the same time, keep the repair as small as practical. There is no benefit to stripping a large area of good paint unnecessarily.
As the corrosion comes off, you may uncover holes where the rust has eaten through the sheet metal. That is also your chance to reassess the repair. If removing the rust leaves extensive missing metal or a crumbling panel, stop and move to metal replacement.
Make Room for the Filler
The remaining metal in the damaged area is thinner than the surrounding panel. For this repair, I’m using fiberglass-strand filler over that area, followed by a smoother finishing filler.
If you apply those materials directly over a surface that is already at its finished height, you create a hump. Gently tap the damaged section inward so there is room to build the repair back up flush with the surrounding body.
For a tiny spot, use a screwdriver as a small punch and tap it carefully rather than making a large dent with the hammer. Keep the indentation limited to the area that actually needs filling.
Do Not Forget the Back of the Panel
This is one of the most important parts of the job. If there is rust on the outside, inspect the inside too. A nice-looking patch on the front will not solve corrosion that is still working its way through from behind.
- Raise the car safely at the correct lifting points and support it on jack stands.
- Remove the wheel to access the back of the wheel arch.
- Use 80-grit sandpaper to remove the backside rust and expose clean metal.
- Clean the sanded surface.
- Apply the rust reformer according to its instructions.
- After it has dried as directed, apply a compatible rubberized undercoating to the prepared wheel-well area.
The rust reformer coats the prepared surface and is intended to react with residual rust. It is not a reason to skip mechanical rust removal. The rubberized undercoating adds a protective layer that resists the stone impacts a wheel well is exposed to.
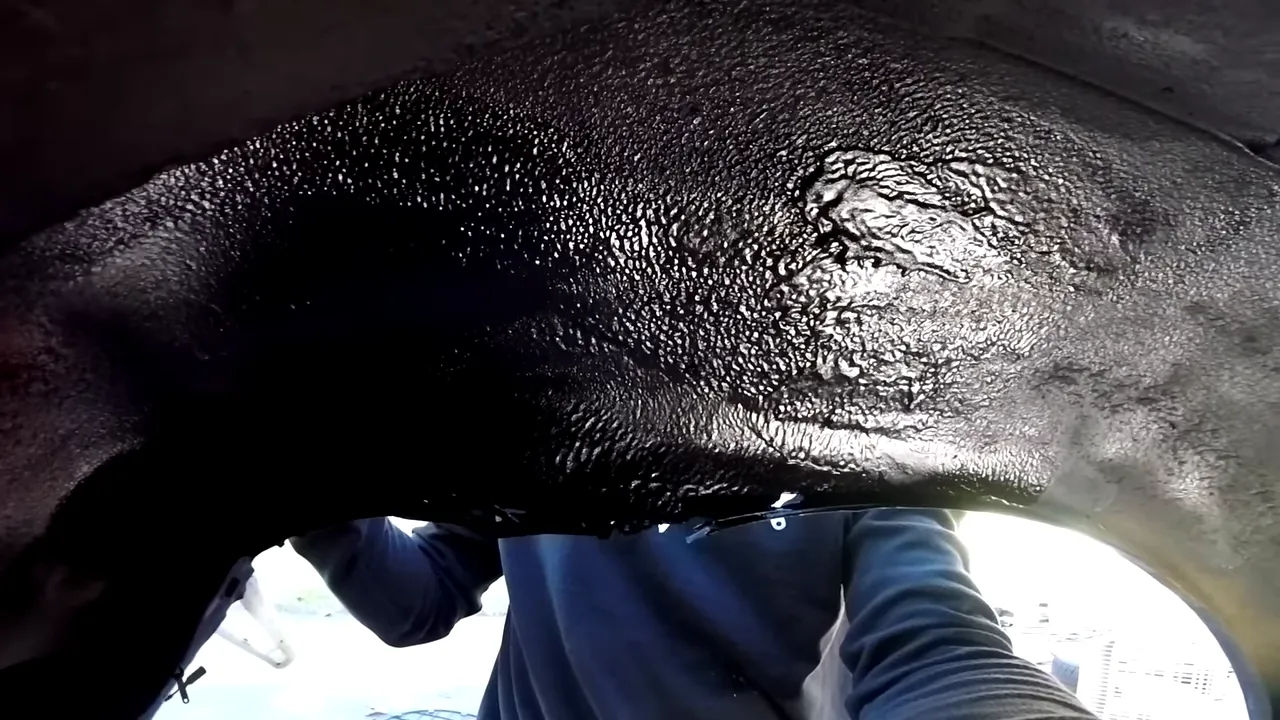
Once the coatings have dried as required, reinstall the wheel, tighten it to the vehicle’s specified torque, and lower the car safely.
Fit Mesh Behind the Small Holes
For the remaining small holes and missing cosmetic corner, I’m using an adhesive body patch mesh. Shape it to the damaged area and cut it to size with scissors.
Place the mesh behind the panel, not over the front. Mesh sitting on top would raise the repair and make it difficult to sand the surface flush.
Temporarily position the bumper so you can use it as a reference for the lower edge. Bend the mesh to follow the corner you need to rebuild. For a smaller hole, a screwdriver can help position a small piece of mesh from behind.
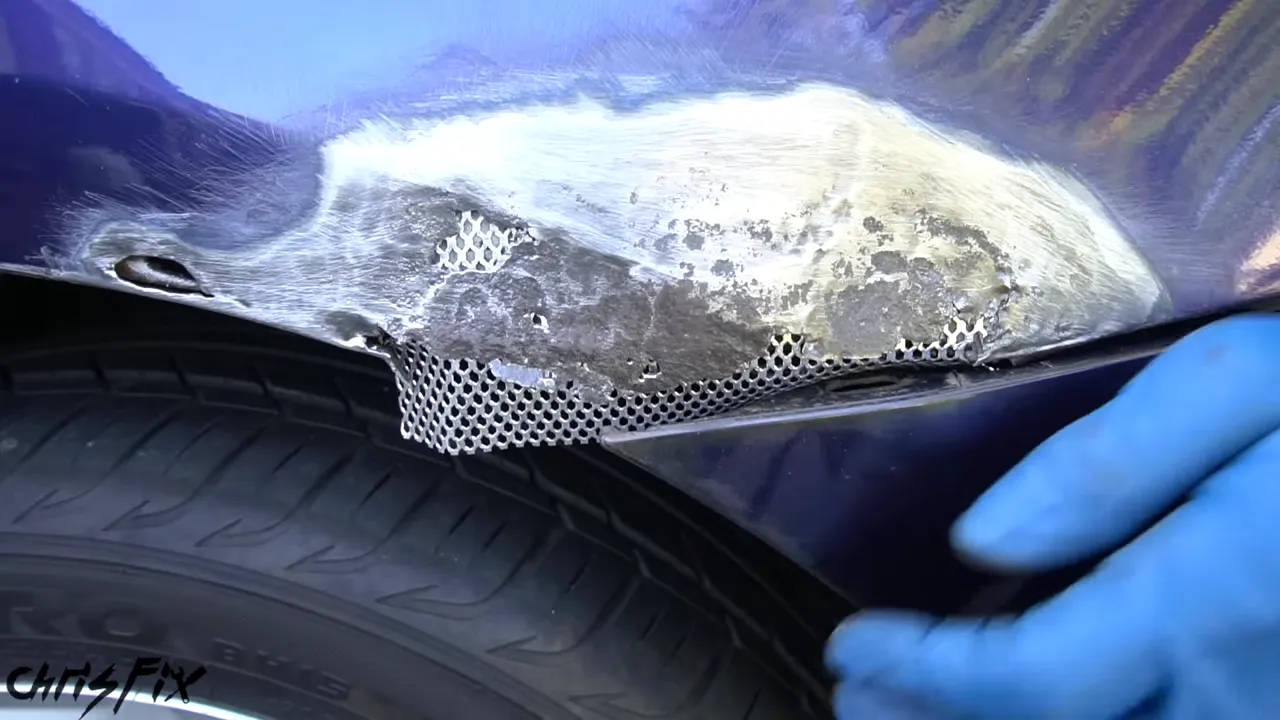
Before applying filler, clean the exterior repair area again and allow the cleaner to evaporate completely.
Step 2: Apply Fiberglass Filler, Then Finishing Filler
The two fillers have different jobs. Fiberglass-strand filler forms the reinforced base over the prepared damage and mesh. The finishing body filler makes the surface easier to shape and smooth.
Mix Filler Without Adding Air
Use a clean, nonabsorbent mixing surface. I tape parchment paper flat over a board so the mixing surface does not soak up part of the hardener.
Follow the filler manufacturer’s specified hardener ratio. For the products used here, I estimate the amount by forming a circular mound about half an inch high, then running a bead of hardener across its diameter. Treat that as a product-specific estimating technique, not a universal ratio for every filler.
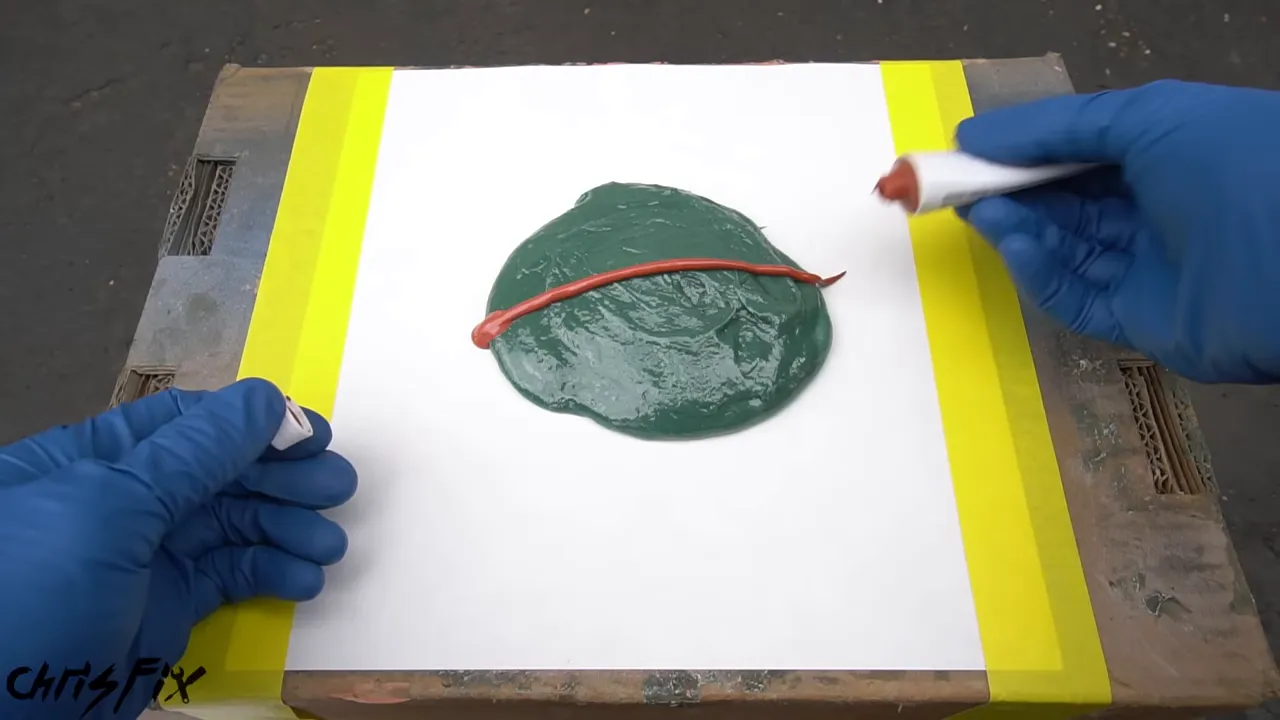
Knead the hardener tube before dispensing it. Then mix with the spreader using a gathering and pressing motion:
- Gather the filler into one area.
- Press and spread it flat.
- Repeat until the color is consistent and no hardener streaks remain.
Do not stir it like cake batter. Stirring can introduce air bubbles that become pinholes in the finished repair.
Mixing takes about 45 seconds here, and the working time is only around five minutes. Your actual working time depends on the product and conditions, so make small batches. If you have never used filler before, a small practice batch is worthwhile.
After mixing, spread the filler out rather than leaving it in a thick pile. The curing reaction releases heat. A thinner layer sheds that heat more easily, helping preserve working time and allowing trapped air to escape.
Apply the Fiberglass-Strand Base
Put a small amount on the spreader and press the first thin layer firmly against the prepared metal and into the patched area. You want good contact without trapped air.
Build up additional thin layers until the holes are filled and the recessed area approaches the surrounding panel height. Stay within the product’s thickness limits. This layer does not have to look perfect because the finishing filler comes next.
On this repair, the fiberglass filler was ready to sand after about 15 to 20 minutes. Follow the cure time for your product, then use coarse sandpaper on a block to shape it.
Pay attention to factory body lines. This panel has a crease running toward the bumper, so I sand the surfaces on either side separately rather than rounding the crease away. The goal is to recover the original shape, not simply make one smooth mound.
A handy cleanup trick for a flexible spreader is to let the leftover filler harden, then flex the spreader and pop it off.
Add the Smoother Finishing Layer
Mix the finishing filler using the same pressing technique and its specified hardener ratio. Apply a thin first coat firmly into the repair, then build up thin layers slightly above the surrounding surface so you have material to sand away.
Let it harden fully. In this case, that took about 20 minutes.
Step 3: Shape and Smooth the Repair
Start With 80 Grit, Then Move to 180
Use 80-grit sandpaper to establish the final shape. Hold the sanding block flat against the surface you are shaping so you do not dig waves or dips into the filler.
Check the wheel-arch edge and the bumper fit as you work. You want a straight, consistent edge and an even panel gap. These details make a big difference once everything is painted.
Next, switch to 180 grit to refine the surface and feather the filler into the surrounding bodywork.
Run your fingers across the transition with your eyes closed. It should feel like one continuous panel. If you can feel a ridge, bump, or abrupt edge, keep correcting it. Paint will not hide a shape you can already feel.
Fill Pinholes With a Thin Skim of Spot Putty
At this point, you can continue refining the repair with finer abrasives. I like to use glazing and spot putty first to fill the tiny pinholes and surface imperfections that become obvious under paint.
Apply only a thin skim coat, pressing it into the surface. Spot putty is for small imperfections, not large holes or major reshaping.
The putty used here was ready to sand after about 15 minutes. Sand it with 320 grit, then clean the area. Now the contour should be smooth, the edges feathered, and the little surface defects filled.
Step 4: Prime and Paint the Panel
Clean the Work Area and Mask With a Soft Edge
Before painting, remove the accumulated sanding dust from the surrounding work area. A blower or compressed air can help clear it away, but do this before the final cleaning and give the airborne dust time to settle.
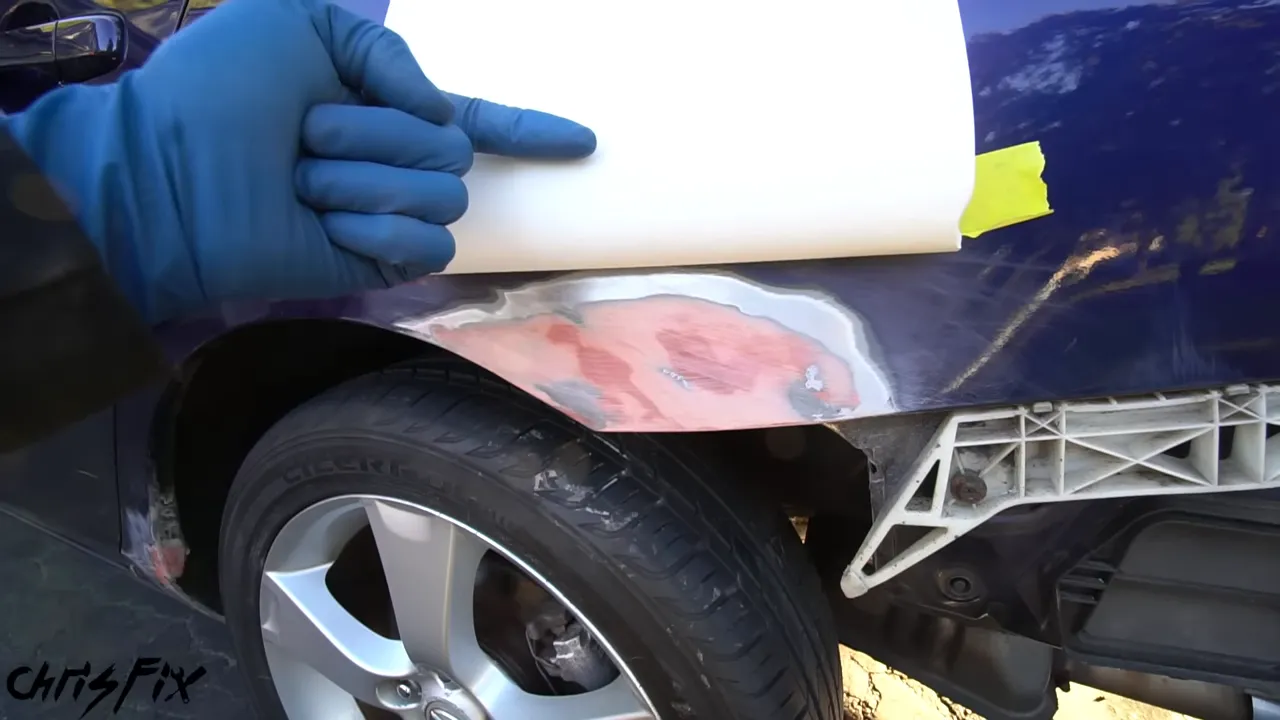
Wipe down the panel again with a compatible cleaner. Mask the wheel and surrounding parts that need protection from overspray.
Here is a useful masking trick: instead of ending the repair at a hard tape line, tape masking paper above the work area, then fold it back into a curve. That rounded edge holds the paper slightly away from the panel and helps create a softer spray transition.
Apply Filler Primer
I’m using a gray filler primer, rather than a basic primer, to help fill small remaining surface imperfections.
Apply the coats according to the can’s directions. This repair received three coats. Respect the specified flash times, drying time, spray distance, and coating compatibility.
Once the primer is dry, you have two options: finish the painting yourself or take the prepared repair to a paint shop. Doing the rust removal and bodywork yourself can reduce the work the shop needs to perform, although the shop will need to assess your preparation and materials.
Sand the Primer With 600 Grit
For the DIY paint finish, sand the primer with 600-grit paper on a block. Use light pressure and let the abrasive do the work.
Smooth the primer and feather its transition into the existing finish. On this repair, I also scuff about two inches into the surrounding clear coat to prepare a blending area.
Clean the surface again, let it dry, and remask with the curved-paper technique.
Spray the Color-Matched Base Coat
Use a base coat matched to the car’s paint code and a compatible clear coat.
The goal is light, even coverage. Concentrate the color over the primed repair rather than trying to cover everything with one heavy coat. Too much paint at once can run.
- Apply a light, even first coat.
- Allow it to flash as instructed. The base coat used here changes from shiny to matte as it dries.
- Apply the next coat with slightly fuller coverage.
- Repeat as needed for even color. This repair received three coats.
Use the product’s instructions as your guide rather than relying only on appearance to judge when another coat is ready.
Apply the Clear Coat
The clear coat provides the glossy outer finish. I apply a relatively light first coat with full coverage, followed by additional coats as directed. This repair received three coats, with the final coat slightly fuller to help it flow out without running.
I also warm the clear-coat can in tap water to improve the spray pattern, but only do this if the manufacturer permits it and stay within the label’s temperature limits. Never use boiling water, a flame, or direct heat. Dry the can thoroughly before spraying so water cannot drip onto the fresh finish.
Do not judge the color match while the coatings are still wet. Let the finish dry before evaluating it.
Here, the coating was dry enough after about an hour to remove the masking and refit the bumper. Your product may require a different wait.
You may notice a dusty-looking band of clear-coat overspray around the repair. Do not rub at fresh clear coat to remove it. Let the coating cure before attempting the final leveling and polishing.
Wet Sand the Cured Clear Coat
The clear coat used here allowed sanding after 24 hours, but I gave it several days before finishing. Follow your clear coat’s cure requirements before wet sanding.
Wet sanding removes some clear coat, so work carefully. The goal is to level surface texture and soften the transition, not sand through the finish.
Clean, Protect the Edges, and Prepare the Paper
Spray the area with soapy water and clean it thoroughly with a microfiber towel. Dirt trapped under the sandpaper can create deeper scratches.
Tape off neighboring edges you do not want to sand, including the bumper edge. Soak the wet-sanding paper as directed; I soaked the 1500-grit paper in soapy water for about 10 minutes.
Wrap the paper around a sponge. The sponge helps distribute pressure while conforming to the panel’s curves.
Work Through 1500, 2000, 3000, and 5000 Grit
Use this progression:
- 1500 grit: begin leveling the surface texture and overspray transition.
- 2000 grit: refine the scratches left by the first pass.
- 3000 grit: further refine the surface.
- 5000 grit: prepare the finish for polishing.
Keep the panel and abrasive wet with soapy water. Sand back and forth with long, even strokes rather than circular motions or concentrated rubbing in one spot.
Work carefully across the transition between the new clear coat and the existing clear coat. Rinse and wipe the panel between grits so you can inspect the surface and remove sanding residue.
A uniform haze is expected at this stage. The shine comes back during polishing. After the final grit, clean the area, let it dry, and remove the protective tape.
Polish the Paint to Bring Back the Shine
You can polish by hand, but an electric buffer makes the job much easier. I’m using polish on a wool pad for this repair.
- Apply a small amount of polish to the pad.
- Spread it onto the panel by hand before switching on the machine.
- Use a low speed. With the rotary buffer shown here, I keep it below 1,200 rpm.
- Keep the pad moving and use light pressure.
- Wipe away the residue with a clean microfiber towel and inspect the finish.
Do not hold the buffer in one spot or press hard. Let the pad and polish do the work so you do not overheat or cut through the clear coat.
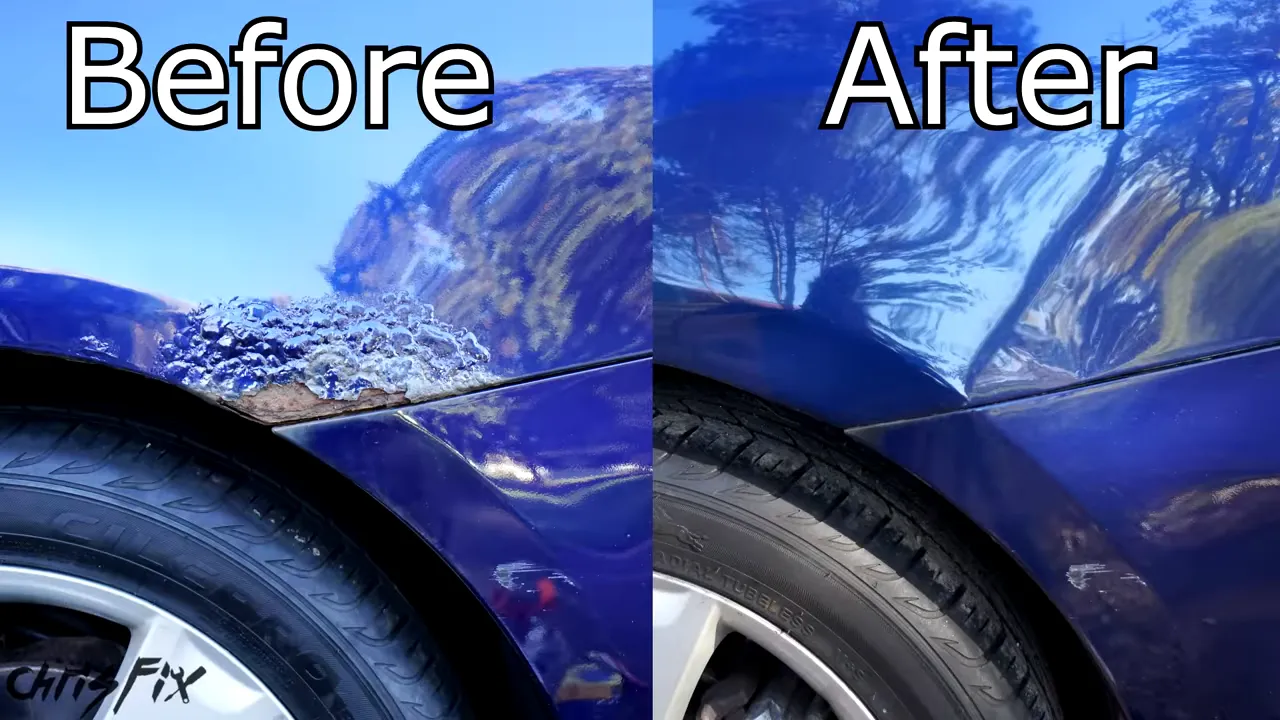
That is a pretty satisfying result for a home repair. I’m not a professional painter or bodywork technician, but careful preparation, patient sanding, and controlled spray coats made a huge difference.
The most important work happened before the color went on: removing corrosion, treating the backside, and preparing a clean surface. Repair small rust spots early, recognize when metal needs replacement, and take your time with each layer. That is how you give a no-weld cosmetic rust repair its best chance of lasting.


