A steering wheel that takes a workout to turn is no fun, whether you are parking on the street or preparing a car for an endurance race. The good news is that replacing a hydraulic power steering pump is a job you can tackle at home with common hand tools.
I’m using my 2004 BMW E46 as the example. This car has more than 250,000 miles, extremely heavy steering, and a badly rusted high-pressure line. Along with the pump, I’m replacing the reservoir, the reservoir-to-pump hose, and the high-pressure line so the system is ready to work again.
The basic process applies to many belt-driven hydraulic power steering systems, but access, fittings, pulley designs, fluid requirements, and torque specifications vary. Use the service information for your exact vehicle before starting. The torque values below are for this BMW repair, not universal specifications.
What You'll Learn
- Check fluid level, leaks, and belt operation before blaming the power steering pump.
- Drain the reservoir first and loosen hydraulic fittings while the pump is still mounted.
- Inspect replacement-part fit and install fresh crush washers and correctly lubricated seals.
- Use vehicle-specific fluid, torque specifications, and bleeding instructions before checking for leaks.
Table of Contents
- Diagnose the Steering Problem Before Buying a Pump
- Tools and Parts You’ll Need
- 1. Raise the Car and Remove Fluid From the Reservoir
- 2. Remove the Air Box for Reservoir Access
- 3. Remove the Belt and Power Steering Pulley
- 4. Disconnect the Lines and Remove the Old Pump
- 5. Transfer the Brackets and Compare the New Parts
- 6. Replace the Reservoir and Feed Hose
- 7. Replace the High-Pressure Power Steering Line
- 8. Install the New Pump and Reconnect the Hoses
- 9. Reinstall the Pulley, Belt, and Air Box
- 10. Fill and Bleed the Power Steering System
- 11. Check for Leaks, Test Drive, and Clean Up
Diagnose the Steering Problem Before Buying a Pump
Hard steering or a noisy power steering pump does not automatically mean the pump needs replacing. Start with the simple checks. You might find a leaking hose or a belt problem instead.
Check the power steering fluid level
Locate the power steering reservoir, remove the cap, and check the level using your vehicle’s specified procedure. On this BMW, the cap has a built-in dipstick with level marks.
If the fluid is low, inspect the reservoir and lines for leaks. Replacing a leaking hose and restoring the proper fluid level may be all the system needs. My BMW already had fluid at the correct mark, so low fluid was not the explanation for its heavy steering.
Pay attention to new groaning noises
A groan that suddenly appears when you turn the steering wheel is worth investigating. Some pumps are naturally louder than others. The Ford pump in my Mazda B3000, for example, has made the same familiar noise since I bought the truck. A change from the system’s normal sound is more useful than noise alone.
Old fluid can also contribute to pump noise. Compare these samples: the fresh fluid is bright red, while the used fluid is much darker. Fresh fluid may help a noisy system, although changing it cannot repair a mechanically damaged pump.
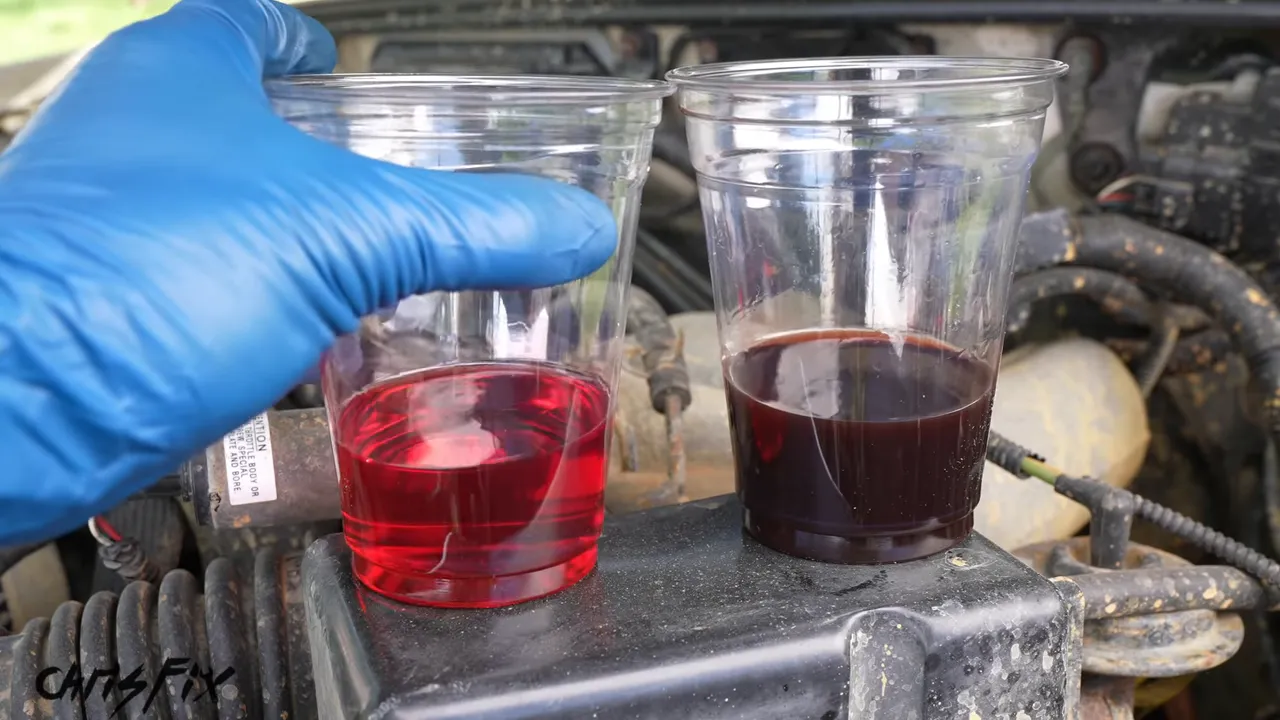
If the fluid needs service, address that first and reassess. When the steering remains heavy and the pump remains noisy after the fluid issue has been addressed, the pump becomes a stronger suspect.
Check the belt and tensioner
If hard steering comes with belt squealing, check the pump’s drive belt and tensioner. A loose or worn belt can slip instead of driving the pump properly.
With a helper turning the steering wheel, observe the pulley from a safe distance. A pulley that slows dramatically or stops while the belt slips points toward a drive problem. Keep hands, clothing, and tools away from running belts and pulleys.
On my BMW, the pump really was damaged. Later, opening it revealed broken metal inside and a sheared drive shaft. That explains why turning the wheel took so much effort.
Tools and Parts You’ll Need
Most of this job uses a basic tool set. The one tool that made a big difference in the tight space was a flare nut crow’s-foot wrench.
- Ratchet, sockets, wrenches, and extensions
- Torque wrench
- Pliers and a flathead screwdriver for hose clamps
- The correct belt-tensioner tool or bit, a T50 Torx on this BMW
- Flare nut wrench or flare nut crow’s-foot set
- Funnel and a fluid extractor or dedicated turkey baster
- Drain pan, collection container, and cardboard for spills
- Ramps or a jack with suitable jack stands, plus wheel chocks
- Replacement pump and any required mounting hardware
- Reservoir, hoses, and high-pressure line as needed
- New crush washers, seals, and suitable replacement hose clamps
- Replacement pulley if the original is damaged
- Medium-strength threadlocker where specified
- The correct power steering fluid for your vehicle
Why replace the reservoir?
Many power steering reservoirs contain a filter. On this BMW, that filter is not separately serviceable, so replacing the reservoir is how you replace the filter.
The reservoir appeared to be original, and with more than 250,000 miles on the car, a restricted filter was a concern. Once removed, its internal filter was also loose. Installing a new pump while leaving a questionable reservoir in place is not where I want to save a few dollars.
Inspect the lines while access is good
The high-pressure line on this car was heavily rusted. Even if it had not failed yet, it was not something I wanted to trust during an endurance race.
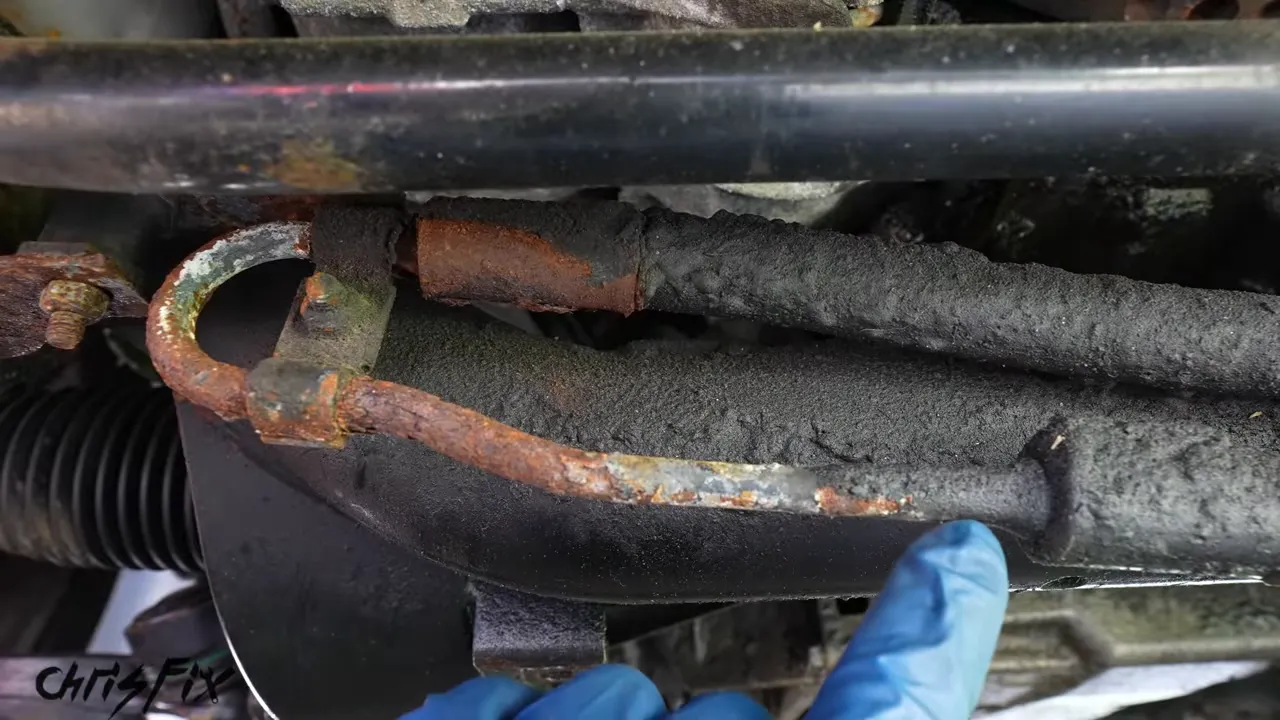
I bought a kit containing the pump, reservoir, hoses, and crush washers. It was listed at $140, and after making an offer, I paid $110.
That mattered for this budget build. I bought the BMW for $1,100 for an eBay Motors-supported 24 Hours of Lemons challenge. Selling unneeded parts could bring the car’s effective cost down to $430. Adding the $110 steering kit brought that to $540, which meant four penalty laps under the budget calculation for this build. Working power steering was absolutely worth it.
1. Raise the Car and Remove Fluid From the Reservoir
The pump on this BMW is accessed from underneath. I used ramps, but a correctly positioned jack and jack stands can also provide access. Chock the wheels to prevent the car from rolling, and make sure it is securely supported before getting underneath.
There is not much room around the pump. The radiator and sway bar limit access, but I was able to complete this repair without disconnecting the sway bar.
- Place cardboard under the work area and position a drain pan where fluid may spill.
- Remove the reservoir cap.
- Extract as much old fluid as possible into a collection container.
- Reinstall the cap until you are ready to remove the reservoir.
Draining the reservoir first makes the rest of the job much cleaner. There will still be fluid in the pump and lines, but there is no reason to let a full reservoir drain onto everything below it.
2. Remove the Air Box for Reservoir Access
On this E46, removing the air box opens up the area around the reservoir.
- Remove the two air-box mounting bolts.
- Release the retaining clips securing the mass airflow sensor housing to the air box.
- Separate the sensor housing from the air box and move it aside carefully.
- Release any intake-duct fasteners, then wiggle the air box out.
My front intake duct was already missing its plastic fasteners, so it was loose. Check yours rather than assuming it will lift straight out.
With the air box removed, identify the two reservoir hoses. One runs toward the front of the car to the cooler, and the other feeds the power steering pump below. Leave them connected for now while you remove the pump.
3. Remove the Belt and Power Steering Pulley
Here is a simple trick that saves frustration: loosen the pulley bolts before removing the belt. The belt helps keep the pulley from spinning while you break the bolts loose.
- Break all three pulley bolts loose, but leave them installed.
- Fit the tool to the belt tensioner. This BMW uses a T50 Torx.
- Rotate the tensioner clockwise to release belt tension.
- Slip the belt off the power steering pulley.
- Tuck the belt out of the way, leaving it routed around the other pulleys.
- Remove the three pulley bolts and the pulley.
The original BMW pulley is plastic, and mine did not want to come off. Rust had seized it to the pump hub. It also had chips and cracks, so it needed replacing regardless.
If you are trying to save a serviceable pulley of this bolt-on design, work gently and evenly. I applied light outward pressure, rotated the pulley, and repeated. Do not assume every vehicle uses this arrangement or removal method. Use the specified procedure for your pulley design.
My damaged pulley ultimately broke during removal. I replaced it with an aluminum version that matched the original dimensions and belt grooves.
4. Disconnect the Lines and Remove the Old Pump
Leave the pump bolted to the engine while loosening the hydraulic fittings. The mounting bolts hold it steady while you work.
Disconnect the high-pressure line
A regular wrench could reach the fitting, but the sway bar left almost no room to swing it. A 17 mm flare nut crow’s-foot let me reach the fitting with a ratchet instead.
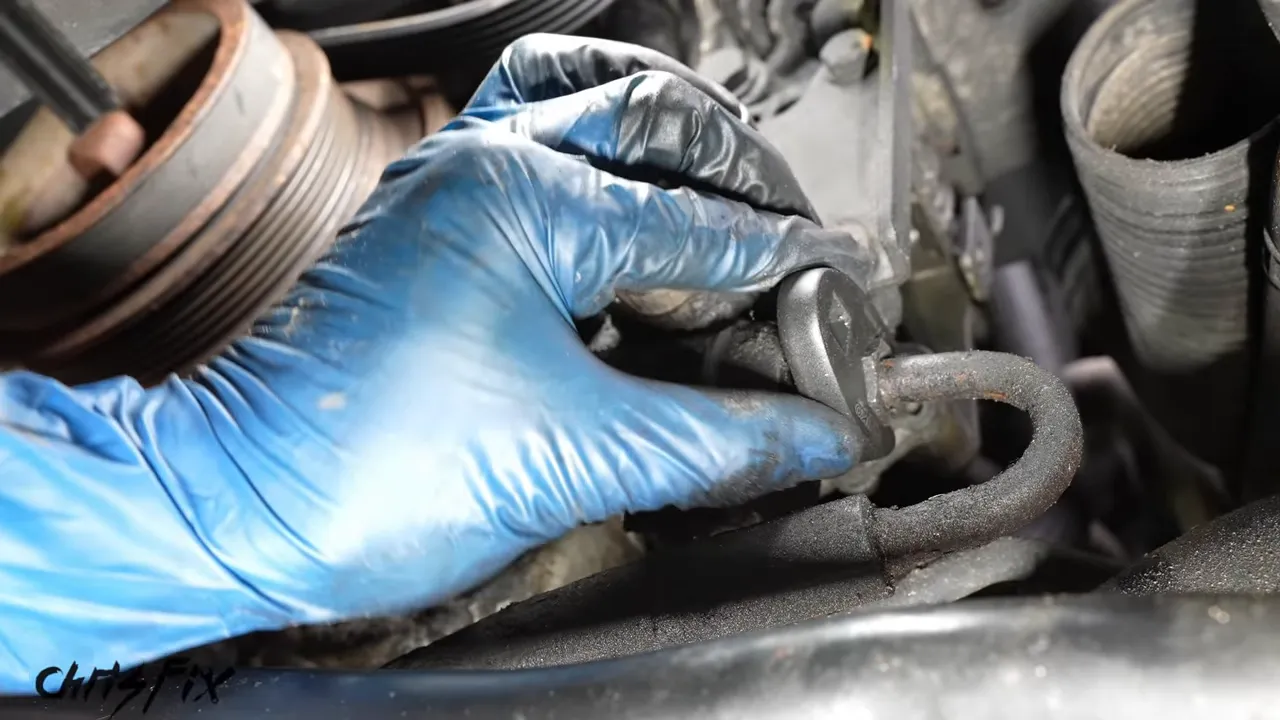
Break the fitting loose, unthread it, and pull the line out of the pump. Keep the drain pan ready for the remaining fluid.
Disconnect the low-pressure hose
The original low-pressure hose used a one-time crimp clamp. Open the crimp carefully with a flathead screwdriver, remove the clamp, and work the hose off the pump fitting. The clamp will be replaced during assembly.
Remove the three pump mounting bolts
Two bolts are accessible at the front bracket. The third sits behind the pump, where a long extension reaches it through a gap near the tie rod.
- Remove the two front mounting bolts.
- Reach the rear bolt with a long extension and remove it.
- Support the loose pump and guide it out through the available opening.
Perfect. With the pump on the bench, you can prepare its replacement without fighting the tight space under the car.
5. Transfer the Brackets and Compare the New Parts
The new pump did not include the front and rear mounting brackets, so I transferred them from the old pump.
- Remove the three front-bracket fasteners.
- Keep track of the bracket’s orientation and transfer it directly to the new pump.
- Apply medium-strength threadlocker as used for this installation.
- Start all three fasteners by hand, then torque them to 16 ft-lb.
- Remove the rear bracket’s two bolts and transfer that bracket in the correct orientation.
- Apply threadlocker, hand-start the bolts, and torque them to 16 ft-lb.
Before installing the pump, compare it with the original. Check the housing size, mounting holes, hose connections, and bracket fit. Everything should line up.
Do the same with the pulley. The replacement must match the original diameter, groove count, and mounting arrangement. Changing from plastic to aluminum does not remove the need to check fit.
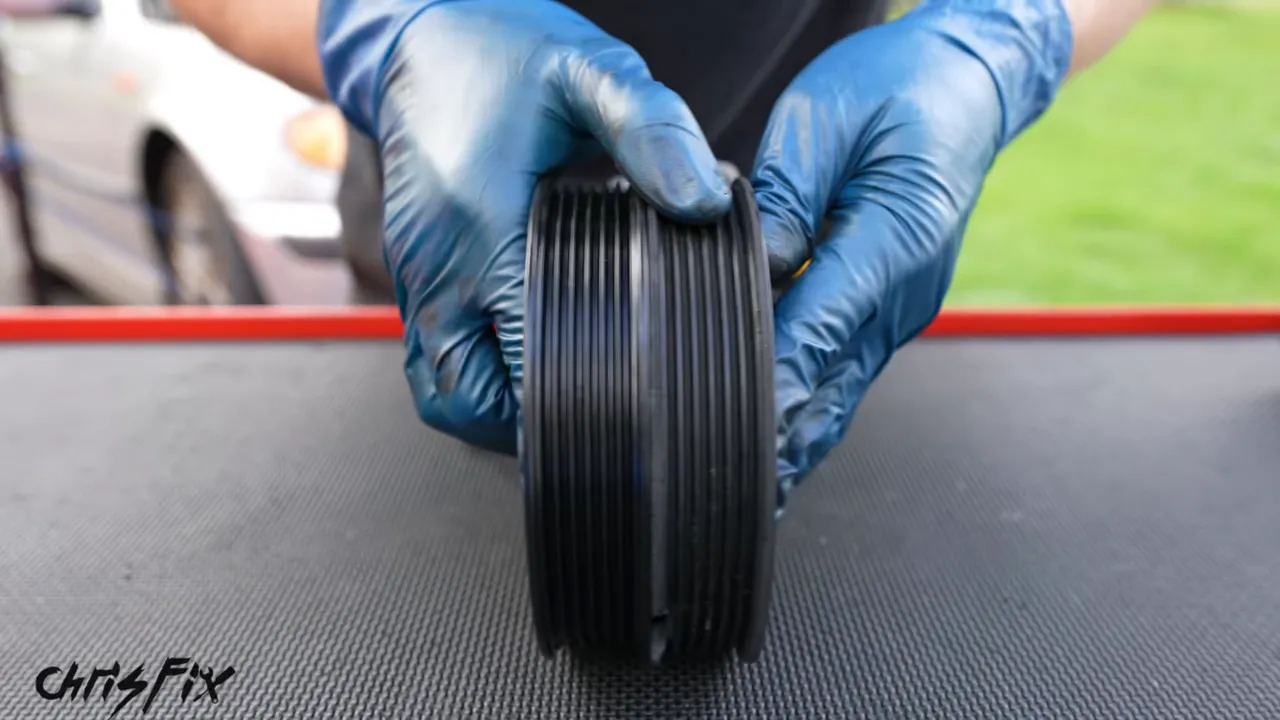
What failed inside the old pump?
Opening the old pump revealed a broken piece of metal interfering with its internal mechanism. The shaft connecting the pulley to the pumping assembly had also sheared.
Normally, the pulley drives that shaft, which turns the pumping assembly. With the shaft broken, the pulley could no longer drive the pump properly. This was a mechanical failure, not something a fluid change could fix.
6. Replace the Reservoir and Feed Hose
Before installing the new pump, replace the old reservoir so you are not feeding it the old reservoir’s remaining fluid.
- Protect the alternator below the reservoir from fluid drips.
- Open and remove the crimp clamp on the cooler hose.
- Twist the hose gently to break its grip on the reservoir fitting, then pull it off.
- Loosen the reservoir’s retaining-clamp bolt.
- Lift out the reservoir with the old pump-feed hose still attached.
Twisting the cooler hose before pulling made a big difference. After nearly 20 years, it was firmly stuck to the fitting.
I fitted the new feed hose supplied with the kit to the corresponding port on the new reservoir. Compare the old and new parts so the hose goes on the right connection.
Only snug the hose clamp on a plastic reservoir nipple. Overtightening can crack the plastic. Once secured, give the hose a gentle pull to make sure it will not slide off.
Feed the new hose down toward the pump location, seat the reservoir in its holder, and snug the retaining bolt. Then slide a new clamp onto the cooler hose, reconnect that hose, and tighten the clamp until secure.
7. Replace the High-Pressure Power Steering Line
The pump end of the pressure line is already disconnected. Now remove its support bracket and the connection at the steering rack.
- Remove the bolt securing the pressure-line bracket to the subframe.
- Loosen and remove the banjo bolt at the steering rack.
- Remove the old line.
- Check the rack and banjo bolt for old crush washers, and remove them.
Do not overlook a washer stuck against the rack. Stacking a new crush washer on top of an old one is not the correct way to seal the connection.
Install two new crush washers
Position the replacement line and secure its mounting bracket. At the steering rack, assemble the banjo connection with one new washer on each side of the line fitting:
- Banjo bolt head
- New crush washer
- Pressure-line banjo fitting
- New crush washer
- Steering rack sealing surface
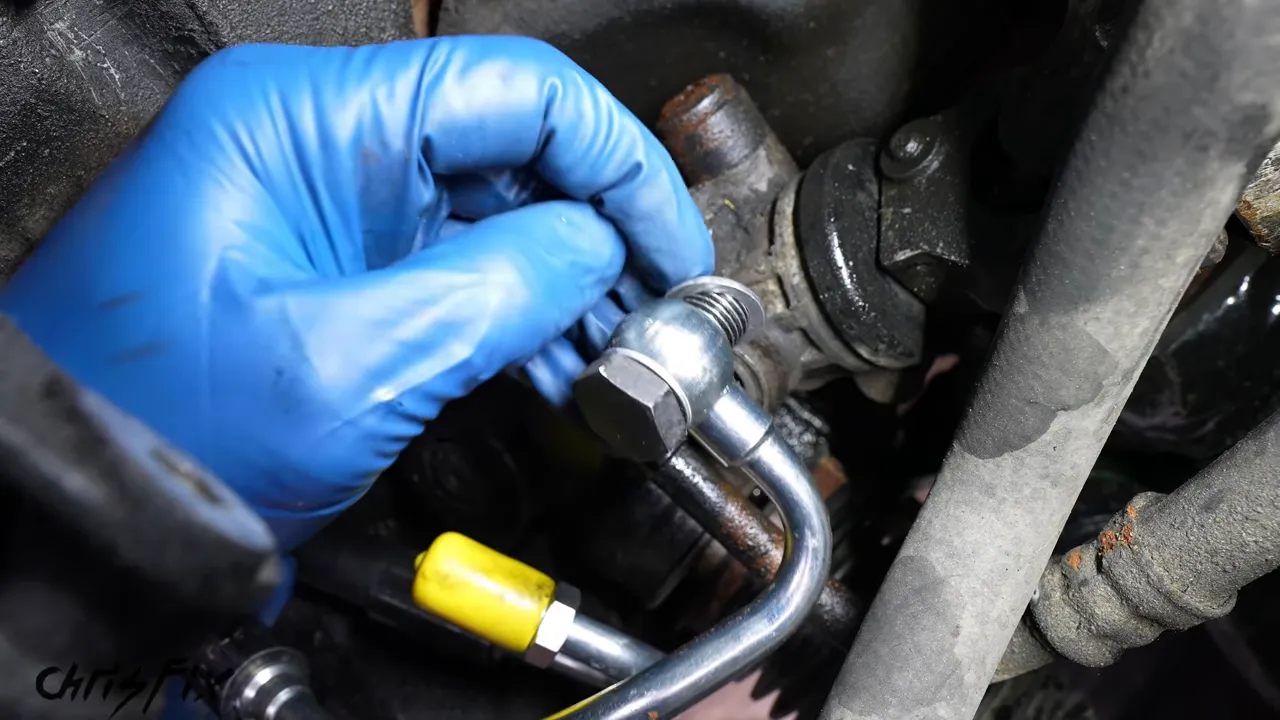
Start the bolt by hand to avoid cross-threading. On this BMW, I torqued the rack banjo bolt to 26 ft-lb. Correct torque matters because the washers must compress to seal the connection.
8. Install the New Pump and Reconnect the Hoses
Guide the new pump into position and hand-start the mounting bolts. I used medium-strength threadlocker on the mounting fasteners for this installation.
Torque the two front mounting bolts to 16 ft-lb, then install and torque the rear bolt through the access gap with the long extension.
Connect the low-pressure feed hose
Slide the hose fully onto the pump inlet until it bottoms against the fitting’s stop. Position the clamp and tighten it until snug. Access was easiest from above, although the connection itself was mostly by feel.
Connect the high-pressure line
Lubricate the line’s O-ring with a little clean, correct power steering fluid before inserting it into the pump. This helps the seal slide into place without getting pinched.
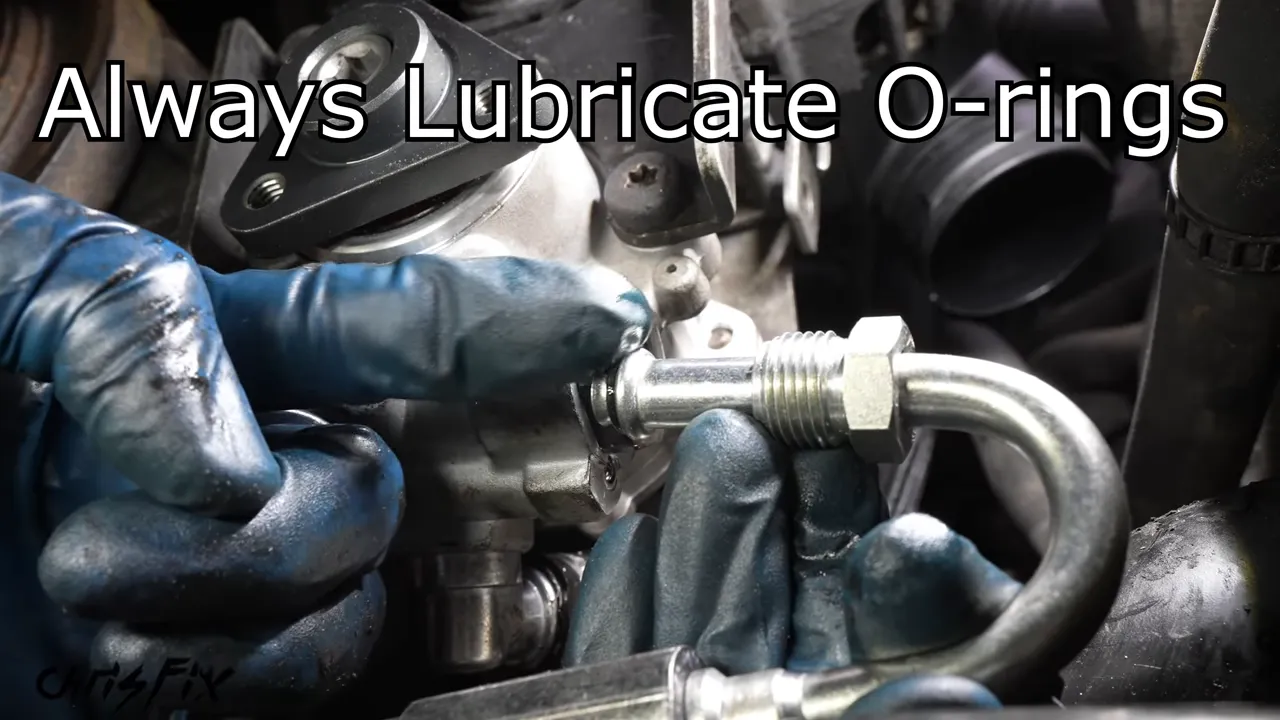
Push the line into place and thread the fitting in by hand. Then use the crow’s-foot wrench to tighten it to the specified torque, 25 ft-lb for this BMW connection. Follow your torque wrench and adapter instructions so the adapter arrangement does not change the applied torque unexpectedly.
9. Reinstall the Pulley, Belt, and Air Box
- Place the pulley on the pump hub.
- Apply medium-strength threadlocker to the three pulley bolts as used in this installation.
- Start all three bolts by hand.
- Release the belt tensioner and slip the belt back over the pulley.
- Make sure the belt is properly seated, then release the tensioner.
- Torque all three pulley bolts to 16 ft-lb.
With the belt back on, reinstall the air box. Seat it properly, reconnect the mass airflow sensor housing, snug the two mounting bolts, and secure the retaining clips on both sides. Refit any intake ducting and fasteners removed for access.
Now the mechanical installation is complete. The important part left is getting the correct fluid into the system and the air out.
10. Fill and Bleed the Power Steering System
Choose fluid by specification
Check your owner’s manual and the required fluid specification before filling. Do not assume every hydraulic steering system uses the same fluid.
For this repair, I used a full-synthetic product labeled for the BMW application. What matters for your car is that the fluid meets its actual requirements.
Fill the system without letting the pump run dry
The new pump and hoses need fluid, so the reservoir level will drop as the system fills. Have extra fluid ready and monitor the level carefully.
On this BMW, I initially added two 12-ounce bottles and filled above the normal operating level because the replacement components were empty. That was the approach used here, not a universal fill instruction. Follow your vehicle’s filling and bleeding procedure, and finish at its specified level.
Cycle the steering to remove air
For this repair, I started the engine and turned the steering wheel slowly from one steering limit to the other to circulate fluid and purge air.
- Fill the reservoir according to the applicable service procedure.
- Cycle the steering slowly from side to side as directed for your vehicle.
- Keep checking the reservoir so the pump does not run dry.
- Continue the prescribed bleeding process until steering assist becomes smooth and pump noise settles.
- Recheck and adjust the fluid to the specified level.
Do not force or hold the wheel against the steering stops. Some vehicles call for initial bleeding with the engine off or the front wheels raised, so use the procedure for your system rather than assuming this example fits every car.
At first, my BMW’s steering was still heavy because the replacement components had not filled. After roughly five side-to-side cycles, the effort dropped dramatically. That is what I wanted: light, smooth steering instead of a workout.
The system took almost another 12-ounce bottle afterward, for approximately 36 fluid ounces total during this repair. That is the amount used here, not a universal system capacity.
The fluid initially looked frothy from the air being purged. Let the air settle and recheck the level. Persistent foam, noise, or heavy steering means the system is not ready for a test drive and needs further attention.
11. Check for Leaks, Test Drive, and Clean Up
Before driving, inspect every connection you disturbed:
- Both reservoir hose connections
- The low-pressure hose at the pump
- The high-pressure fitting at the pump
- The banjo connection at the steering rack
- The replacement line’s routing and support bracket
Look for fresh drips or wet fittings while keeping clear of moving components. My pressure line and pump fittings were dry, the pump had quieted down, and the fluid level had stabilized.
Once everything checks out, take the car for a test drive. The result on this BMW was smooth as butter. Turning the wheel was effortless again, exactly what this car needed before its endurance-racing preparation could continue.
Collect the old fluid for proper disposal. A local recycling center, some parts stores, or a repair shop may accept it, but confirm what they take before bringing it in. The EPA’s used-oil recycling guidance also explains why automotive fluids should be handled carefully rather than dumped.
And that piece of cardboard under the car? It earned its keep. Even after draining the reservoir first, there were still spills, and containing them made cleanup much easier.
Replacing the pump is only part of a successful repair. Diagnose the problem first, inspect the reservoir and lines, use fresh seals and the correct fluid, and finish with proper bleeding and a leak check. Those details are what turn a new pump into working power steering.


