A power window usually gives you a little warning before it quits. Mine started making a groaning noise, and I kept using it for about a month. Then, on a rainy day, the motor finally gave out with the window stuck halfway open. Perfect timing, right?
The good news is that you may not need an entire window regulator assembly. If the mechanism is still in good shape and only the motor has failed, replacing the motor can save you hundreds of dollars.
I’m doing this repair on my Hummer, but the basic process applies to many vehicles. The biggest difference is usually how the interior door panel comes off and how the motor attaches to the regulator. Diagnose the problem first, verify your replacement part, and check clearances before putting everything back together.
What You'll Learn
- Check the fuse, switch, wiring, and regulator before deciding the window motor needs replacement.
- Replacing only a failed motor can cost substantially less than replacing the complete regulator assembly.
- Replacement bolts must clear the glass, window frame, and regulator throughout the window’s travel.
- Preserve and reseal the moisture barrier before reinstalling the interior door panel.
Table of Contents
- Diagnose Why Your Power Window Won’t Move
- Tools and Supplies
- Remove the Interior Door Panel
- Peel Back the Moisture Barrier Without Tearing It
- Remove the Old Window Regulator Motor
- Compare the Motors and Transfer the Mounting Plate
- Install the New Motor and Check Bolt Clearance
- Reassemble the Door
- Test the Window and Address Any Remaining Binding
Diagnose Why Your Power Window Won’t Move
I don’t like throwing parts at a car and hoping something fixes it. A window that won’t roll up could have a bad motor, but it could also have a blown fuse, a failed switch, damaged wiring, or a broken regulator.
Common warning signs of a failing window motor include:
- Grinding, groaning, or loud whining during operation.
- A window that moves slowly or seems weak.
- Movement that stops partway through its travel.
- A window that will not move in either direction.
Those symptoms tell us where to start, not necessarily which part to buy.
1. Check the power window fuse
Use your owner’s manual or fuse diagram to identify the correct power window fuse. Remove it and inspect the metal connection inside. An intact connection is a good sign; a broken or burned connection indicates a blown fuse.
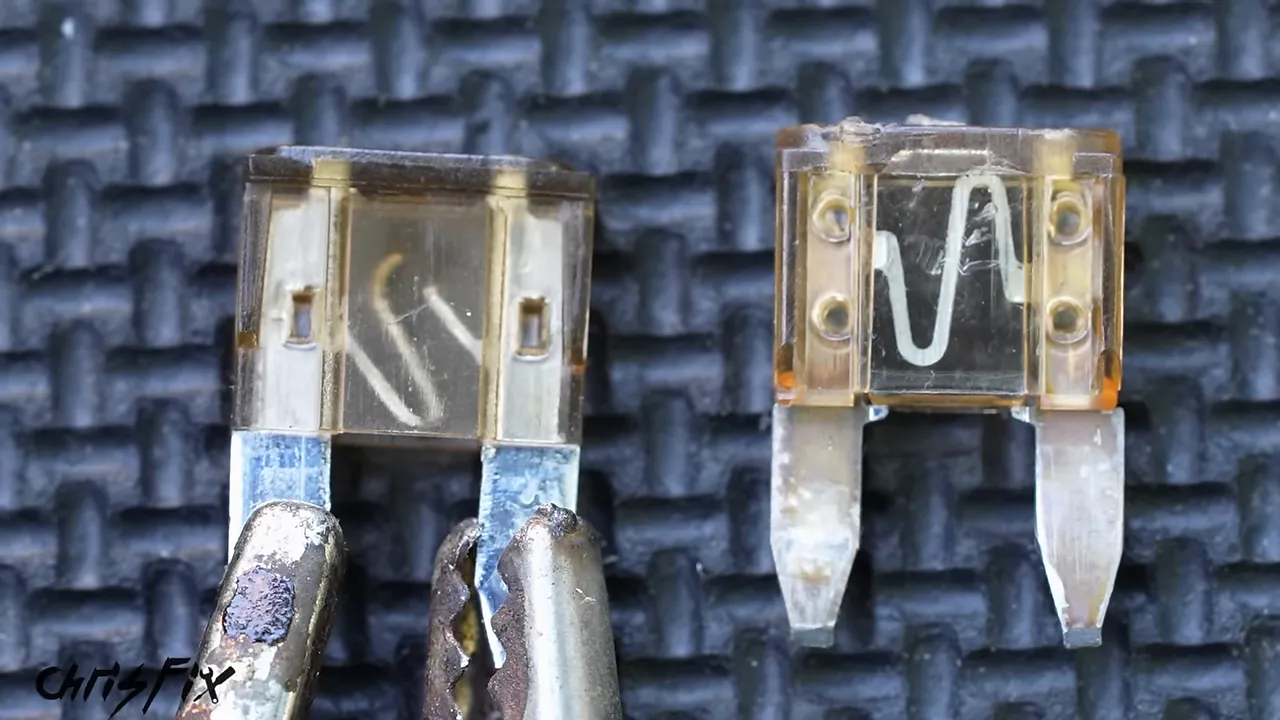
If the fuse is blown, replace it with the same specified type and amperage rating. For example, a circuit specified for a 5-amp fuse needs another 5-amp fuse, not a larger one. The fuse protects the circuit, so increasing its rating is not a repair.
Test the window after replacing the fuse. If it blows immediately, stop and investigate the motor, wiring, and connections for an overload or electrical fault. If it works and the fuse stays intact, monitor its operation. An intermittent problem may take longer to show up again.
On my Hummer, the fuse was fine, so I moved on.
2. Test the window switch
A failed switch can make a perfectly good motor seem dead. On this vehicle, the passenger-side window uses an identical switch, and I already knew that switch worked.
- Carefully release the suspect switch from its bezel.
- Disconnect it and inspect its terminals for burning or corrosion.
- Inspect the harness connector as well.
- If another switch is confirmed to be identical and compatible, temporarily connect that known-good switch.
- Try operating the window.
Don’t assume two switches are interchangeable just because they look similar. Here, the compatible passenger switch did not move the driver’s window either, which ruled out the original switch as the cause.
3. Check the wiring between the door and body
Most cars have a flexible rubber boot protecting the wires that run between the body and the door. Those wires flex every time the door opens and closes. Over time, a wire can become damaged and lose its connection.
A quick check is to operate the window switch while gently moving that wiring boot. If the window starts and stops as the boot moves, that points toward a damaged wire or intermittent connection inside.
This is only a preliminary test. A completely broken wire may not reconnect when you move it. If the simple checks don’t identify the problem, check for the expected power at the window motor while commanding the window, using the vehicle’s wiring information.
The Hummer has a rigid sliding wire protector rather than the more common flexible boot, so I used my Jaguar to demonstrate that particular wiring problem. Repair access varies by vehicle; don’t assume the door has to come off.
4. Separate a motor failure from a regulator failure
The motor provides the power. The regulator is the mechanism that supports and moves the glass. Replacing the motor will not fix a broken regulator.
For example, the Dodge Viper regulator I examined uses a flexible drive running through a plastic tube. That tube is a known failure point on the Generation 3 through Generation 5 examples discussed here. When the regulator mechanism itself fails, it needs repair or replacement, not just a motor.
The price difference makes diagnosis worthwhile. The Viper regulator was about $500 each, and the Hummer regulator was about $450. The motor used for this Hummer repair cost about $50. Those are prices for these examples, not a universal estimate, but the savings are substantial.
My replacement motor was listed for a 1991 through 1996 Jeep Cherokee. Some applications share motors, but verify fitment, mounting points, drive gear, and electrical connector before buying.
Tools and Supplies
This job uses mostly common hand tools. The drill is needed because the Hummer’s original motor is attached with three rivets.
- A compatible window regulator motor.
- A drill and suitable drill bits.
- Screwdrivers, wrenches, and the appropriate socket or Torx tools.
- A trim removal tool, depending on the door panel.
- A tray for screws and other small fasteners.
- A bungee cord or suitable means of keeping the door from swinging.
- Suitable replacement nuts and bolts for this riveted installation.
- Medium-strength threadlocker.
- Silicone dielectric grease for the motor connection.
- A razor blade for carefully separating stubborn moisture-barrier adhesive.
- Replacement butyl tape if the original sealant no longer sticks.
- Side cutters and a replacement zip tie.
- A vise and hacksaw if a replacement bolt needs shortening.
- Dry window-track lubricant, only if needed.
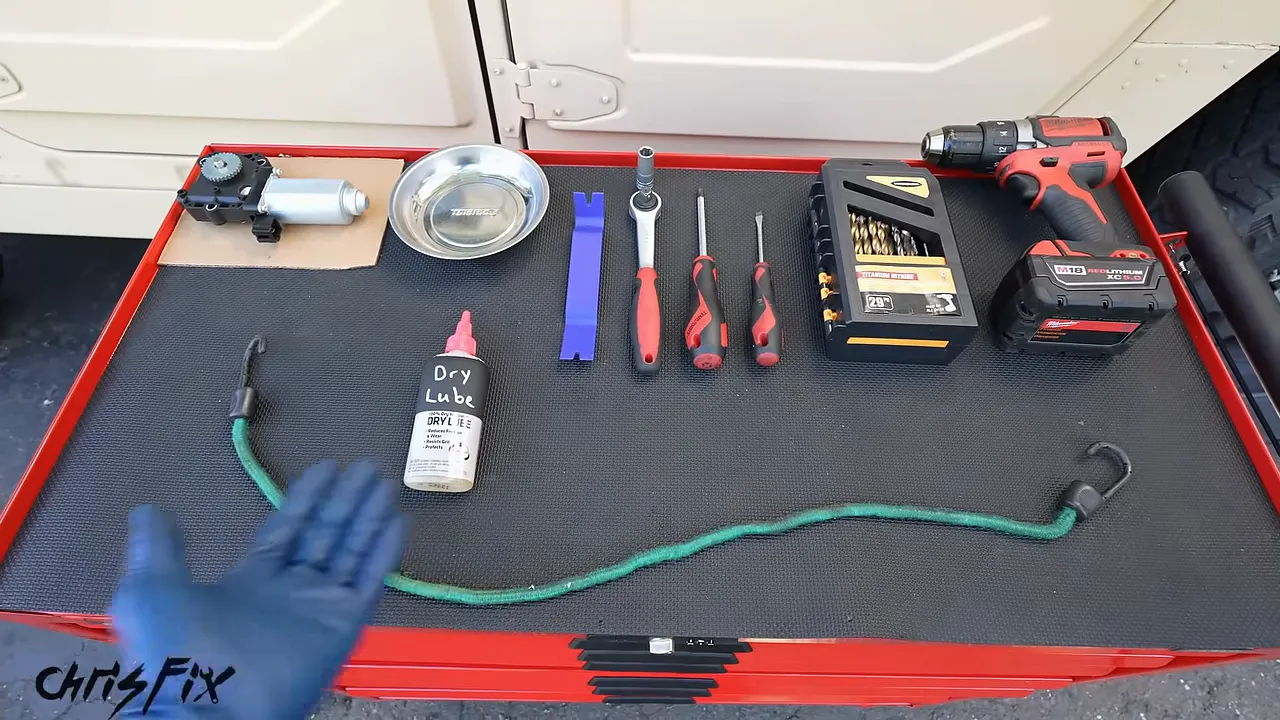
Before removing the motor, check your vehicle’s service procedure for supporting the glass and securing the regulator. Door mechanisms differ, and some can move or release stored spring tension when disconnected. Keep hands clear during powered testing, wear eye protection when drilling or cutting, and isolate electrical power during disassembly as directed by the service procedure.
Remove the Interior Door Panel
First, keep the door from swinging shut while you work. I used a bungee cord to hold mine open.
Door-panel attachment varies considerably. Some panels have screws, some use plastic clips, and some combine both. Find the fasteners before pulling on the panel so you don’t break it.
Here is the removal sequence for this Hummer:
- Remove the five panel screws along one side and put them in the parts tray.
- Loosen the two screws underneath the armrest. These are captive screws, so they stay in the armrest.
- Remove the upper corner screw on the opposite side.
- Unbolt the door-limiting strap and move it aside.
- Remove the lower corner screw.
- Remove the two screws securing the switch bezel.
- Remove the four screws securing the interior door handle assembly.
- Disconnect the window and lock switches.
- Pass the handle assembly through the panel opening.
- Release the hook-and-loop attachment at the top and lift the panel away.
Keep track of where each fastener belongs, particularly if the screws differ in length. The goal is to finish with everything back in its original location, not with a handful of mystery screws.
Peel Back the Moisture Barrier Without Tearing It
Behind the panel is a plastic moisture barrier. It keeps moisture inside the door from reaching the interior trim, so we want to preserve it and reseal it properly.
Start peeling it back slowly. The black adhesive around its edge is butyl rubber. If it releases easily, leave as much of that adhesive in place as possible so it can be reused.
If the adhesive is stretching the plastic or threatening to tear it, carefully slice through the butyl with a razor blade while gently peeling the barrier away. Cut the adhesive, not the plastic or nearby wiring.
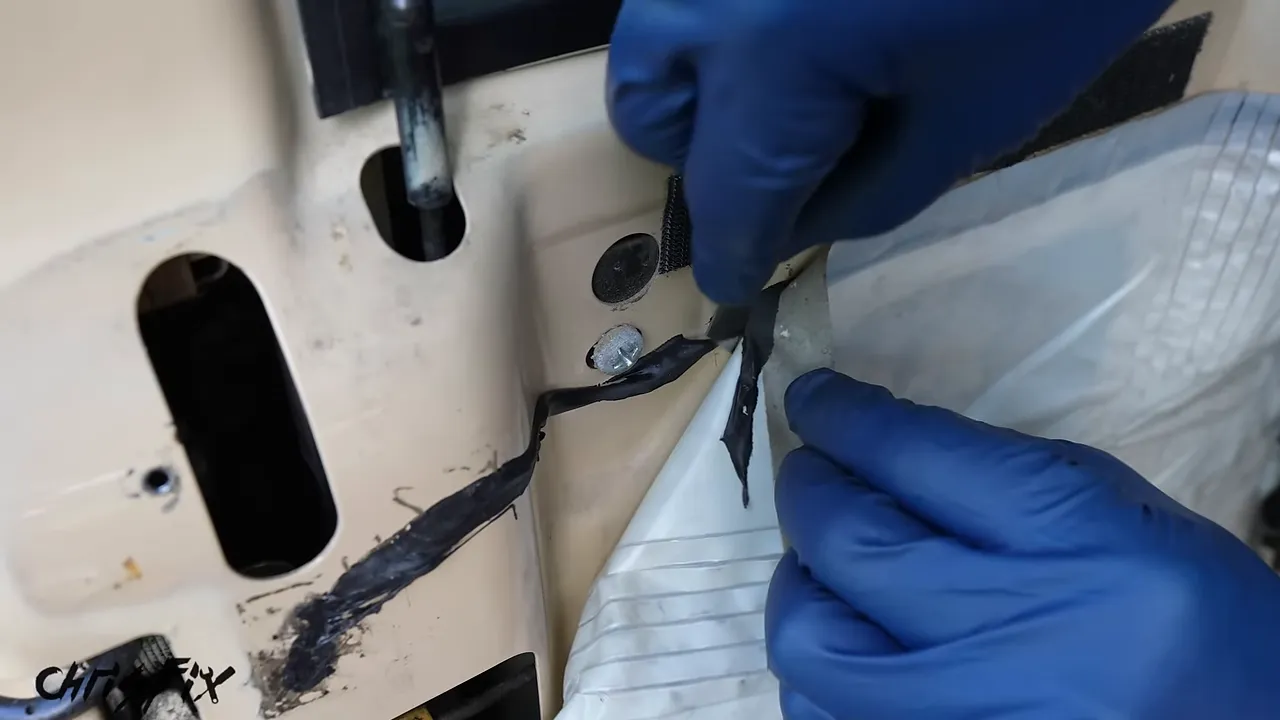
You don’t need to remove the whole barrier if folding it down exposes the motor. I left mine attached at the bottom and hanging above the ground. That keeps dirt off the adhesive, which helps it stick again during reassembly.
Remove the Old Window Regulator Motor
Move the support out of the way
The replacement motor makes a useful reference for locating its three mounting points. On the Hummer, a metal support blocks access to one of the rivets.
- Clip the zip tie securing the wiring harness to the support.
- Remove the center T27 bolt attaching the regulator to the support.
- Remove or loosen the Phillips-head fasteners at the support’s ends.
- Swing the support aside far enough to access all three rivets.
I could leave the support hanging from one loose end fastener rather than removing it completely.
Drill off the rivet heads
The drill bit needs to be large enough to remove the rivet’s retaining head. A tiny bit that fits inside the rivet’s center will simply drill through the middle without releasing the head.
Choose a bit that cuts the shoulder around the center opening while avoiding unnecessary damage to the mounting plate. Drill only far enough for the rivet head to separate, then repeat for the other two mounting rivets.
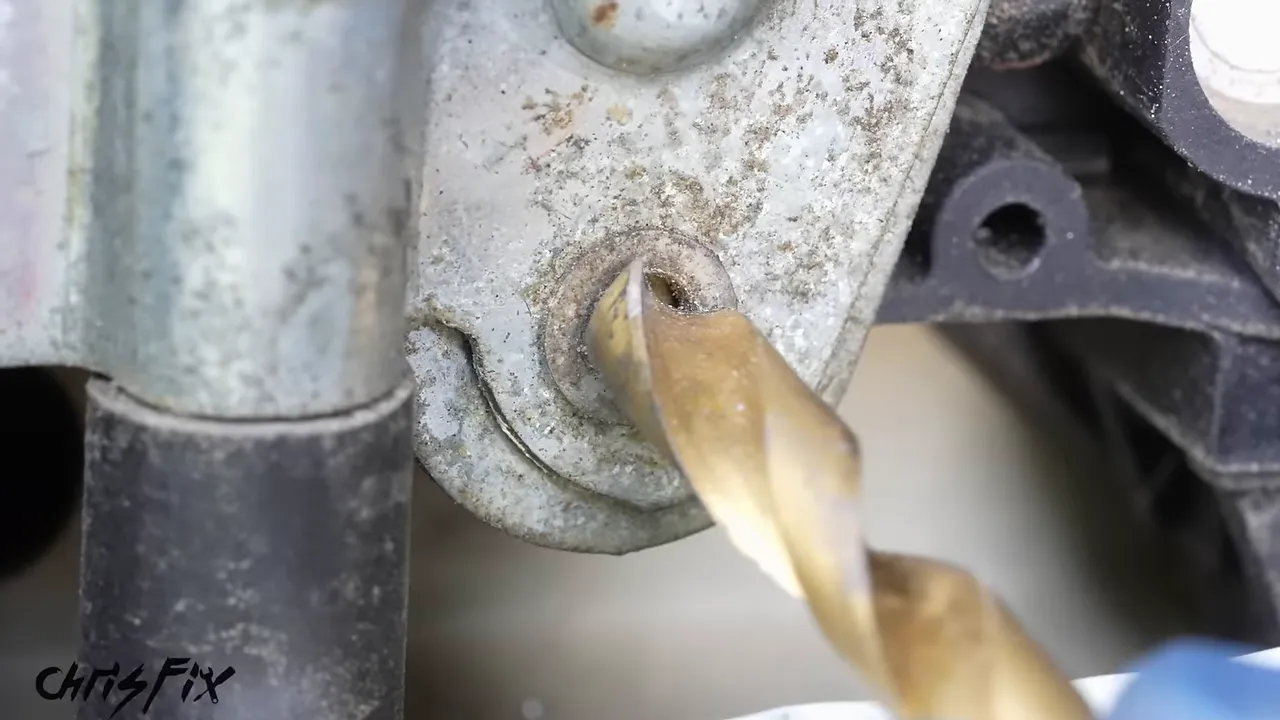
With the heads removed, the remaining rivet bodies can come out and the motor can separate from the regulator. Disconnect the electrical harness and remove the motor.
During diagnosis, my old motor briefly came back to life after a few taps with the back of a screwdriver, then stopped again. That explains why a failing window sometimes works after the door gets slammed. Temporarily reviving a motor is not the same as repairing it.
Compare the Motors and Transfer the Mounting Plate
Before installing a replacement part, put it beside the old one. This quick comparison can save a lot of frustration.
Check these details:
- Mounting pattern: The attachment points must line up.
- Drive gear: Compare diameter, tooth pitch, and installed orientation.
- Electrical connector: The connector and terminal arrangement must match.
- Transferred hardware: Look for brackets or plates missing from the new part.
- Connector condition: Inspect for corrosion or damage that also needs attention.
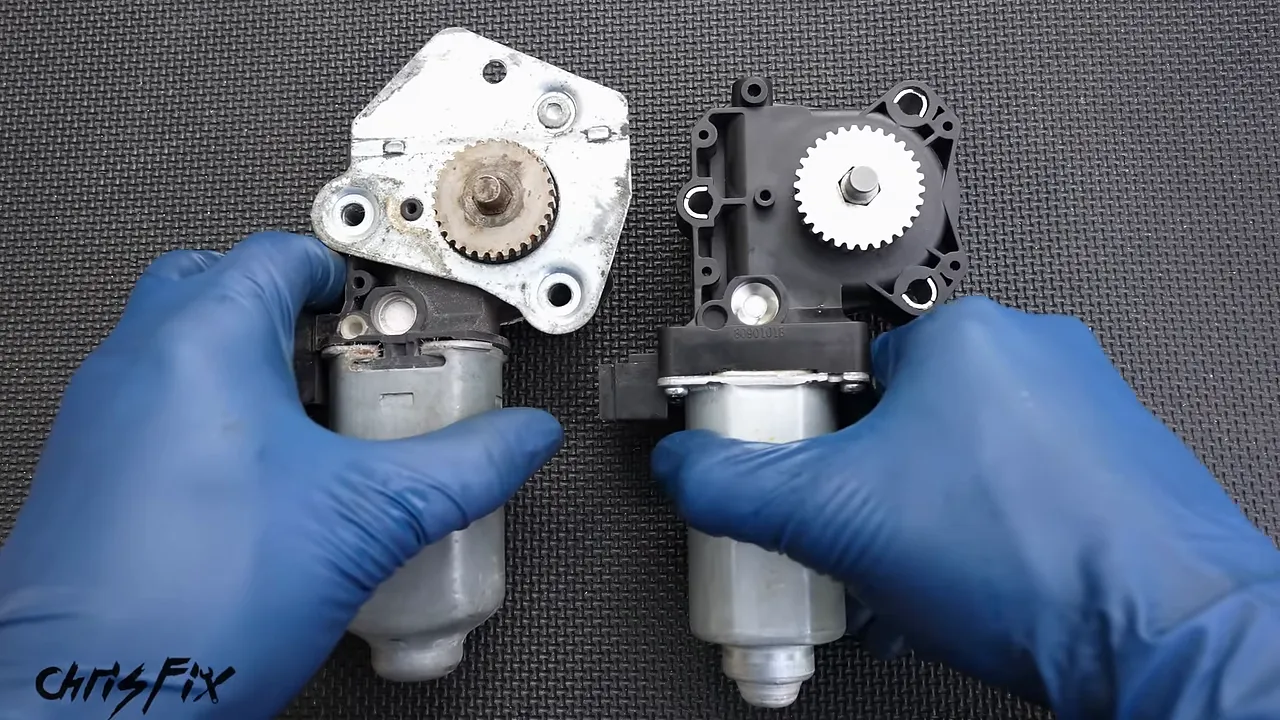
My old motor still had a metal mounting plate attached, while the new motor did not. I finished drilling out the remaining rivet holding that plate to the old motor, then transferred the plate to the replacement.
For this installation, I replaced the riveted attachment with suitable nuts and bolts. I secured the transferred plate with a bolt and nut, using a little medium-strength threadlocker to help prevent vibration from loosening it.
Use the specified threadlocker strength rather than choosing by bottle color. For general product guidance, Henkel’s threadlocker information explains the available product category.
Before reconnecting the motor, I also applied silicone dielectric grease at the connector opening to help keep moisture out. This is moisture protection, not a substitute for fixing corroded or damaged terminals.
Install the New Motor and Check Bolt Clearance
Connect the wiring harness, position the motor on the regulator, and align the drive gear and mounting holes. Insert the replacement mounting bolts.
Here’s the detail that makes this repair more than a simple parts swap: a bolt can stick out farther than the rivet it replaces. The motor may fit perfectly, but the moving glass or its lower frame can still hit the new hardware.
Check the full path of the glass
On my initial fit check, the threaded end of an upper bolt pointed toward the glass. The window traveled upward, but its lower metal frame contacted that bolt on the way down.
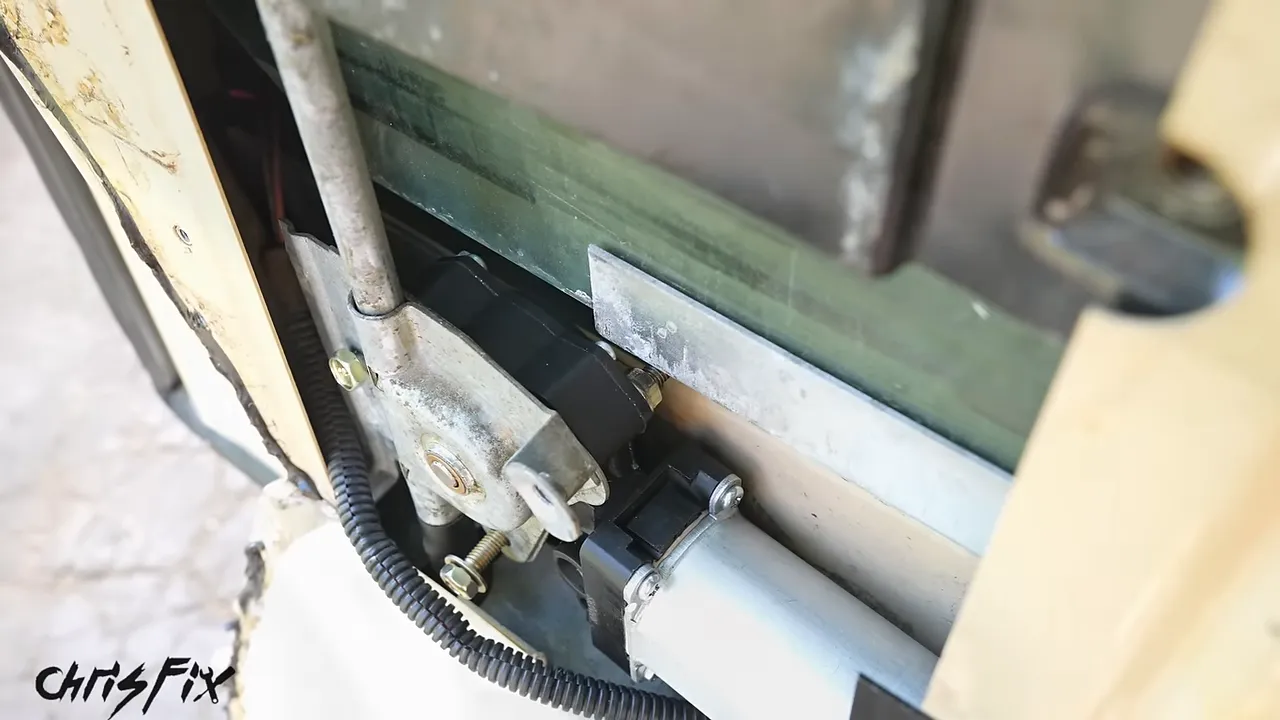
Don’t force the window past an obstruction. Stop, reposition the hardware, and check again.
I solved that interference by reversing the bolts so the lower-profile bolt heads faced the glass and the threaded ends pointed away from it. One bolt also had a washer under its head that reduced clearance. On this installation, removing that washer gained a little more room.
That washer change was specific to the hardware used here. Choose suitable fasteners for your application rather than assuming every washer can be discarded.
Shorten a bolt if it interferes on the other side
Reversing the bolts fixed the glass-side problem, but one threaded end then extended too far toward another part of the regulator. That bolt needed to be shorter.
- Mark the required length with the bolt positioned in its mounting hole.
- Remove the bolt.
- Clamp the portion being discarded in a vise so the usable threads are not damaged.
- Cut through the bolt at the mark with a hacksaw.
- Check that the nut threads on properly and that sufficient thread engagement remains.
A plain hand hacksaw did the job. I used a magnet to help position the shortened bolt because access was tight.
Secure the motor and test again
Once the hardware fit correctly, I applied medium-strength threadlocker to the three mounting bolts, installed the nuts, and snugged them down to secure the motor to the regulator. The upper two were easy to reach. The lower fastener needed a crow’s-foot wrench to hold the bolt head in the confined space.
With the assembly safely secured for testing, move the window through its travel while keeping hands and tools clear. Confirm that the glass and its frame pass the hardware without contact. On the second check, mine had the clearance it needed. Beautiful.
Reassemble the Door
Restore the support and harness routing
Swing the metal support back into position and tighten its end fasteners. Reinstall the center bolt securing the regulator to the support. Don’t forget that center attachment.
Replace the zip tie that holds the wiring harness in its original position, then trim the excess tail. The harness needs to stay clear of the moving window mechanism.
Reseal the moisture barrier
Pass the handle assembly and switch wiring through their openings in the barrier. Align the plastic with the original butyl outline and press firmly around the entire perimeter.
If the original adhesive is dirty, old, or no longer sticking, use fresh butyl tape. Cut off a suitable piece, stretch it into a thinner strip as needed, and place it along the area that needs resealing.
Take your time here. Reinstalling the trim does not make up for a moisture barrier that is loose or poorly sealed.
Reinstall the interior panel
For the Hummer, reassembly follows this sequence:
- Pass the handle assembly and wiring through the panel openings.
- Position the panel and reinstall the five side screws.
- Tighten the two captive screws under the armrest.
- Reconnect the window and door-lock switches.
- Position the switch bezel and secure its two screws.
- Install the four handle screws, tightening in a crisscross pattern so the assembly seats evenly.
- Reattach the door-limiting strap.
- Install the remaining upper and lower corner screws.
For another vehicle, restore its clips, connectors, and fasteners according to its panel design.
Test the Window and Address Any Remaining Binding
With the door fully assembled, run the window all the way down and back up. It should move smoothly without catching, slowing dramatically, or making the new motor struggle.
Mine was fast and quiet again, so it did not need any additional lubrication.
If the glass still binds in its side tracks, investigate that resistance instead of assuming the new motor is faulty. A suitable dry window-track lubricant may help when track friction is the issue. I prefer a dry-film product here rather than leaving a residue that holds dirt in the channel.
Apply it into the affected side track, cycle the window, and repeat on the opposite side if needed. Follow the lubricant’s compatibility instructions and reassess the movement. Lubricant will not correct damaged hardware or a mechanical obstruction.
If the window already moves properly, leave the tracks alone. There is no need to add another product just because you have it on hand.
The finished repair gave me a working window without replacing a good regulator assembly. A roughly $50 motor instead of a roughly $450 assembly is a big difference. Diagnose first, pay attention to the replacement hardware, and reseal the door properly. That’s a job well done, and the window is finally closed before the rain gets any worse.


