A quick vacuum makes a car look better. A super clean goes after the dirt you cannot easily see: grit buried in the carpet, sticky candy underneath the seats, debris in the spare tire well, and stains on the headliner.
That extra attention makes a huge difference. The interior is where you sit, touch things, breathe, and bring passengers. You want it to look good and smell fresh, not just have a clean dashboard above a musty carpet.
I used two very different examples for this job: Susan, a badly dirtied car with mud, melted candy, and gum inside, and my sister’s daily driver, which had the more familiar combination of dust, tracked-in dirt, and everyday mess. Both cleaned up beautifully. The process is the same, even if the starting point looks pretty intimidating.
We’re focusing on four areas here: carpets, carpeted floor mats, the trunk, and the headliner. You can do the basic cleaning with inexpensive, readily available supplies. A few optional tools make the work faster and help pull out even more dirt.
What You'll Learn
- Brush embedded dirt loose before vacuuming, then spot clean and shampoo the carpet.
- Control moisture carefully because carpet backing can trap water and become difficult to dry.
- Clean removable floor mats outside the car, dry them completely, and apply carpet protector.
- Start headliner cleaning dry, adding minimal cleaner only when gentle dry methods are insufficient.
Table of Contents
- Gather Your Interior Cleaning Supplies
- Prepare the Car Before You Start Cleaning
- Super Clean the Carpets in Four Stages
- Deep Clean and Protect Carpeted Floor Mats
- Super Clean the Trunk, Including the Hidden Areas
- Clean the Headliner Without Causing Damage
- The Extra Details Make the Transformation
Gather Your Interior Cleaning Supplies
For the carpets, you only need four basic things:
- Clean microfiber towels
- A strong vacuum, preferably a wet/dry shop vacuum
- A stiff-bristle carpet brush
- An automotive carpet cleaner
Choose a carpet cleaner intended to tackle both stains and odors, especially if the interior smells musty.
For the rest of the job, have a clean, soft-bristle detailing brush, interior plastic cleaner, plastic protectant, waterless wash and wax, and a carpet protector ready. Keep separate clean towels available so you are not moving dirt from one surface to another.
These optional tools are useful, but they are not required to get started:
- Handheld steamer: Helps loosen stubborn material such as gum embedded in carpet.
- Carpet extractor: Sprays liquid into the carpet and immediately pulls the dirty liquid into a recovery tank.
- Drill brush attachment: Speeds up scrubbing on durable carpeted floor mats.
- Hose or pressure washer: Helps flush dirt from removable floor mats outside the car.
The important distinction: a stiff brush and plenty of agitation work well on durable carpet. The headliner needs a completely different, much gentler approach.
Prepare the Car Before You Start Cleaning
Open Everything You Need Before Disconnecting the Battery
Start by rolling down the windows. This keeps the glass out of the way of cleaners and oily protectants that can be a pain to remove later. Open the trunk, too.
For this deep clean, I disconnected the negative battery cable for two reasons. The doors would be open for hours, which could drain the battery through the interior lights, and I would be unplugging wiring beneath the seats, including possible airbag connections.
I allowed 20 minutes after disconnecting the battery before working on the seat wiring. Check your vehicle’s service instructions for its required airbag shutdown procedure and waiting period. Do not assume every vehicle uses the same procedure.
Remove the Seats for Better Access
Removing the seats exposes the areas that a normal vacuuming misses. It also gives you room to clean the sides of the center console and work the carpet thoroughly.
- Move the seat along its tracks to expose the front and rear mounting fasteners.
- Remove the mounting fasteners.
- Carefully tilt the seat to reach the wiring underneath.
- Disconnect the necessary harnesses using the vehicle-specific procedure.
- Lift the seat out without dragging its metal brackets across the door panel or interior trim.
In my sister’s car, each front seat had four mounting fasteners and one wiring harness. The rear seat cushion released using two levers beneath the cushion. Yours may attach differently, so check before pulling on anything.
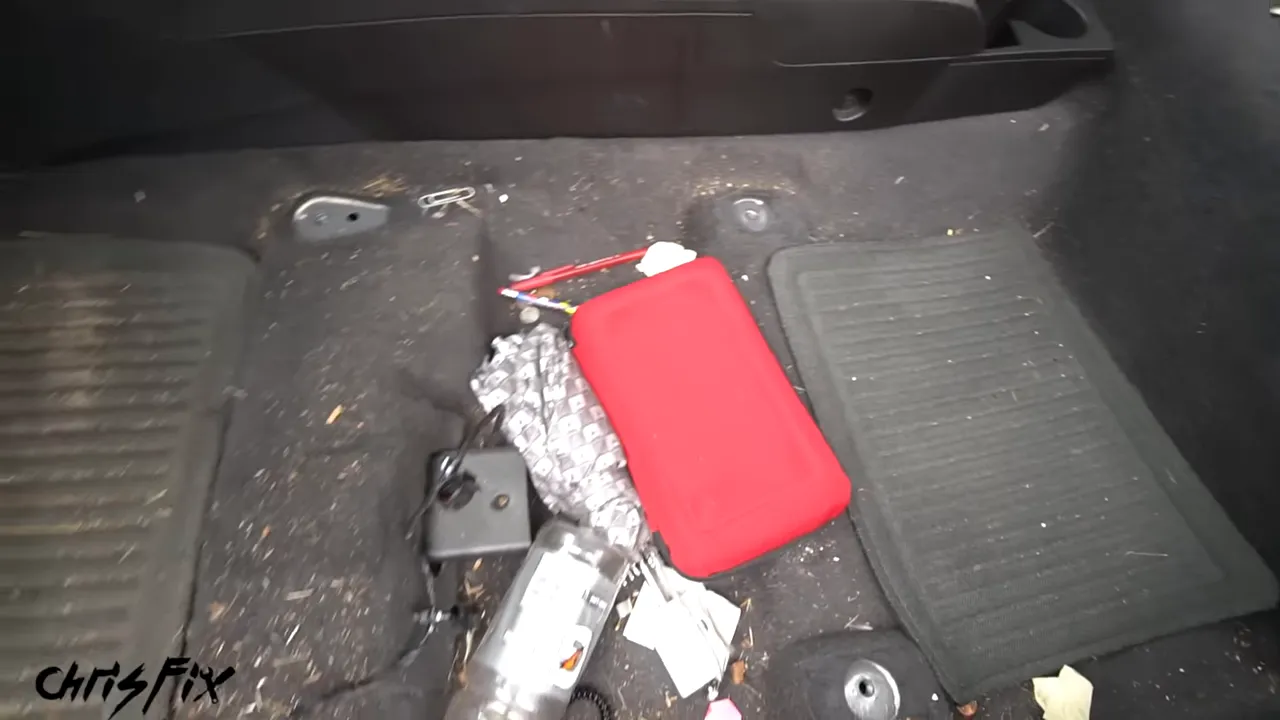
Look at everything that collects underneath a seat. Cleaning only the visible footwells leaves that mess behind, along with material that can hold odors.
If you are not comfortable working around seat-mounted airbags or electrical connectors, leave the seats installed and clean the accessible areas, or get qualified help with removal. Seat fasteners and wiring must be reinstalled correctly before the car returns to use.
Empty the Cabin and Trunk Completely
Remove loose garbage, papers, personal belongings, and everything stored in the trunk. Do not try to clean around a pile of stuff. Getting it all out is half the battle.
Remove the floor mats as well. Fold their edges inward as you lift them so loose dirt does not spill back onto the carpet.
Super Clean the Carpets in Four Stages
The carpet-cleaning process is straightforward:
- Vacuum.
- Spot clean.
- Shampoo.
- Protect once dry.
Each stage handles something different. Vacuuming removes loose material, spot cleaning tackles stubborn contamination, and shampooing works on the dirt and discoloration left throughout the fibers.
1. Brush and Vacuum Out Embedded Dirt
Start by vacuuming the larger pieces of dirt and debris from the surface. A strong shop vacuum makes this easier. The one I used is a wet/dry model, which also allows liquid pickup when configured correctly.
Once the obvious debris is gone, grab your carpet brush. Agitate the carpet to loosen dirt trapped deeper in the fibers, keeping the vacuum nozzle nearby to collect it as it comes up.
This is the step that makes ordinary vacuuming much more effective. The brush frees the grit; the vacuum removes it. Work around the floor contours, beneath the former seat locations, and beside the center console.
Even before adding cleaner, brushing and vacuuming can make a dirty carpet look dramatically better.
2. Spot Clean Melted Chocolate and Other Stubborn Messes
Vacuuming will not remove everything. Melted chocolate and chewing gum need some extra attention, but you do not want to rip out carpet fibers trying to pull them free.
Use Warm, Soapy Water for Melted Chocolate
For the chocolate, I used a small squirt of dish soap mixed with hot tap water, approximately 120°F, and a toothbrush.
- Pick away as many large, loose pieces as possible.
- Apply warm, soapy water to the affected fibers without soaking the carpet backing.
- Gently agitate the chocolate with the toothbrush.
- Wipe away the loosened material with a clean towel.
- Blot up the remaining moisture.
The warm water softens the chocolate so the brush can release it from the fibers. Keep the treatment localized rather than flooding the surrounding carpet.
Use Steam to Help Release Embedded Gum
For gum, a handheld steamer can do a lot of the work. I filled mine with plain water according to its instructions. Steam is much hotter than warm tap water, so treat the nozzle and steam carefully.
- Direct steam at the gum to soften and loosen it.
- Carefully lift away the material that releases without pulling out carpet fibers.
- Apply another short steam treatment to the remaining gum.
- Use a small brush to bring material buried in the fibers toward the surface.
- Wipe away the loosened residue.
Work patiently. Cleaning the surface is easy compared with getting gum out from deeper between the fibers. The goal is to release the gum, not tear it out along with the carpet.
Steam helps loosen contamination, but do not treat a quick pass as a guarantee of sanitizing the carpet or preventing mold. Removing residue and allowing the carpet to dry remain essential.
3. Shampoo the Entire Carpet
Once the individual problem spots are handled, clean the whole carpet. This helps remove lingering dirt, small stains, uneven discoloration, and odor-holding residue.
You have two options: a brush-and-towel method or an extractor. Both start with working carpet cleaner into the fibers.
Shampoo Without an Extractor
- Apply carpet cleaner evenly. Cover the carpet surface according to the product directions without drenching it.
- Brush in multiple directions. Work the cleaner down into the fibers instead of leaving it sitting on top.
- Wipe with an absorbent microfiber towel. Use medium pressure and back-and-forth passes to collect loosened dirt and cleaner.
- Vacuum thoroughly. Use a wet/dry vacuum configured for moisture pickup to remove remaining loose material and liquid.
- Make a final towel pass. Absorb the remaining moisture and residue brought toward the surface.
I like working in one direction and then crossing it in the other direction. That gives me a clear pattern to follow so I do not miss sections.
Take a look at the towel as you work. Carpet can look reasonably clean while still releasing a surprising amount of dirt.
Use a Carpet Extractor for a Deeper Clean
An extractor vacuum has a clean-liquid tank, a spray nozzle, and a recovery tank. It injects liquid into the carpet, then pulls that liquid back out along with loosened dirt.
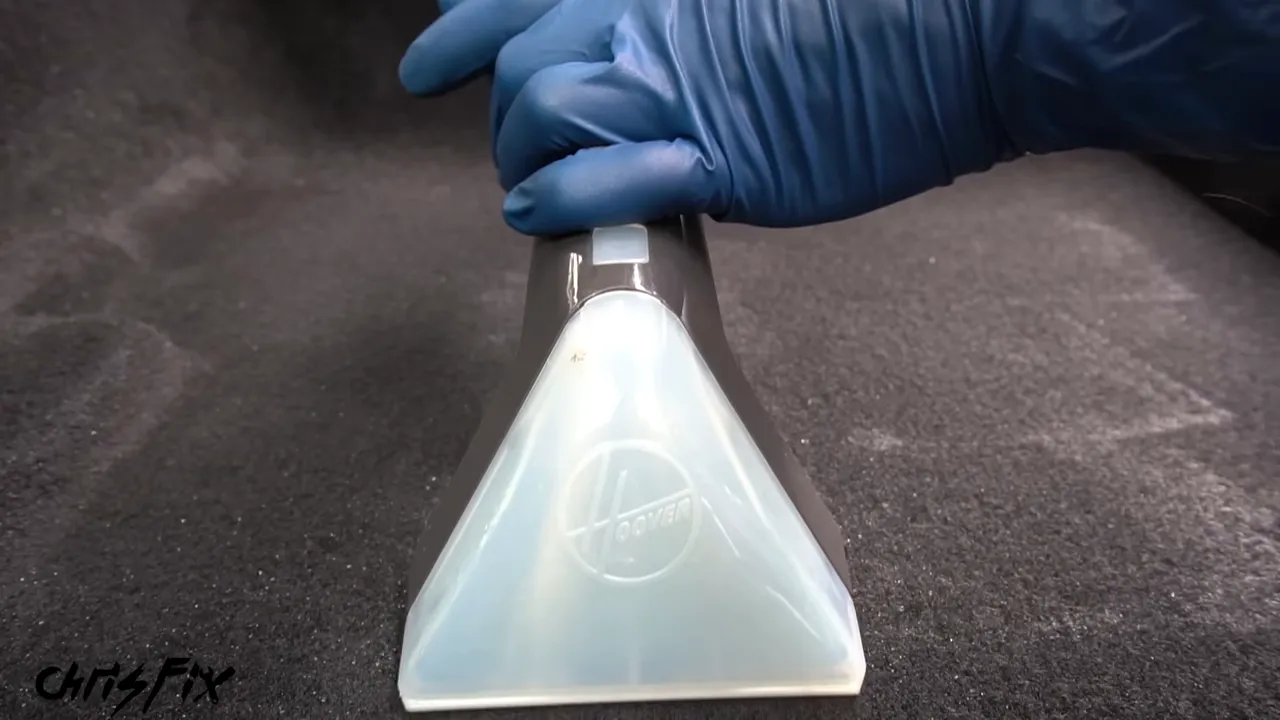
Fill the machine with the water or compatible cleaning solution specified in its instructions. Place the nozzle against the carpet, press the spray trigger, and slowly pull it along with medium downward pressure.
Work methodically in one direction, then cross the area in the opposite direction for complete coverage. Extract the moisture rather than repeatedly adding more liquid.
This is one of my favorite detailing steps because you can actually see the dirty water coming out. Even after the basic cleaning, the recovery tank collected more dirt.
Brush the Fibers for an Even Finish
After cleaning, use a clean carpet brush to lay the fibers in one direction. That makes the carpet look more uniform in shade and texture instead of leaving random brush marks.
It is a small finishing step, but it makes a big visual difference. Then let the carpet air out and dry.
Do Not Oversaturate the Carpet
More water does not mean a better clean. Beneath the visible carpet is sound-deadening material that can act like a sponge. Once that backing absorbs water, it can be difficult to dry without lifting or removing the carpet.
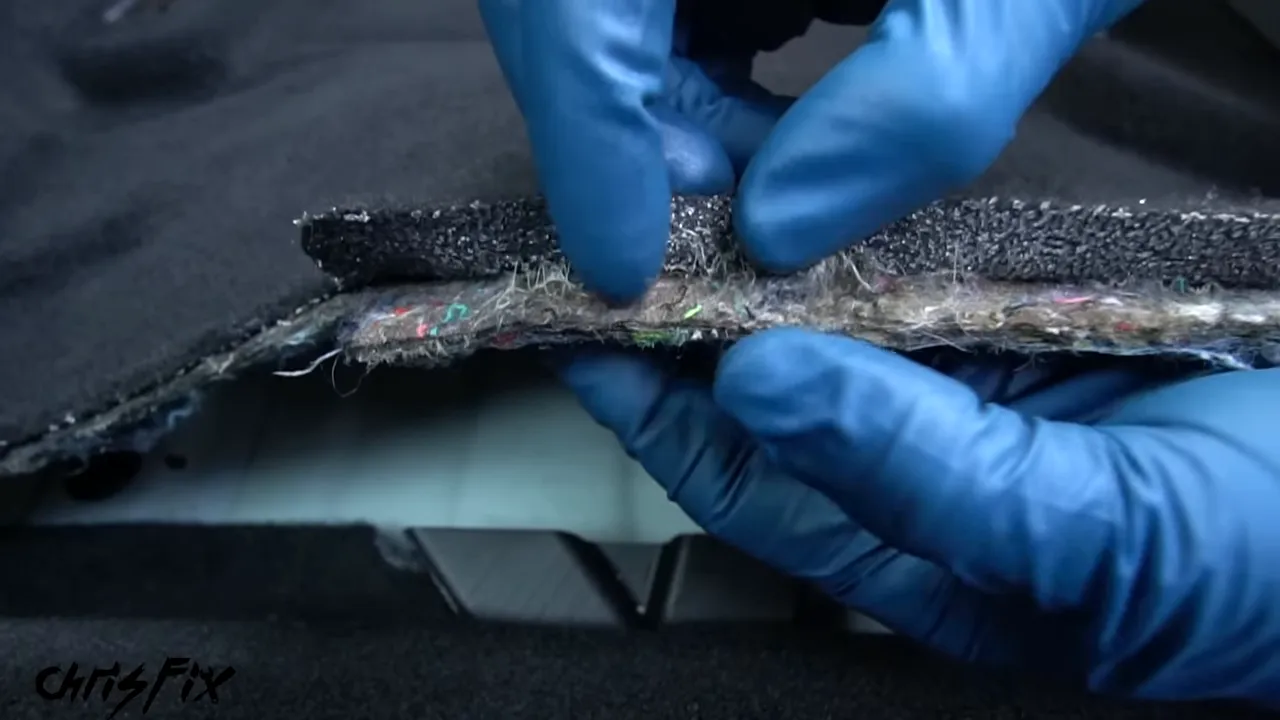
Trapped moisture can create a mold problem. Apply enough cleaner to work on the fibers, remove the moisture you add, and give everything time to dry. The EPA’s guidance on mold and moisture explains why moisture control matters.
4. Protect the Clean Carpet
Once the carpet is dry, a compatible carpet protector can help resist future spills and make cleanup easier. The floor mats are a great place to demonstrate the application, since they take most of the abuse from shoes.
Deep Clean and Protect Carpeted Floor Mats
Floor mats follow the same basic cleaning process, but being able to remove them gives you a big advantage. You can shake dirt out, rinse them outside, and hang them up to dry.
Remove Loose Dirt Before Adding Water
Brush off the surface dirt, then bang or shake the mats to release grit caught deeper in the fibers. Finish with the vacuum.
It is amazing how much dirt comes out just from knocking the mats out. Get that dry material out before you start washing.
Rinse, Shampoo, and Scrub
For the durable carpeted mats I cleaned, a hose or pressure washer helped force out dirt and stains. This is a removable-mat technique, not something to do to carpet inside the car. Check that your mats can tolerate washing before using it.
- Rinse the mats to flush out dirt.
- Apply carpet cleaner and allow the brief dwell time specified by the product. I let mine sit for about a minute.
- Scrub with a carpet brush or suitable drill brush.
- Rinse away the loosened dirt and soap.
- Use an extractor to remove as much remaining water and cleaner as possible.
With a drill brush, use light to medium downward pressure and medium speed. Let the tool do the work, and keep it moving from side to side or up and down. Do not hold a spinning brush in one spot.
Cross your passes in the other direction for even cleaning. Give stains extra attention, but be careful around embroidered logos and edges.
Hang the Mats Until They Are Completely Dry
An extractor leaves the mats damp rather than perfectly dry. I hang them from clip-style hangers in open air so both sides are exposed.
Let them dry completely before protecting or returning them to the car. Putting damp mats on top of the carpet defeats all that careful drying work.
Apply Carpet Protector in Light, Even Coats
Think of applying protector like spray painting: light, even, overlapping passes rather than one heavy wet coat.
- Spray a light coat across the dry mat in one direction.
- Let it dry for the time required by the product. Mine called for 15 minutes between coats.
- Apply a second light coat in the opposite direction.
- Make sure the edges are covered, and allow the required drying time before use.
The difference is easy to see. On untreated carpet, water absorbs into the fibers. On the treated sample, it stayed on the surface long enough to blot away.
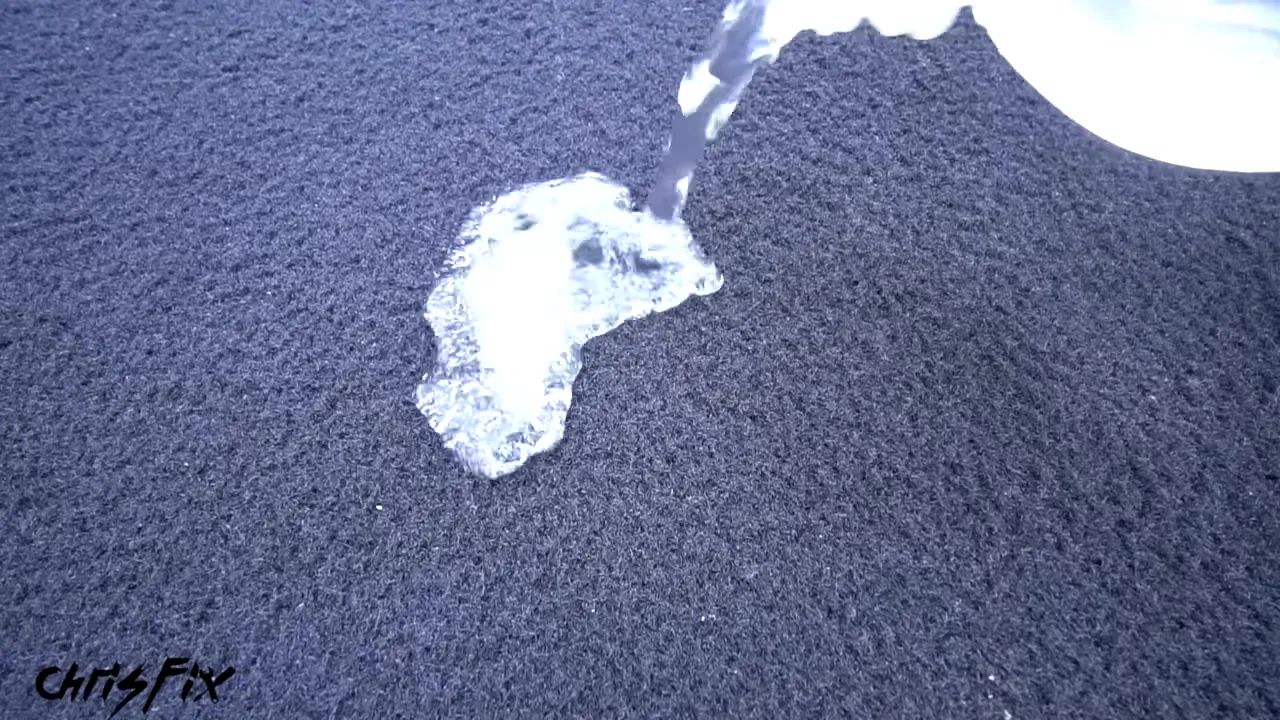
That does not make the mats stain-proof, but it makes future cleanup easier. Once everything is dry, reinstall the mats securely.
Super Clean the Trunk, Including the Hidden Areas
A clean trunk means more than vacuuming the panel you put groceries on. Get underneath it, clean the sides, and finish the painted edges around the opening.
Clean Beneath the Trunk Floor
- Remove the trunk floor panel if it is designed to come out.
- Remove the spare tire and loose equipment.
- Vacuum the accessible carpeting.
- Lift out removable liners and vacuum the spare tire well.
- Vacuum the carpeted sidewalls, using a brush to loosen trapped dirt where needed.
- Clean the removed floor panel outside the car.
The trunk carpet in this example did not need shampooing. A thorough vacuum was enough. Match the cleaning to the condition rather than adding liquid where it is unnecessary.
Clean and Protect the Textured Plastic Trim
Spray interior cleaner into a detailing brush, then work it across the plastic trim. A brush reaches into the texture much better than a towel alone.
Wipe the cleaner and loosened dirt away with microfiber. Then apply a compatible plastic protectant with a separate clean brush, working it evenly into the textured surface.
Allow the product’s recommended dwell time, then buff away the excess with a clean towel. For the trim I treated, I let the protectant sit for a minute or two before buffing.
Once the hidden areas are clean, put the spare tire, equipment, liners, and floor panel back in their proper positions.
Do Not Forget the Trunk Lid and Rain Channels
The painted underside of the trunk lid and the channels around the opening are easy to overlook. They are also right in front of you every time the trunk opens.
Vacuum the trunk lid lining if needed. Then vacuum leaves, twigs, and loose debris from the surrounding rain channels.
Instead of spraying a hose toward the open trunk, I used waterless wash and wax on the lightly dirty painted surfaces. Apply enough product to lubricate the dirt, then gently wipe it away with clean microfiber.
For tight spaces, use a soft brush to loosen the dirt before wiping. Work carefully rather than dragging grit across the paint.
Now the whole area looks finished: clean carpeting, an organized spare tire well, refreshed trim, and clean painted edges. Those little details are what give it that fresh-car feel.
Clean the Headliner Without Causing Damage
The headliner is not carpet mounted upside down. It is a delicate assembly, typically made from fabric, foam, and adhesive. Aggressive scrubbing or excessive moisture can damage those layers and contribute to sagging.
My dad’s Jaguar had a sagging headliner, which is exactly the result we want to avoid. Clean only as aggressively as necessary, and use as little liquid as possible.
You need a clean, soft microfiber towel, an extra-clean soft-bristle brush, and a suitable cleaner only if dry cleaning is not enough.
Start With a Dry Microfiber Towel
Lightly rub the mark back and forth with a clean, dry towel. Use very little pressure, and move to a fresh section of the towel as dirt transfers.
Do not use a towel that has already cleaned the carpet or plastic trim. Even a small amount of transferred dirt can leave an obvious mark on a light-colored headliner.
Try a Clean, Dry Soft Brush Next
If the towel leaves a faint mark, lightly brush the fabric with a clean, dry soft-bristle brush.
I washed my brush with soapy water and let it dry before using it here. The bristles must be clean so they do not push old dirt into the fabric.
One of the marks came out completely using only the dry towel and brush. That is the best outcome: the stain is gone, and no moisture has reached the backing.
Use Minimal Cleaner Only When Necessary
A deeper stain may need a little cleaner. Apply it to the towel, not directly to the headliner.
- Add a small amount of cleaner to a clean microfiber towel.
- Work it into the towel fibers so there is not a concentrated wet spot.
- Lightly wipe the stain at the fabric surface.
- If needed, apply a small amount to the soft brush and gently work the remaining mark.
- Use a dry towel to absorb moisture.
The goal is not to soak through the fabric. Stop adding cleaner once you have enough to work on the stain.
Feather Out a Damp Edge Before It Dries
Even a small amount of cleaner can leave a visible damp patch. If that patch has a hard outline, it may leave a noticeable ring when it dries.
To blend it, gently work around the edge with the soft brush, feathering outward from the damp area toward the dry fabric. Use light pressure and avoid adding more cleaner.
Then lightly wipe with a dry microfiber towel to absorb as much moisture as possible. You are trying to create a gradual transition, not make a larger wet patch.
On the deeper stain I cleaned, this removed the obvious damp outline and left the surrounding fabric looking even. Patience and a light touch are much more important here than scrubbing power.
The Extra Details Make the Transformation
The biggest improvement comes from doing the whole job: removing loose junk, brushing embedded dirt out of the carpet, treating sticky spots, shampooing, drying thoroughly, and cleaning the places normally hidden beneath seats and trunk panels.
Susan’s badly dirtied carpets looked dramatically better, and my sister’s everyday interior cleaned up just as impressively. The trunk was tidy, the floor mats looked refreshed, and the distracting headliner marks were gone.
For the rest of the interior, use the separate guides to clean the dashboard, center console, and door panels and deep clean the seats. Those surfaces need their own techniques.
Get the hidden dirt out, control the moisture, and finish the small details. That is how you move beyond a quick cleanup and get an interior that looks and feels genuinely clean.


