You press the start button, the engine barely turns over, and then you hear clicking. A dead battery seems like the obvious answer. But before you buy a replacement, there is one important question to answer: why did the battery go dead?
The battery itself could be bad. The alternator might not be charging it. Something in the car could be drawing power while it is parked. Even a slightly loose or corroded terminal can keep an otherwise good battery from starting the engine.
I worked through these problems on three very different vehicles: a newer sedan with a failed battery cell, my drift Mustang after winter storage, and my Duramax-powered Hummer with two weak batteries. The symptoms were similar, but getting the diagnosis right meant testing more than just voltage.
What You'll Learn
- Check terminal connections, charging voltage, and parked-current draw before blaming the battery.
- A reading near 10.5 volts can indicate a failed cell that needs confirmation.
- Choose the correct battery specification, disconnect negative first, and reconnect negative last.
- Secure mounting and maintenance charging help protect batteries from vibration and prolonged discharge.
Table of Contents
- Before You Start: Tools and Battery Safety
- 1. Locate the Battery and Check the Connections
- 2. Test the Battery Voltage With a Multimeter
- 3. Test the Alternator Before Blaming the Battery
- 4. Check for a Parasitic Battery Drain
- 5. Test Starting Capability, Not Just Voltage
- 6. Choose the Correct Replacement Battery
- 7. Replace the Car Battery Properly
- Keeping Radio Presets During a Battery Change
- Why Car Batteries Fail and How to Help Them Last
- Return the Old Battery for Recycling
Before You Start: Tools and Battery Safety
Replacing an accessible car battery is usually straightforward. Diagnosing it takes a few more checks, but you can do most of them with basic tools.
- A digital multimeter for voltage and current measurements
- A battery charger appropriate for your battery type
- A battery tester for checking starting capability
- Wrenches or sockets for the terminals and hold-down
- Safety glasses and protective gloves
- Baking soda, warm water, a brush, and cleaning rags
- A wire brush, abrasive pad, or 180-grit sandpaper
- Optional felt terminal protectors and silicone terminal grease
A basic automotive multimeter is a useful addition to your toolbox. Just make sure you understand the difference between measuring voltage across a battery and measuring current in series with a circuit. We will use both methods, and the meter setup is different.
Keep sparks, flames, and metal tools away from the battery posts. A tool bridging the positive and negative terminals can get extremely hot, cause burns, and create a fire or explosion hazard. Never use the top of a battery as a tool tray.
Lead-acid batteries contain strong acid. Do not cut one open. The opened battery used for my internal inspection had already had its acid removed and neutralized.
1. Locate the Battery and Check the Connections
Most batteries sit under the hood, but not all of them. On some cars, including the BMW and Maserati examples I checked, the battery is in the trunk behind a panel or access cover. Your owner's manual will tell you where to look.
Before grabbing a meter, check two things:
- Are the terminal clamps tight? Give each one a gentle wiggle. Neither should rotate or lift off the post. Even a little looseness can interfere with the high current needed to start the engine.
- Are the terminals clean? Look for dirt, white or colored corrosion, and buildup around the posts and cable ends.
These simple checks can save you from replacing a battery that was never the problem.
How to Clean Corroded Battery Terminals
Put on your safety glasses first. With the ignition off, use a small amount of warm water and baking soda to make a slurry. Brush it around the outside of the posts and terminal clamps to neutralize acid residue. Bubbling can indicate that the baking soda is reacting with acid.
Keep the mixture out of the battery's vents and openings. You are cleaning the outside, not adding anything to the electrolyte.
- Disconnect the negative cable first, then the positive cable. Keep the disconnected cables away from the posts.
- Remove dirt and neutralized residue from the surrounding area.
- Use a wire brush, abrasive pad, or 180-grit sandpaper to expose clean metal on each post.
- Clean the inside of each cable clamp, not just its outside. The inner surface is where the electrical connection happens.
- Wipe the area clean and dry before reassembly.
- If you are reinstalling the same battery, reconnect positive first and negative last. Seat the clamps fully and tighten them without overtightening.
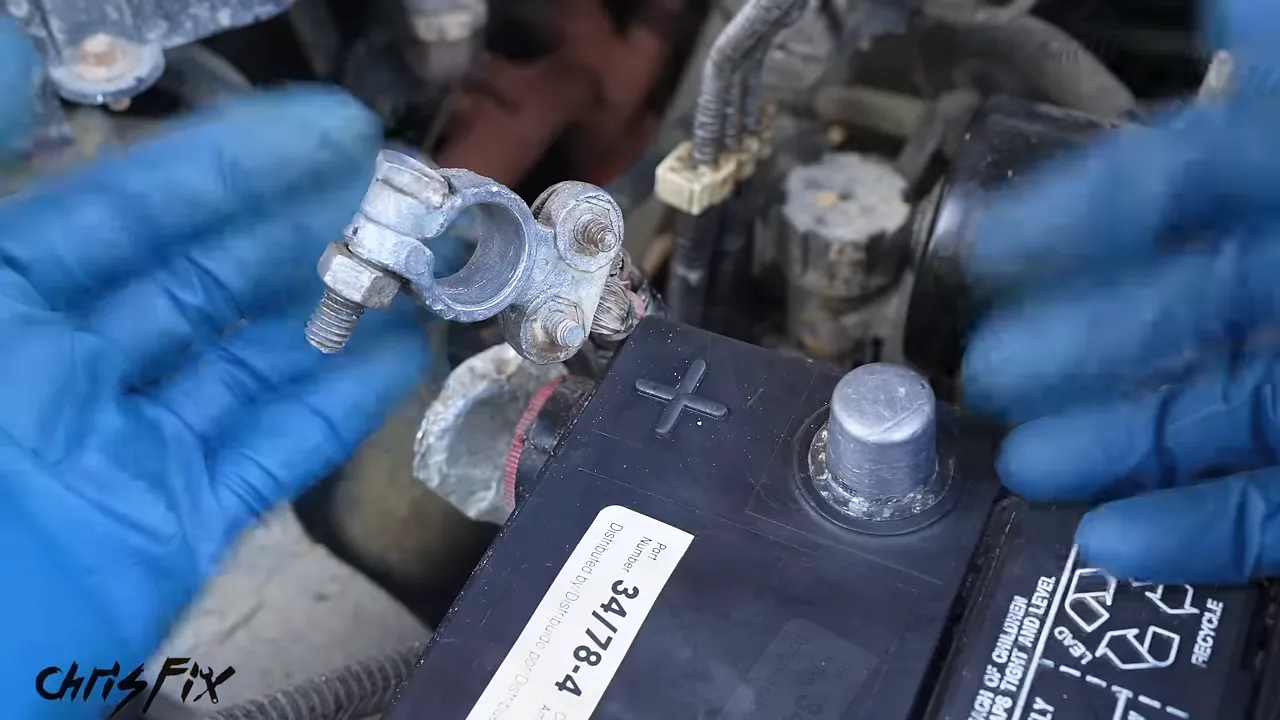
I like using felt terminal protectors beneath the clamps. They contain a treatment intended to reduce acid-related corrosion, and their colors make identifying positive and negative easier. Always verify the actual polarity markings on the battery, though.
Once the metal-to-metal connection is tight, coat the exposed terminal assembly with silicone terminal grease. The grease helps keep moisture away. Give each clamp one final wiggle to confirm that it cannot move.
2. Test the Battery Voltage With a Multimeter
With clean, tight connections, you can move on to testing. Turn off the engine and electrical accessories. Set your multimeter to DC volts on a range above 12 volts.
Touch the red probe to the positive battery post and the black probe to the negative post.
- About 12.6 volts: A useful reference for a fully charged conventional 12-volt lead-acid battery at rest.
- About 12.4 volts: Within the initial checking range used here, but below the fully charged reference.
- Below 12 volts: The battery is discharged and needs further diagnosis.
- About 10.5 volts: A strong clue that one of the battery's six cells may have failed.
Voltage tells you a lot, but it does not tell you everything. A discharged battery is not automatically a ruined battery, and a battery showing normal resting voltage can still lack the current needed to crank an engine.
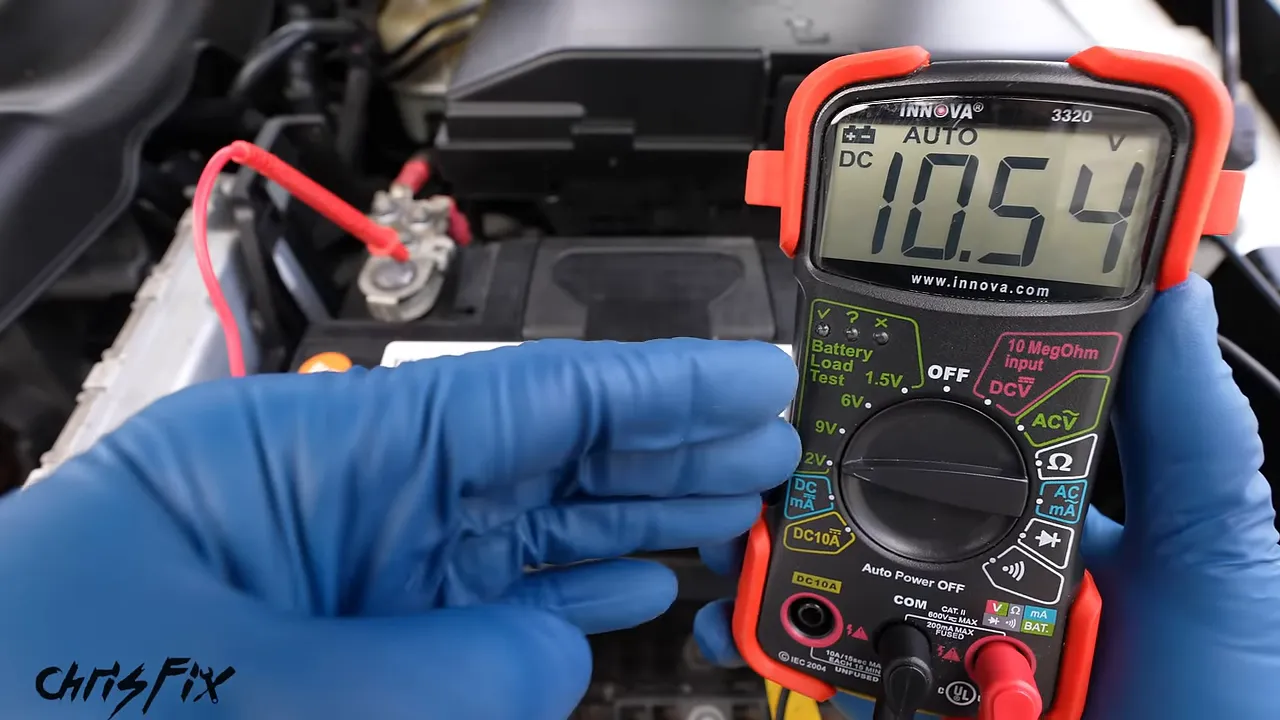
Why 10.5 Volts Can Mean a Bad Cell
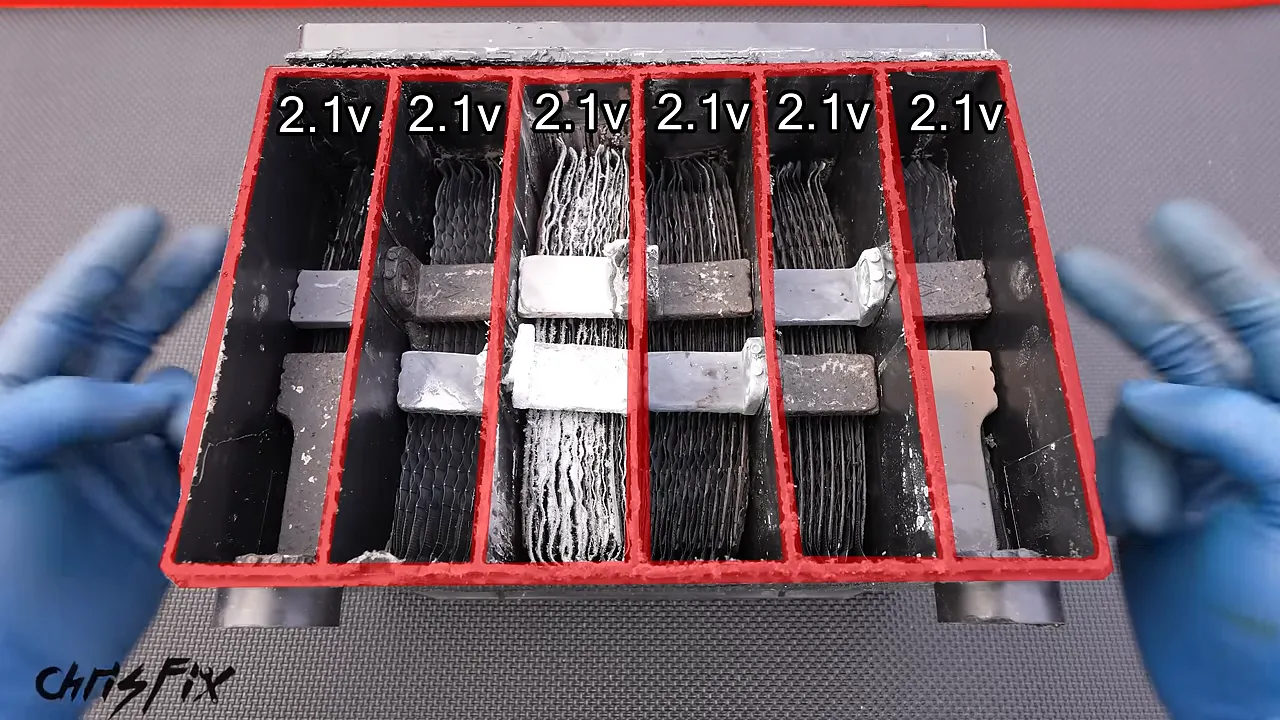
A conventional 12-volt car battery contains six cells connected in series. Each fully charged cell contributes approximately 2.1 volts:
Six cells × 2.1 volts = 12.6 volts.
If one cell stops contributing its voltage, that leaves approximately 10.5 volts. That is why the sedan's reading immediately made me suspicious of an internal battery failure.
Charge It Before Making the Final Call
To check whether the battery was simply discharged, I connected a suitable battery charger and let it charge for several hours.
The voltage climbed while the charger was connected. But when I switched the charger off, the reading quickly fell back toward 10.5 volts. That behavior supported the failed-cell diagnosis. A subsequent parts-store battery test also identified a bad cell.
Do not judge a battery by the voltage it shows while a charger is actively supplying power. Check what it holds after charging, and use a battery test to confirm its condition.
3. Test the Alternator Before Blaming the Battery
If a battery charges successfully but goes dead again, check the charging system. A new battery will not solve an alternator problem for long.
On the Mustang, the battery initially measured about 11.8 volts. I charged it to approximately 12.6 volts before starting the engine and checking alternator output.
- Charge the battery sufficiently to start the engine.
- Disconnect the charger.
- Start the engine.
- Measure DC voltage across the battery posts again.
On the conventional charging system tested here, approximately 13.6 to 14.6 volts was the reference range. The Mustang measured around 14.3 to 14.4 volts, indicating that the alternator was supplying charging voltage.
Use those numbers as a reference, not a universal verdict for every vehicle. Check the vehicle's charging-system specifications before condemning a component.
If Charging Voltage Is Too High
Excessive charging voltage can damage the battery. On the system being tested, a reading around 15 volts would call for investigation of the voltage regulator and charging system. More voltage is not automatically better.
If Charging Voltage Is Too Low
A low reading at the battery does not necessarily mean the alternator is bad. There could be resistance in a cable or connection between the alternator and battery.
To separate those possibilities, compare the battery reading with a measurement directly at the alternator's output terminal and case ground. Only attempt this if you can safely reach the test points. Keep probes, leads, hands, and clothing clear of the spinning belt and pulleys, and do not let a probe bridge the positive output terminal to the case.
- Normal voltage at the alternator but low voltage at the battery: Investigate the cable, terminal connections, and ground path.
- Low voltage at both locations: The alternator or its control system needs further diagnosis.
My direct alternator measurement was about 14.1 volts. Between that and the battery measurement, there was no obvious charging-voltage problem to explain the Mustang's dead battery.
4. Check for a Parasitic Battery Drain
A parasitic draw is electrical current leaving the battery while the car is switched off. Some draw is normal. The security system, clock, and computer memory still need power.
The question is whether that draw is excessive after the vehicle has gone to sleep.
Prepare the Car for an Accurate Test
- Switch off the headlights, interior lights, and accessories.
- Make sure doors and the trunk are closed or their switches are safely set to the closed position.
- If there is a hood-open switch, account for it so the car can enter its normal parked state.
- Move a keyless-entry or push-button-start fob away from the vehicle.
- Allow time for the electronics to go to sleep.
I allowed 15 minutes in this test. The correct sleep time can vary, so follow the vehicle's procedure when available.
Connect the Multimeter in Series
This is different from a voltage test. The meter must become part of the circuit so the parked vehicle's current flows through it.
- Disconnect the negative battery cable.
- Move the red meter lead into the appropriate high-current DC amp socket.
- Select the meter's high-current DC amp range, 10 amps on the meter used here.
- Connect one meter lead to the disconnected negative cable and the other to the negative battery post.
- Secure the connections and let the vehicle settle into its sleep state.
Never place a meter set to amps directly across the positive and negative battery posts. Also, do not start the engine or operate high-current accessories with the meter connected in series. That can exceed its rating and damage the meter or blow its fuse. Follow the meter's current and test-duration limits.
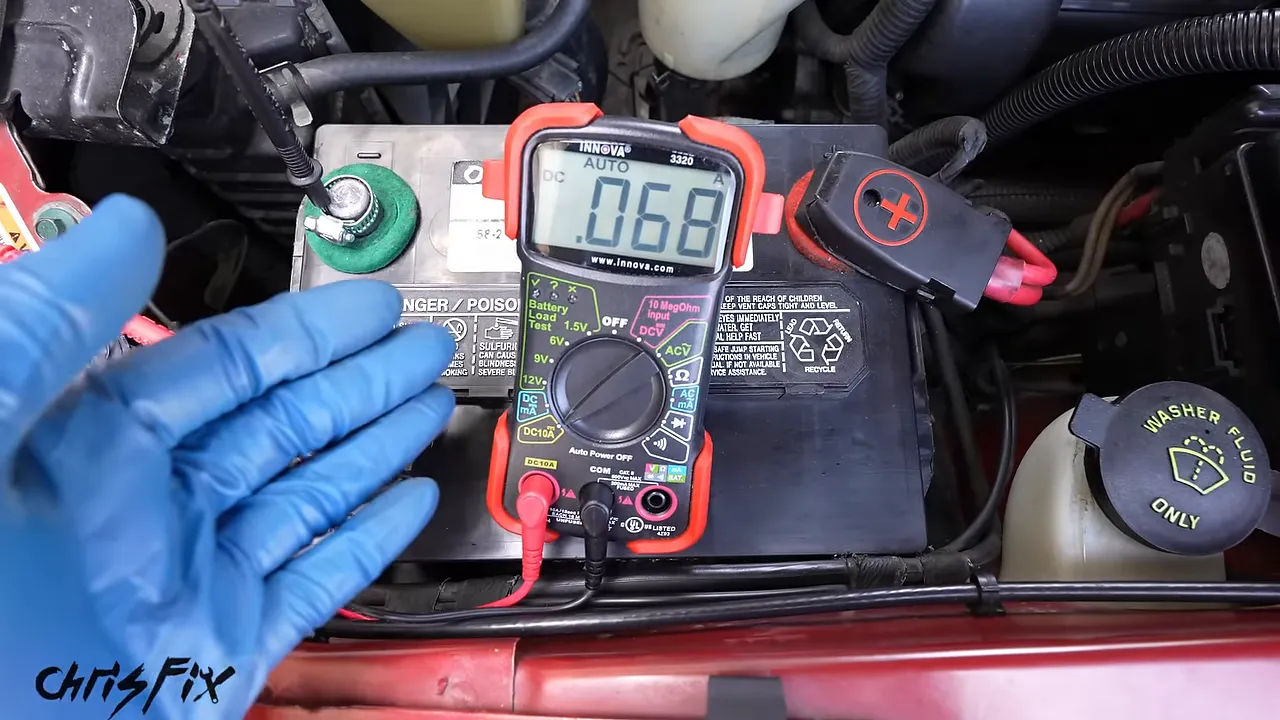
Interpret the Current Reading
A common rule of thumb is 50 milliamps, or 0.05 amps, or less. The acceptable amount varies by vehicle.
The Mustang measured approximately 70 milliamps, or 0.07 amps, both initially and after 15 minutes. That was not a large unexplained load in this example, but it was still enough to discharge the battery during a long period of storage.
A sustained reading of 100 milliamps, or 0.1 amps, or more would warrant closer investigation in this basic diagnostic approach. Always compare the final reading with the vehicle's specification rather than assuming one threshold fits every car.
Find the Circuit Causing the Drain
If the draw is excessive, monitor the meter while removing and reinstalling fuses one at a time. A substantial drop when a particular fuse is removed points toward the circuit supplied by that fuse.
Use the fuse identification information to determine which components are on that circuit. You have narrowed down the search, not necessarily found the failed component yet. Be aware that disturbing circuits can wake electronic modules and require another settling period.
If checking the fused circuits does not reveal the draw, the alternator can also be a suspect. Its output cable is a high-current connection, so do not remove it while energized. Isolate battery power before disconnecting and insulating that cable, then follow a safe testing procedure or have a technician investigate it.
When the charging system and parked-current draw check out, return to the battery itself. That is where a starting-capability test becomes especially useful.
5. Test Starting Capability, Not Just Voltage
A multimeter can tell you that a battery has voltage. It cannot, by a resting-voltage measurement alone, tell you whether the battery can deliver enough current to start the engine.
That was the issue worth checking on my Hummer. It has two batteries, and starting had become inconsistent: sometimes it started, and sometimes it struggled badly.
With both batteries disconnected from the vehicle and each other, I tested them individually using a digital battery tester.
- Connect the tester to the battery with the correct polarity.
- Select the correct battery type, such as regular flooded or AGM.
- Select the rating standard printed on the battery. I used SAE cold cranking amps.
- Enter the battery's rated CCA.
- Run the test and evaluate its result.
Both batteries were rated at 800 CCA. The tester estimated about 350 CCA for one and about 70 CCA for the other, and it recommended replacement for both.
The second battery was also low on charge, which can affect the result. If a tester calls for charging and retesting, do that before treating the first reading as final.
After replacing the two failed batteries, the Hummer started immediately without the previous hesitation. Beautiful.
If you do not own test equipment, a parts store can be a convenient alternative. Advance Auto Parts provided free battery testing in this example, including testing at the vehicle. Confirm current services with your local store.
6. Choose the Correct Replacement Battery
Once you know the battery is bad, buying the right replacement matters more than buying the fanciest label.
Match the Group Size and Fitment
Check your owner's manual, the original battery label, or a parts lookup using the vehicle's year, make, and model. The sedan's original battery was labeled group H6.
The replacement needs the correct physical fit, terminal arrangement, and hold-down compatibility. If the installation uses a vent connection, that must be handled correctly as well.
Meet the Required Cold Cranking Amps
Cold cranking amps describe a battery's ability to supply starting current in cold conditions, with the rating based on testing at 0°F.
The sedan's original battery was rated at 600 CCA. The replacement should meet at least the manufacturer's required rating. A higher CCA rating can provide more starting-current capability, but CCA is not a substitute for checking the correct battery type and fitment.
Flooded vs. AGM Batteries
The two battery types compared here were:
- Conventional flooded batteries: The familiar lead-acid design used in many vehicles.
- AGM batteries: Absorbed glass mat batteries, designed to handle demanding electrical use and resist vibration.
Newer vehicles can place substantial demands on their batteries through sensors, electronics, and automatic stop-start operation. If the manufacturer specifies AGM, replace it with the specified AGM battery. Do not assume a cheaper conventional flooded battery is an equivalent replacement.
For a vehicle originally equipped with a flooded battery, an AGM upgrade may be worth considering where compatible, especially with added equipment such as off-road lights, a winch, or an aftermarket sound system. Verify the vehicle's requirements first.
Is the Most Expensive Battery Worth It?
Within the same group size, the tiers I compared mainly differed in starting capability and warranty. The highest tier in that lineup carried a four-year warranty.
For my daily driver, reliability matters enough that I prefer the higher-end option. For a tighter budget or a car I do not plan to keep much longer, a less expensive battery can make sense, provided it still meets the vehicle's requirements.
Choose the specification first, then decide how much warranty and additional capability are worth to you.
7. Replace the Car Battery Properly
For a normal battery replacement, the connection order is simple:
Disconnect negative first. Reconnect negative last.
Why? On a typical negative-ground vehicle, the body is connected to battery negative. If you loosen the positive terminal while negative is still connected and your wrench touches the body, you can create a direct short. Removing negative first reduces that risk.
- Turn the vehicle off. Follow any vehicle-specific shutdown or battery-replacement procedure.
- Disconnect the negative cable. Position it so it cannot spring back onto the post.
- Disconnect the positive cable. Keep it protected from accidental contact.
- Remove the hold-down. It may clamp the battery at its base or use a bracket across the top.
- Lift out the old battery. Keep it upright and remember that batteries are heavy.
- Clean the tray. I vacuumed out debris, then used soapy water and a rag to clean the area.
- Install the new battery. Verify that its positive and negative posts face the correct cables.
- Reinstall the hold-down. Tighten it securely without damaging the case.
- Connect positive first. Clean the contact surfaces, seat the clamp fully, and tighten it appropriately.
- Connect negative last. Seat and tighten it, then check both clamps for movement.
- Protect the terminals. Apply silicone terminal grease to the exposed metal and reinstall the positive-terminal cover.
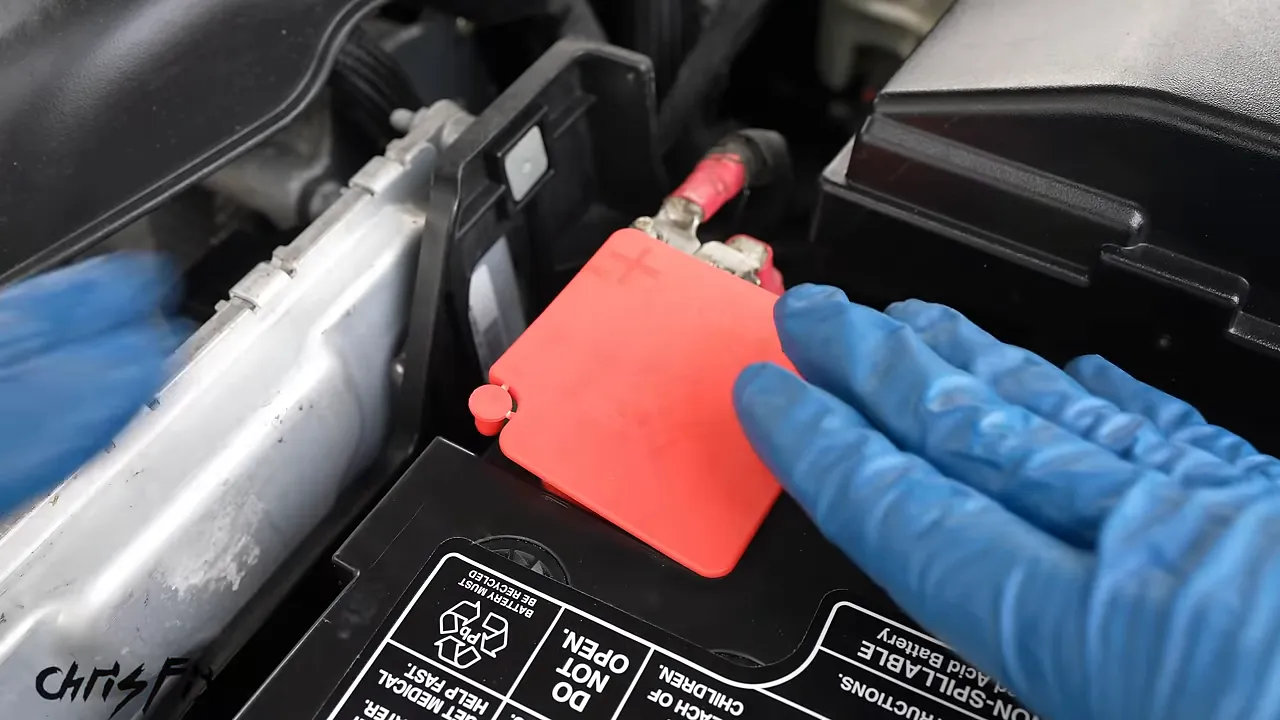
The hold-down does more than stop an annoying rattle. It limits vibration and keeps a heavy battery from moving around or becoming a projectile in a collision.
Start the engine and confirm normal operation. After the sedan's replacement, it started immediately and displayed about 14.4 volts with the engine running.
Keeping Radio Presets During a Battery Change
Disconnecting battery power can reset the clock, radio presets, and some computer memory. On the Mustang, I demonstrated a way to preserve power using the new battery as a temporary external supply through jumper cables.
The idea was to connect the new battery's positive terminal to the vehicle's positive cable and its negative terminal to a chassis ground. That maintained the car's 12-volt supply while the old battery was removed and the replacement moved into place.
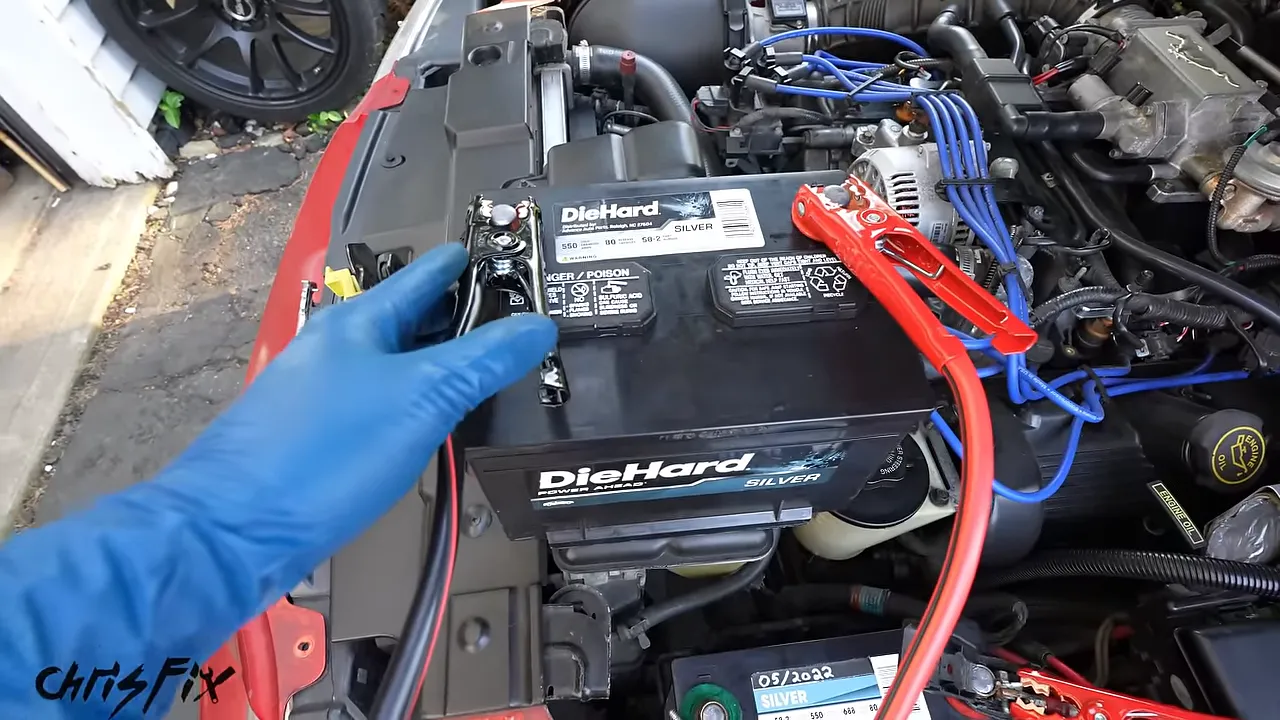
This is an advanced variation, not the normal disconnected-battery procedure. The positive vehicle cable remains live even after it is lifted off the old battery. If it touches the body, a bracket, or another grounded metal part, it can short out.
The demonstration used well-insulated jumper clamps and a helper to control the energized positive cable. Correct polarity, secure connections, and continuous separation from metal were essential. Do not start the engine during the exchange.
If you cannot safely control every live connection, use the standard disconnected replacement procedure and restore the settings afterward. Follow the vehicle manufacturer's instructions, including any required battery registration or relearn procedure. Preserving clock power does not replace those requirements.
With uninterrupted power, the Mustang retained its clock and radio presets. It is a useful result, but saving presets is never worth risking a short circuit.
Why Car Batteries Fail and How to Help Them Last
The opened battery made the effects of heat and vibration easy to understand. Inside each cell are positive and negative plate assemblies. Porous separators keep adjacent plates from directly touching while allowing the electrolyte's ionic movement needed for the chemical reaction.
The plate grids carry active material that participates in that reaction. In the damaged example, some material had fallen away, one grid had broken loose, and fragile connections between plates and their connecting strap had failed.
Heat-related corrosion weakens those connections. Vibration can then finish breaking them. Losing active material reduces performance; losing the electrical connection for an entire cell can produce the 10.5-volt problem.
Keep the Battery Secure
Always reinstall the correct hold-down and any original protective pieces. A battery that can bounce around is being subjected to unnecessary mechanical stress.
Do Not Leave It Discharged
The Mustang sat through winter without a maintainer, and I had forgotten to disconnect its battery. The approximately 70-milliamp parked draw slowly discharged it.
Leaving a lead-acid battery discharged encourages persistent lead sulfate buildup on the plates. That interferes with the battery's ability to charge and deliver starting current. Repeated or prolonged discharge can shorten its life.
If you drive a stored car periodically, actually take it for a drive. Starting it for a couple of minutes and shutting it off is not the same as giving the battery a useful recharge.
Use a Battery Maintainer for Long Storage
For a car that sits often, I strongly recommend a suitable automatic battery maintainer. The setup I used has a small connector harness that stays on the car, while the charger itself stays at home.
The harness connects to the appropriate positive and negative connection points, following the vehicle and maintainer instructions. When parking the car for an extended period, plug the harness into the maintainer. Disconnect it before driving.
Use equipment compatible with your battery type and intended for maintenance charging. Keeping a good battery charged is much better than repeatedly rescuing it after it goes flat.
|
Return the Old Battery for Recycling
A battery replacement is not finished until the old battery is handled properly.
When buying a replacement, you will often pay a core charge. Return the old battery under the retailer's terms to receive that charge back.
Even without a core refund, a parts store or scrap recycler may accept an old battery and may offer payment or store credit. The offer shown in my example was a $10 Advance Auto Parts gift card, but current programs and amounts can change.
Lead-acid batteries contain valuable recyclable material as well as hazardous lead and acid. They should not go in household trash. The EPA's battery recycling guidance provides additional information on proper handling and recycling.
The important part is diagnosing before replacing. Check the connections, measure voltage, verify charging, investigate parked-current draw, and test starting capability. Then install the right battery securely, keep it charged, and return the old one for recycling. That is how you fix the starting problem without overlooking what caused it.


