A quick coolant test can be the difference between a car that is ready for winter and an engine with a cracked block. The good news is that you do not need expensive equipment. An inexpensive antifreeze tester, a cold engine, and a few minutes will tell you a lot about the protection inside your cooling system.
I’ll show you how to check the antifreeze concentration, verify the coolant level, correct a weak mixture, and bleed trapped air so your heater can keep the cabin nice and toasty. And even if it never freezes where you live, this check still matters. Coolant protects against overheating and corrosion, too.
What You'll Learn
- Test cold coolant with a level, bubble-free hydrometer to check its freeze protection.
- Account for coolant remaining in the engine before calculating how much concentrate to add.
- Bleed trapped air after refilling to restore coolant circulation through the heater core.
- Run winter-rated washer fluid through the lines and nozzles before freezing weather arrives.
Table of Contents
- Why Your Coolant Mixture Matters All Year
- Tools and Supplies You Need
- How to Test Your Coolant With an Antifreeze Hydrometer
- Check the Coolant Level, Too
- How to Correct Coolant That Has Too Much Water
- How to Bleed Air From the Cooling System
- Do Not Forget the Winter Windshield Washer Fluid
- A Small Check Before a Big Temperature Drop
Why Your Coolant Mixture Matters All Year
Coolant is a mixture of antifreeze and water. The target used here is 50% antifreeze and 50% distilled water, commonly called a 50/50 mix. That mixture has three important jobs.
1. Help prevent boiling and overheating
We want the fluid in the cooling system to stay liquid. When it boils, vapor bubbles interfere with heat transfer, making it harder to carry heat away from the engine.
Under normal atmospheric conditions, water boils at about 212°F, while a typical 50/50 coolant mixture boils at about 226°F. Cooling systems also operate under pressure, which raises the boiling point further. At approximately 15 psi of system pressure, the figures used here are about 250°F for water and 260°F for coolant.
The pressure rating varies by vehicle. For example, one of my reservoir caps is marked 21 psi, while a radiator cap is marked 16 psi. The correct coolant mixture and the pressurized system work together to provide that boiling protection.
2. Protect against corrosion and scale
Before I owned my pickup, it had been run with straight water. Its old water pump was covered in rust and scale, and the radiator was even worse. Deposits inside a cooling system interfere with heat transfer, while corrosion can contribute to component failure. That water pump eventually needed replacement.
Antifreeze contains corrosion inhibitors that plain water does not have. The difference was easy to see when I compared that pump with the pump from my Jaguar, which had been running fresh 50/50 coolant before developing a head gasket leak. The Jaguar’s pump was in much better condition.
3. Prevent freezing damage
Water freezes at 32°F. A typical 50/50 coolant mixture provides freeze protection down to approximately negative 34°F.
That difference is a big deal because water expands by roughly 10% as it freezes. Inside a confined cooling passage, that expansion can crack plastic components or even the engine block.
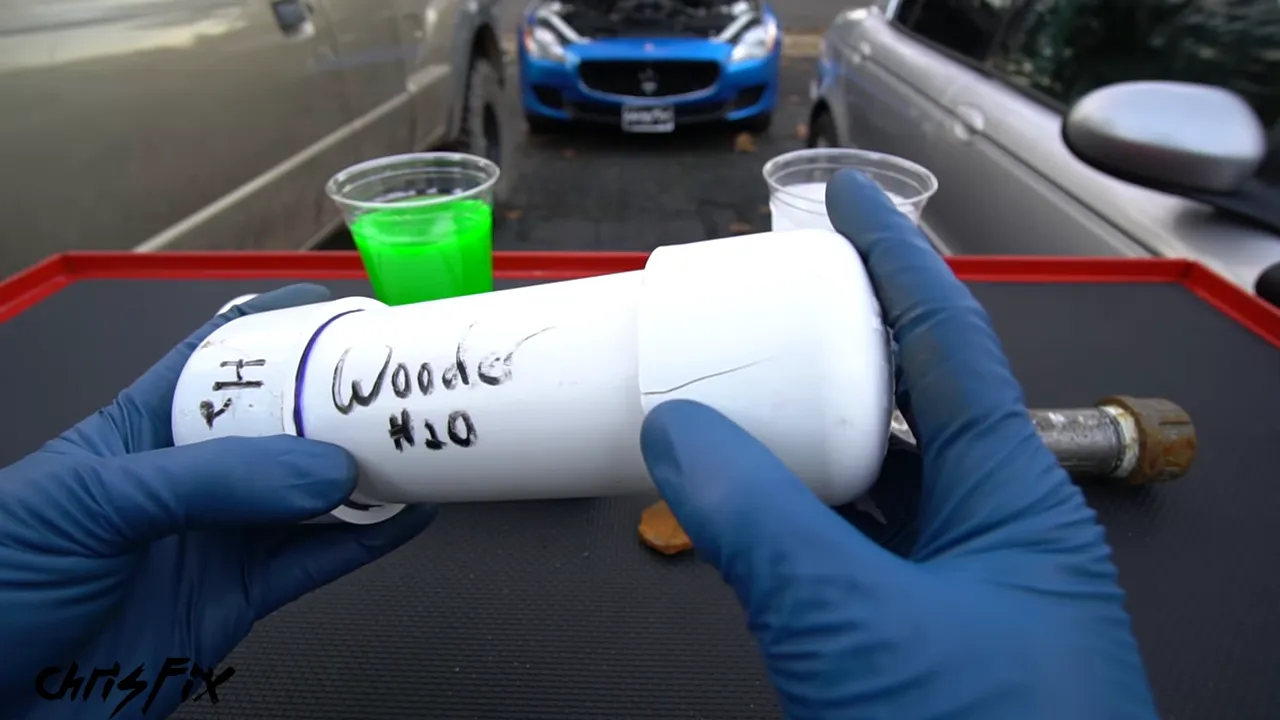
I tested this with capped metal and PVC pipes. One of each contained plain water, and the other contained a 50/50 coolant mixture. After a couple of freezing days outside, the water-filled metal pipe had a broken cap, and the water-filled PVC pipe had a large crack. Both pipes containing the 50/50 mixture were undamaged.
Do not count on freeze plugs to save the engine
The round press-fit plugs on the side of an engine block are often called freeze plugs. Ice can sometimes push one out, but they are not a reliable safeguard against a cracked block.
These plugs close openings used during the casting process, including openings that allow casting sand to be removed. Their purpose is not to make an engine safe to fill with water during freezing weather. The protection needs to come from the coolant mixture.
Tools and Supplies You Need
For the basic test, you only need an antifreeze tester. Correcting the mixture takes a few more supplies:
- Antifreeze hydrometer: The bulb-style coolant tester I use cost about $5 at the time of this project.
- Funnel: A regular funnel works for filling, but a spill-proof funnel kit is especially useful when bleeding air.
- Compatible antifreeze concentrate: Needed when the existing coolant contains too much water.
- Compatible 50/50 premixed coolant: Useful for topping off a mixture that is already correct.
- Distilled water: Used when water is needed to adjust the concentration.
- Drain pan and a sealable fluid container: Needed if you have to remove coolant.
- Safety glasses and safe vehicle support: Needed when working beneath the car to access the radiator drain.
I used PEAK 10X concentrate and premixed coolant for this job, supplied by PEAK in support of the project. It was sold as a universal coolant suitable for mixing with existing antifreeze. For your vehicle, check the coolant’s compatibility information and the requirements in your owner’s manual before adding anything.
Use distilled water, not just any bottled water
Read the label carefully. “Purified water” is not necessarily the same thing as distilled water. One bottle I checked specifically said it had minerals added for taste, which is exactly what we are trying to avoid.
Tap water, hose water, and mineral-containing bottled water can introduce deposits into the cooling system. Those deposits can reduce heat transfer and contribute to corrosion. Use distilled water without added minerals. Premixed 50/50 coolant already contains its water, so it does not need additional dilution for an ordinary top-off.
How to Test Your Coolant With an Antifreeze Hydrometer
The first car I checked was Susan, the previously vandalized car I had been fixing up. I bought it during the summer and did not know the condition of its coolant, which made a pre-winter check especially worthwhile.
Step 1: Start with a completely cold engine
Never remove a coolant pressure cap while the engine or cooling system is hot. Hot coolant is pressurized, and removing the cap can release scalding fluid.
Let the engine cool completely before opening the system. A cap that is hot to the touch is an immediate sign to stop and wait. Locate the appropriate coolant access point for your vehicle. On Susan, I could take the sample from the coolant reservoir.
Step 2: Fill the tester to its marked level
Remove the cap, place the tester’s hose into the coolant, and use the bulb to draw fluid into the chamber. Fill it to at least the tester’s fluid-level mark. Too little fluid prevents the float from moving properly and can give you an inaccurate result.
Step 3: Remove bubbles and hold the tester level
Before reading the scale, do two things:
- Gently tap the tester. Air bubbles can cling to the float and support it, changing the reading.
- Hold it in the correct orientation. On this tester, a small upper pointer must line up with a crosshair. Tilting the tester changes the position of the main float.
The hydrometer works by measuring specific gravity, so those little details matter. Get the bubbles off the float and line up the level indicator before trusting the result.
Step 4: Read the freeze-protection scale
On my tester, the blue scale shows Fahrenheit and the red scale shows Celsius. For the 50/50 mixture used here, I want a reading near negative 34°F. The tester has a negative 35°F mark, which is close enough for this basic check.
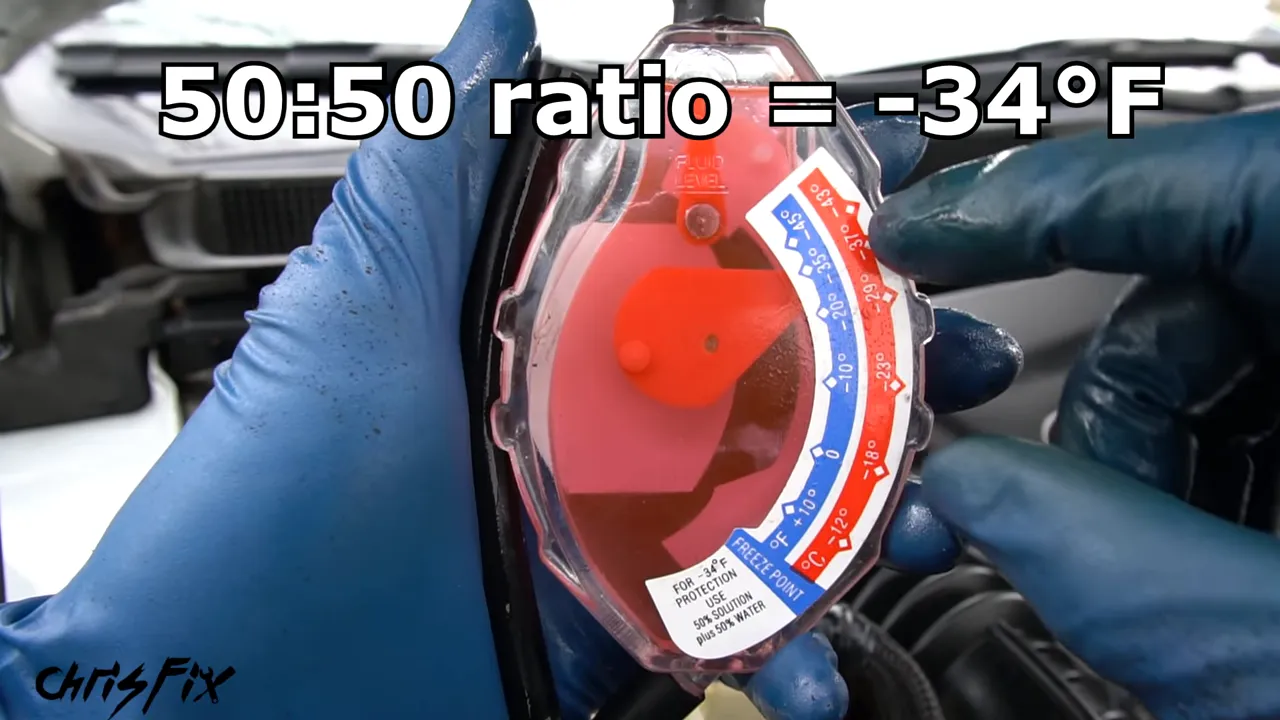
Susan’s coolant read right around that mark. Beautiful. The antifreeze concentration was where it needed to be, so no mixture correction was necessary.
Step 5: Check the tester against distilled water
An inexpensive hydrometer is useful, but it is not a precision instrument. A simple way to check whether it is reasonably close is to test a sample of distilled water.
We know water freezes at 32°F, or 0°C. The tester should indicate approximately that temperature. Mine read a little below the exact mark, which showed its limitation, but it was close enough to distinguish a healthy 50/50 mixture from a badly diluted one.
Keep that test water separate from the vehicle’s coolant. When you finish the coolant check, reinstall the pressure cap and tighten it fully.
Check the Coolant Level, Too
A correct concentration is only part of the job. You also need enough coolant in the system.
Check the reservoir’s minimum and maximum markings with the engine cold, following the vehicle’s instructions. If it needs topping off and the concentration is already correct, use compatible 50/50 coolant to bring it to the specified level.
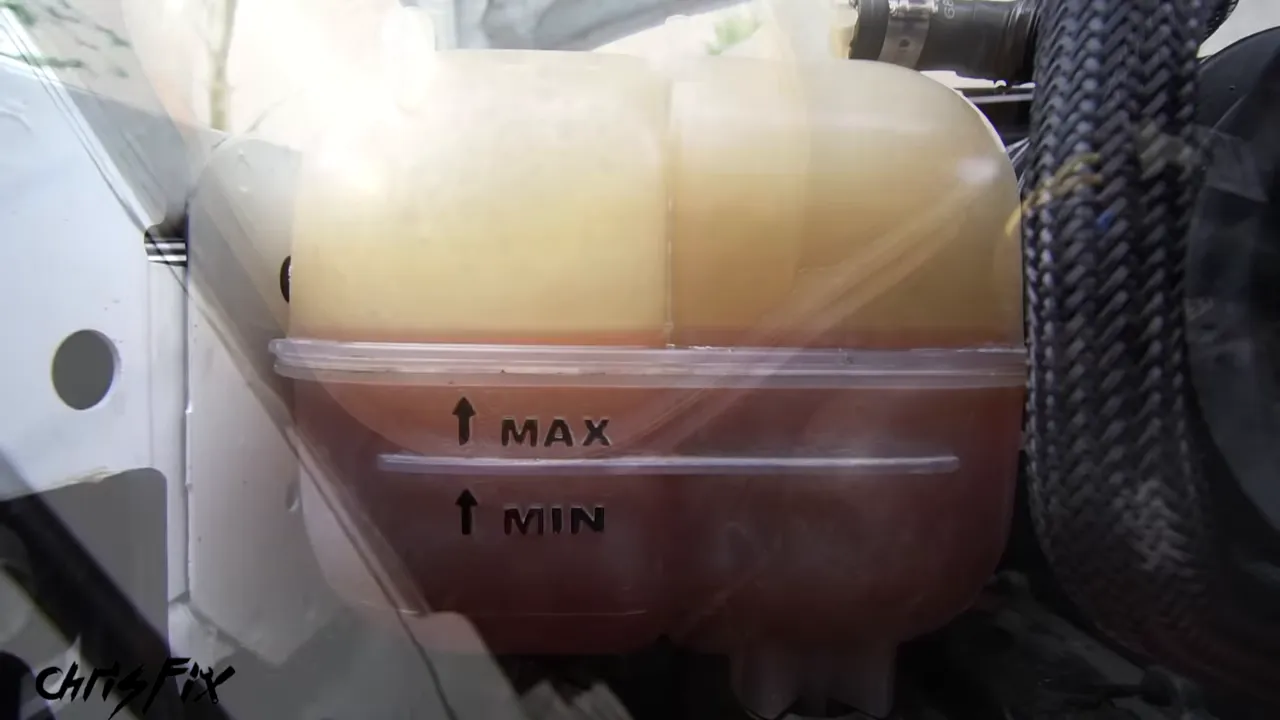
Susan’s coolant was slightly above the maximum mark. That small amount was not a concern in this example, but a heavily overfilled reservoir would need some coolant removed to leave room for expansion. Aim for the specified fill mark rather than filling the tank to the top.
If the concentration and level are both right, the basic check is done. It is a small job that can help prevent a very expensive repair.
How to Correct Coolant That Has Too Much Water
The Jaguar was a different story. It had a head gasket leak and had consumed enough coolant that repeated top-offs became expensive. During that period, I had added water. That was not ideal, and it left the mixture too weak for winter.
I was also evaluating a head gasket sealer over the long term, but that did not change the immediate job: test the mixture and restore its freeze protection.
The Jaguar’s sample showed protection only to about 10°F, or negative 12°C. It sometimes gets colder than that where I live, so leaving it alone was not an option.
Step 1: Drain and measure some of the existing coolant
- With the engine completely cold, raise the front of the vehicle safely if access requires it. I used ramps and chocked the rear wheels. If using a jack, support the vehicle properly before getting underneath.
- Put on safety glasses and position a drain pan beneath the radiator.
- Locate the radiator drain valve. On the Jaguar, it was near a lower corner of the radiator, behind the grille area.
- Open the drain carefully. My valve was plastic and operated with a flathead screwdriver, so it was important not to strip or force it.
- Allow the radiator to drain, then reinstall the drain plug snugly without overtightening it.
- Transfer the removed fluid into a suitable marked container so you can measure it.
Draining the radiator does not empty the entire cooling system. Coolant remains inside the engine, heater core, and some hoses. You need to account for what is still there rather than assuming you are starting with an empty system.
I collected about one gallon, or four quarts, from the Jaguar. Keep the removed coolant contained and take it to a facility that accepts it for recycling or disposal. Check acceptance before making the trip. The EPA’s household hazardous waste guidance is a useful starting point for finding local disposal information.
Step 2: Calculate the mixture left in the car
First, find the total cooling-system capacity in the owner’s manual. Then use the measured freeze-protection reading and an appropriate antifreeze-to-water concentration chart to estimate the existing mixture.
Here is the Jaguar example, worked through one step at a time:
- Total system capacity: Approximately eight quarts, or two gallons.
- Original test result: Protection to 10°F, corresponding to approximately 25% antifreeze and 75% water on the chart used.
- Amount removed: Four quarts.
- Amount remaining: Eight minus four equals four quarts.
- Antifreeze remaining: Four quarts multiplied by 25% equals one quart.
- Water remaining: Four quarts multiplied by 75% equals three quarts.
So the car still contained one quart of antifreeze and three quarts of water.
Step 3: Add concentrate, then finish with premix
To bring that remaining mixture to 50/50, I added two quarts of full-strength antifreeze concentrate. That gave me three quarts of antifreeze and three quarts of water, a balanced mixture totaling six quarts.
With the mixture balanced, I could fill the rest of the eight-quart system with 50/50 premixed coolant. The remaining two quarts of premix contributed one quart of antifreeze and one quart of water, giving a final total of four quarts of each.
The distinction matters: concentrate corrects the weak mixture; premix finishes the fill without changing the corrected ratio. Simply replacing the drained fluid with 50/50 premix would still leave this particular system too diluted.
Do not copy the Jaguar’s two-quart correction blindly. Your system capacity, starting concentration, and drained volume determine how much you need.
How to Bleed Air From the Cooling System
After draining and refilling, trapped air needs a way out. Air in the heater core can contribute to weak cabin heat, and a spill-proof funnel makes this part of the job much easier.
Follow your vehicle’s specified bleeding procedure. The following method worked on the Jaguar with the funnel attached to its coolant reservoir.
Fit the funnel and fill the system
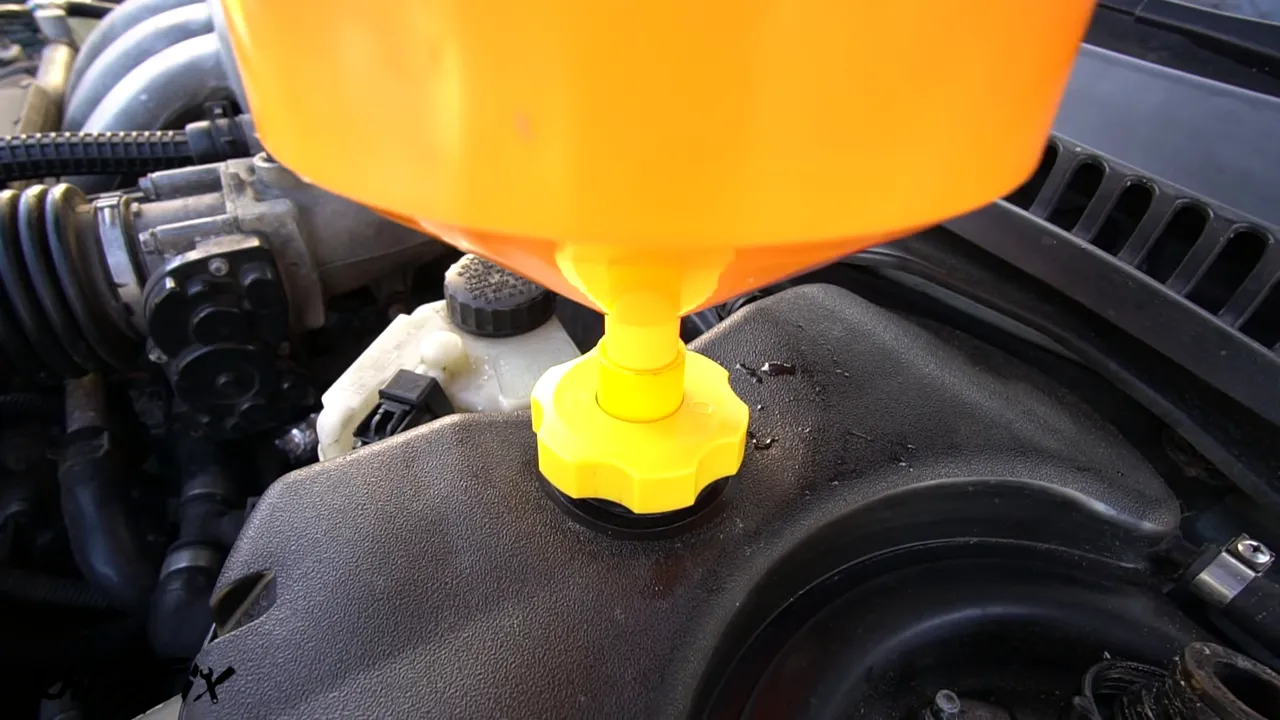
With the engine still cold, install the funnel kit’s correct adapter and secure the funnel. I added the calculated two quarts of concentrate first, followed by 50/50 premix. Then I left some coolant in the funnel to replace the air that would come out.
Warm the engine and turn the heat up
I returned the car to level ground, started the engine, and allowed it to warm until the thermostat opened. Inside the car, I set the heat to its hottest setting. On a vehicle with a heater control valve, that allows coolant to flow through the heater core.
As the engine ran, trapped air bubbled into the funnel and coolant took its place. The funnel level dropped as the system filled, so keep enough coolant available to avoid drawing air back in.
On this car, reaching operating temperature took about 10 to 15 minutes of idling. Treat that as an example, not a universal timer. The thermostat needs to open and the vehicle’s bleeding procedure needs to be completed.
The funnel helps because its fluid level sits above the heater core, engine, and radiator, providing a high point for escaping air.
Finish safely and test again
Once bleeding is complete, shut the engine off. The coolant is now hot, so allow it to cool before handling adapters or taking another sample. Use the funnel’s stopper as directed to contain the remaining coolant during removal.
After the system has cooled, recheck the coolant level and take another hydrometer sample. Tap away bubbles, hold the tester level, and read the scale again.
The Jaguar’s final reading was right around the negative 35°F mark. That confirmed the correction had brought it back to approximately 50/50. Reinstall and fully tighten the pressure cap.
Do Not Forget the Winter Windshield Washer Fluid
There is another fluid under the hood that can freeze: windshield washer fluid. Plain water or a summer washer-fluid mixture may not provide enough protection for winter temperatures.
Freezing can damage the washer reservoir, lines, and spray nozzles. I used winter washer fluid with de-icer rated to negative 25°F. Choose a product rated for the temperatures your car will encounter, and keep washer fluid separate from engine coolant.
- Use up or remove enough of the summer fluid. On Susan, operating the washers for roughly 10 to 15 seconds removed enough to make room for winter fluid.
- Fill with winter-rated washer fluid. Starting with a mostly empty reservoir limits dilution by the old mixture.
- Run the washers again for a few seconds. This moves the new winter fluid through the lines and spray nozzles, not just into the reservoir.
- Close the washer-fluid cap. Repeat the check on any other vehicle you are preparing for winter.
A Small Check Before a Big Temperature Drop
You do not need to guess whether your coolant is ready for winter. Test its freeze protection, check the cold fluid level, and correct the concentration if necessary. If you drain and refill the system, account for the coolant left inside and bleed the trapped air afterward.
Add winter-rated washer fluid, run it through the nozzles, and you have covered another easy-to-miss freeze risk. A little preparation now is much better than finding a cracked component when the temperature drops.


