The best gift for somebody who works on cars is a tool that makes a frustrating job easier. Something useful, a little different, and ideally something they do not already have in their toolbox.
For my sixth annual Christmas gift list, I picked five main gifts plus a bunch of smaller stocking stuffers. These cover everything from getting underneath a lowered car to finding vacuum leaks, restoring scratched paint, and keeping oil changes from turning into a mess. These are tools I use and like, with some important differences to consider before choosing one.
Table of Contents
- 1. Car Ramps: Match the Ramp to the Vehicle
- 2. A Cordless Dual-Action Polisher for Paint Correction
- 3. A Smoke Machine for Finding Vacuum Leaks
- 4. Ratchet Extenders for Bolts With Almost No Swing Room
- 5. An E85 Ethanol Conversion Kit for a Compatible Car
- Choose the Gift That Solves Their Most Annoying Job
1. Car Ramps: Match the Ramp to the Vehicle
Car ramps are a quick, convenient way to get extra clearance for jobs like an oil change. But not all ramps work with all vehicles. Two things matter right away: load capacity and approach angle.
Budget-friendly ramps for everyday cars and trucks
The short plastic ramps I tested have an advertised 8,000-pound capacity, measure 36 inches long, and provide a 17-degree approach angle. Once the tires are on top, they are about 6 inches off the ground.
That gives you useful working room without needing a huge set of ramps taking up space in the garage. For a normal-height car or truck, this style can make a lot of sense.
There are two drawbacks I ran into:
- They can slide. The plastic ramps moved when I first tried driving the Hummer onto them.
- The approach is too steep for some lowered cars. My drift Mustang contacted the ramp with its front bumper before the tires could climb it.
Before buying, read the ramp manufacturer's capacity instructions carefully. A rating may refer to a pair, an axle load, or an allowable vehicle weight, depending on the product. The driver's door-jamb certification label is useful for checking vehicle and axle ratings, but those ratings are not a measurement of the vehicle's actual weight. Do not assume a heavy vehicle is suitable simply because only its front wheels are being lifted.
Long, low-angle ramps for sports cars
The longer ramps solve the bumper-clearance problem with a gentler climb:
- Length: 67 inches.
- Approach angle: 11 degrees.
- Lift height: 10 inches.
- Capacity: 1,500 pounds per wheel, or 3,000 pounds across the supported axle.
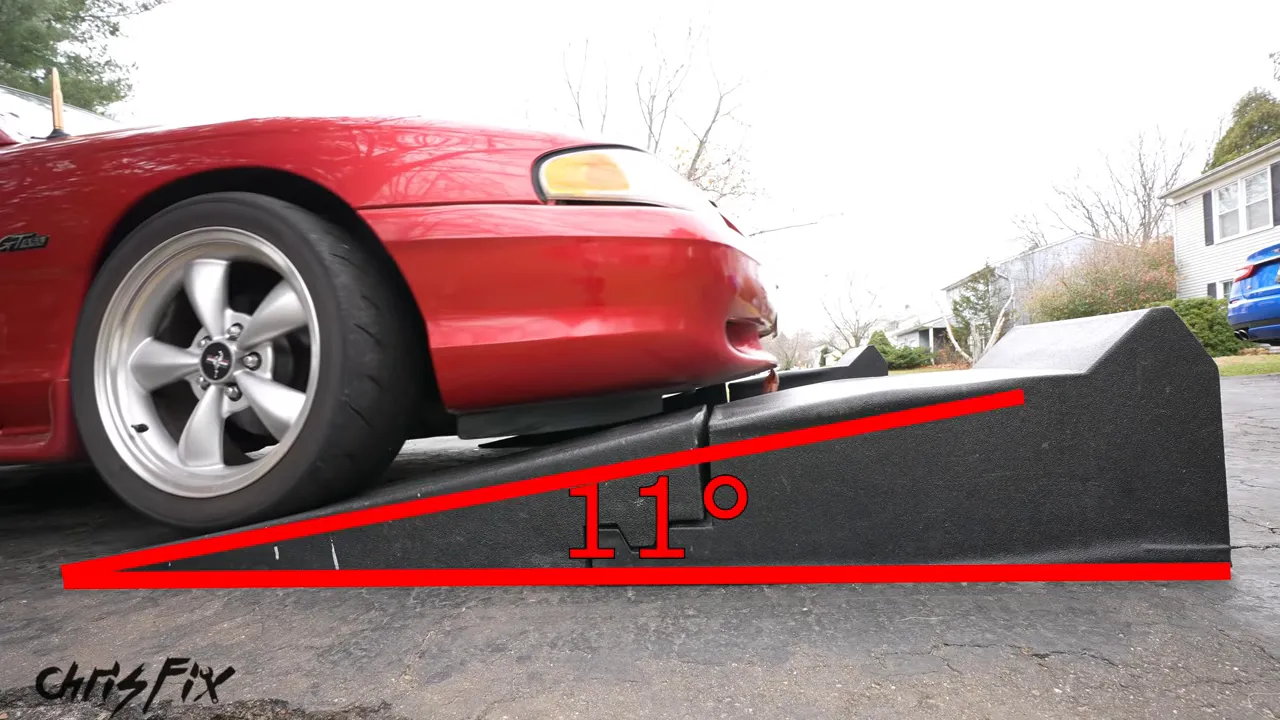
These work with my lowered Mustang and C4 Corvette. The extra height also gives me more room underneath, and the approach sections detach once the tires are securely on the platforms. That opens up access from the side of the vehicle.
They are made from a foam/composite material rather than the same plastic as the shorter ramps. My old set had about ten years of use, with some worn edges and damage at the tips. That is useful long-term experience, but it is also a reminder to inspect lifting equipment and follow the manufacturer's replacement guidance when damage appears.
My choice is simple: short ramps can be a good value for a normal-height vehicle; long ramps are worth considering when ground clearance is the problem. Neither is automatically the right choice for every car.
Safety first: Use ramps only on a suitable level surface, follow the loading instructions, secure the vehicle, and chock the wheels that remain on the ground. Never crawl underneath an unstable vehicle.
Stocking stuffer: Oil Udder
Removing an oil filter is often the messiest part of an oil change. You loosen it, oil runs down the sides, and anything underneath gets coated. The Oil Udder is designed to catch that oil before it spreads everywhere.
It fits over a compatible spin-on filter, holds onto it magnetically, and has a grippy outer surface so you can turn the filter by hand. Openings around the inside collect the draining oil and direct it toward the outlet.
The XL size suits many common filters. I needed the larger XXL version for the big filters on the Hummer and another car, where the filter diameter is roughly 4 inches. Check both filter size and available clearance before choosing one.
The bottom fitting accepts a hose with a 3/4-inch inside diameter, letting you route the oil into a drain container. There is also a cap for the hose so the leftover oil does not drip everywhere afterward.
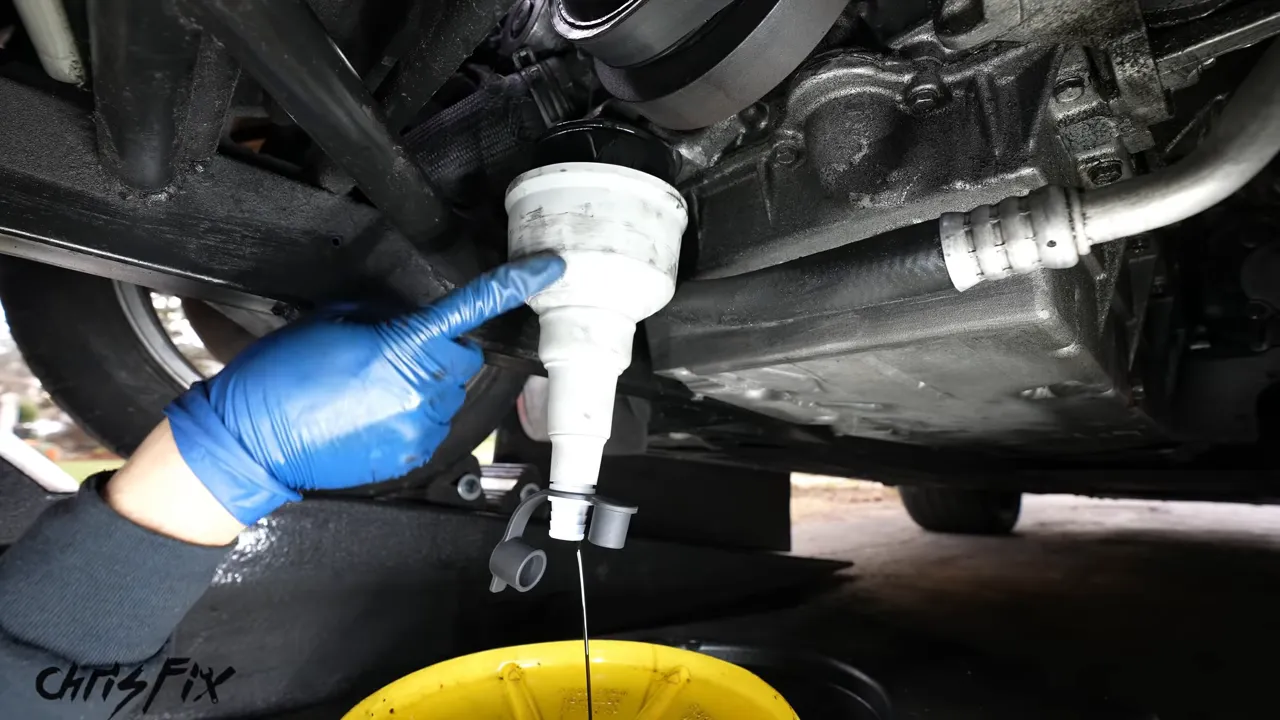
On my test car, a line directly below the filter would normally get covered in oil. With the Oil Udder installed, I loosened the filter and let the oil drain through the hose instead. Once it finished draining, I capped the outlet, removed the filter the rest of the way, and emptied it into the container.
That particular engine holds 11 quarts, so I also collected an oil sample during the change to help assess its condition. Afterward, I installed the new filter, marked the mileage, and refilled with the specified oil for that engine. Oil capacity, viscosity, filter prefilling, and tightening instructions are vehicle-specific, so use your own service information rather than copying another car's specifications.
2. A Cordless Dual-Action Polisher for Paint Correction
If somebody enjoys cleaning and detailing their own car, a dual-action polisher is an awesome gift. It takes a lot of the effort out of improving swirl marks, light scratches, and hazy paint.
The Ryobi ONE+ 18V DA polisher kit I used includes the polisher, a 4Ah battery, charger, optional handle, and three pads for compounding, polishing, and waxing. The battery also works with other compatible tools in that system.
My pickup was a good test. Off-road tree branches had left scratches along the side, and the finish looked dull instead of glossy. I taped off a section so I could compare the untouched paint with the corrected paint.
The three-step process
Before polishing, clean and clay-bar the paint. You want a smooth, clean surface, not dirt or bonded contamination trapped under the pad.
- Compound. Apply compound to the appropriate pad, dab it onto the panel, and spread it at the lowest setting. On this tool, I started around the indicated 3,000 setting, then increased it to about 5,000 for the working passes.
- Work in a crosshatch pattern. Move slowly, roughly an inch per second, making passes in one direction and then perpendicular to them.
- Polish. Wipe away the compound residue, switch to the polishing pad and product, and repeat the controlled passes.
- Protect. Apply wax with its own pad and buff off the residue for a protected finish.
The technique matters more than pushing hard. Keep the pad flat against the panel and follow the bodywork's curves. Use light pressure and let the machine do the work. Too much pressure can stop the pad from rotating properly.
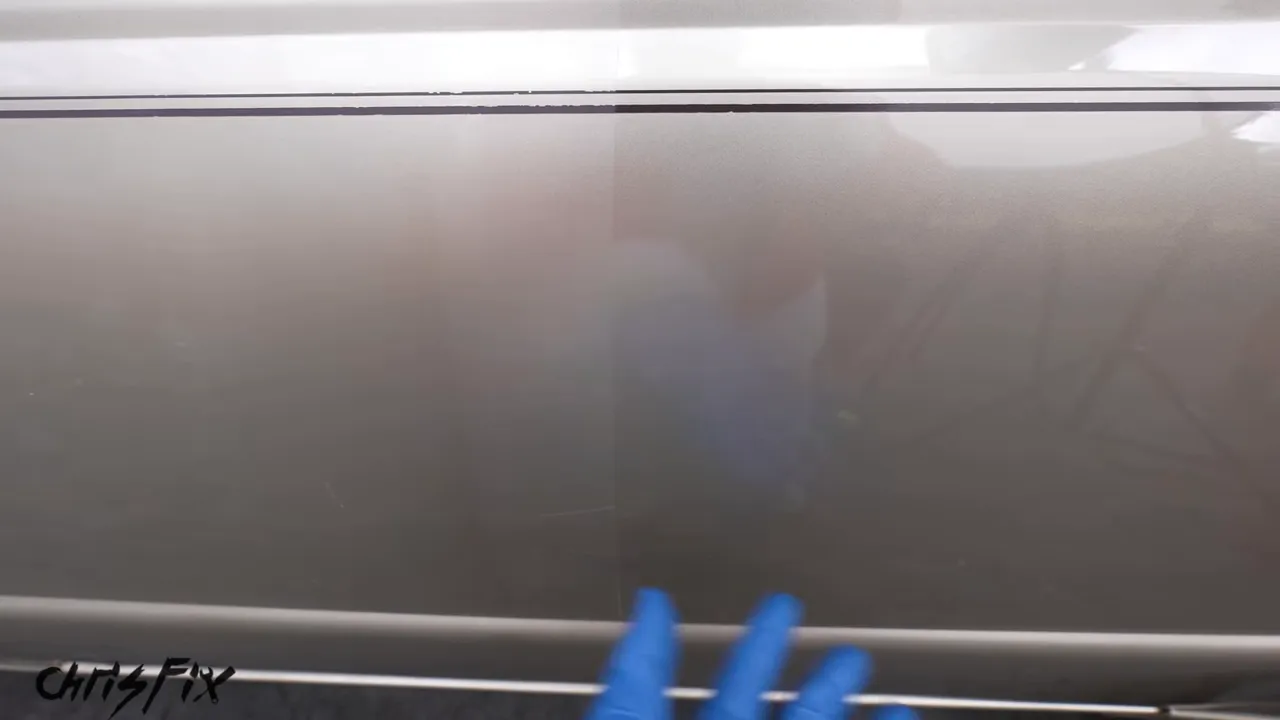
The improvement on the truck was huge: the treated area had much better gloss and clarity, with the visible light scratches greatly reduced. That does not mean every scratch can be polished away, but it shows what this kind of tool can do on suitable paint defects.
Why cordless is convenient
No cord means no cable dragging across the paint and no cable management while moving around the vehicle. This polisher also has rubberized contact areas and a rear bumper, which help reduce the chance of damage from an accidental bump.
In my use, a 4Ah battery provided roughly 45 minutes to an hour of continuous operation, and charging took about an hour. A second compatible battery makes longer jobs easier: use one while the other charges, then swap them.
Stocking stuffer: Drill brushes
A drill brush kit is a smaller gift that puts a cordless drill to work on carpets, floor mats, and suitable cloth upholstery.
The kit I used has three brush attachments. My favorite is the wide, flat brush because it covers a lot of floor-mat surface quickly.
- Vacuum loose dirt first.
- Apply a suitable carpet cleaner.
- Use the brush to agitate the cleaner across the material.
- Extract the loosened dirt and cleaning solution with equipment suitable for wet pickup.
The drill handles the repetitive scrubbing, which makes this a quick, useful addition to a detailing setup. Choose a brush and cleaner appropriate for the material rather than assuming every attachment is safe on every interior surface.
3. A Smoke Machine for Finding Vacuum Leaks
A diagnostic smoke machine turns a hidden leak into something you can actually locate. Instead of guessing which hose or gasket is bad, introduce smoke into the system and look for where it escapes.
I originally wanted to build an inexpensive homemade smoke machine. After adding up the parts, I was around $80 before assembly. At the time, spending a little more bought a ready-made unit with a one-year warranty. Sometimes building a tool yourself is fun; sometimes buying the finished tool makes more sense.
The AutoLine Pro smoke machine I tested came with smoke fluid, a hose, and electrical leads. It also had a 1 psi regulator. A small air compressor supplies the air, so you do not need a huge shop compressor.
How I used it to locate a vacuum leak
- Fill the machine correctly. This model uses a marble inside as its fill reference. Add fluid only to the specified level.
- Connect the hose and electrical lead. Hang the machine securely because its body gets hot.
- Power it and let it warm up. I allowed about three minutes before introducing compressed air.
- Choose an appropriate connection point. On the example vehicle, I disconnected the brake-booster vacuum hose and connected the smoke outlet to the hose leading toward the intake.
- Introduce smoke and inspect. Look around vacuum lines, connections, and intake-manifold sealing areas for escaping smoke.
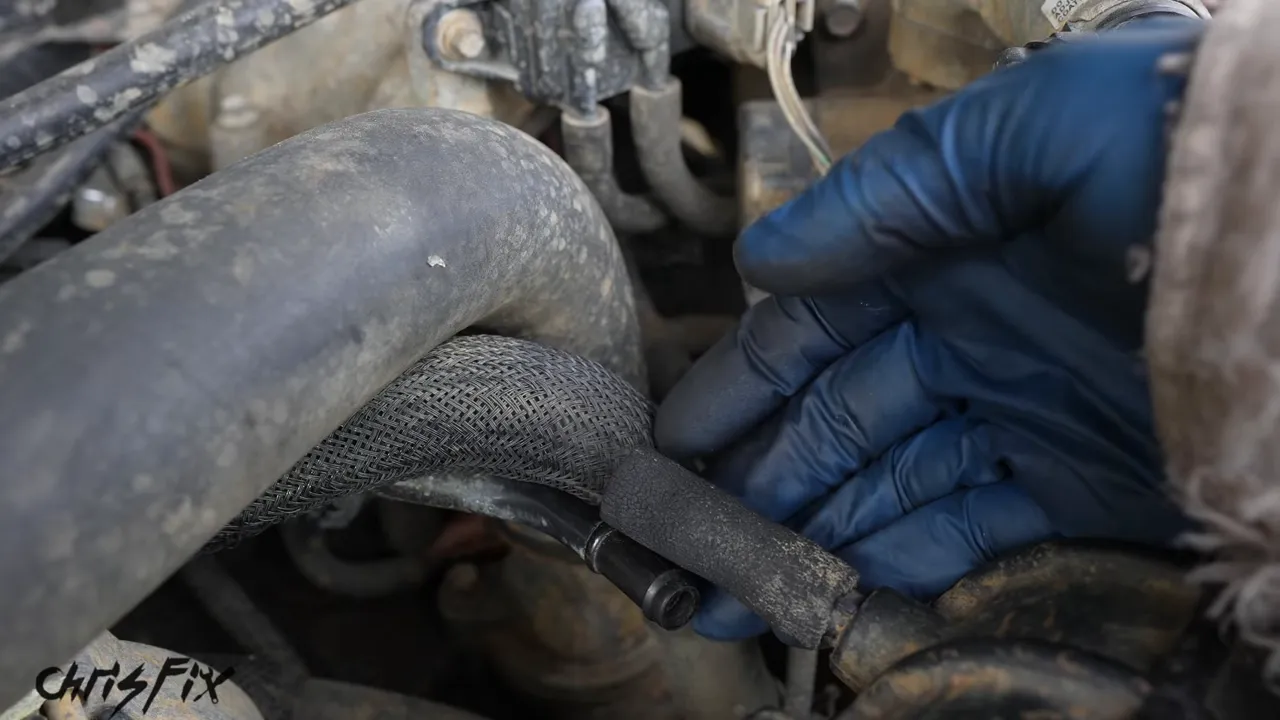
For the demonstration, I deliberately disconnected a vacuum line. The smoke made that opening easy to find. The same principle helps with less obvious problems, such as a cracked hose or a leaking gasket tucked underneath the intake.
Optional adapters provide other connection methods, including an intake adapter, a fuel-cap adapter, and an EVAP service adapter. The basic kit was enough for the vacuum-line demonstration.
Use the pressure and test medium specified for the system. The regulator on this machine is not a universal guarantee of compatibility with every EVAP system. Fuel-vapor testing requires the correct equipment and vehicle-specific procedure.
Stocking stuffer: Scraper utility knife
The scraper utility knife combines two handy tools in one body. Move the switch and the blade changes from a utility-knife position to a scraper position. When finished, retract the blade for storage.
Opening a parts box and then scraping residue are two straightforward uses. Blade replacement is simple too: release the blade-retaining mechanism, remove the old blade, and install the replacement.
One important caution: a metal blade can gouge a gasket surface and create a leak. Although I demonstrated the scraper on a differential cover, I generally prefer plastic razor blades where protecting the sealing surface is the priority. Match the scraper to the material.
4. Ratchet Extenders for Bolts With Almost No Swing Room
Ratchet extenders are not tools you will use on every repair. But when a bolt is buried somewhere with almost no room to move a ratchet, they can be incredibly helpful.
These Tite-Reach ratchet extenders move the ratchet's input point away from the socket. Inside, a chain transfers rotation between the two ends.
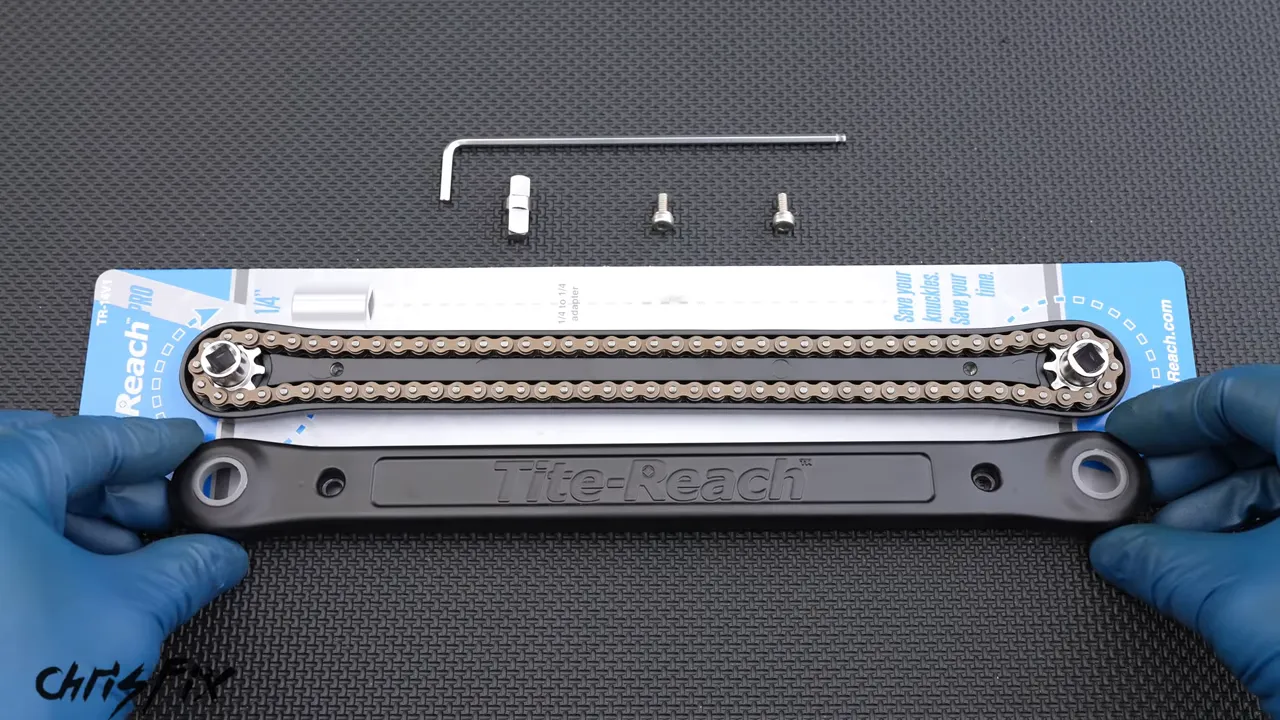
The lineup I tried included a plastic-bodied 3/8-inch DIY version and aluminum Pro versions in 1/4-inch, 3/8-inch, and 1/2-inch drive. The Pro models came with a lifetime warranty.
Where the extender actually helps
A valve-cover bolt at the back of the BMW's engine bay was the perfect example. A ratcheting wrench fit, but I could move it only a few degrees. A normal ratchet had the same problem.
With the extender on the bolt, the ratchet sat farther out in the open. That gave me a much fuller swing instead of countless tiny movements in a cramped space.
I also tested the 1/2-inch Pro version with an impact wrench to loosen a lug nut, and it worked. That is specific to the suitable model and its rating, not permission to use any extender with an impact tool.
Torque accuracy needs attention too. For the unit demonstrated, the stated compensation was about 6 percent, illustrated by a 106 lb-ft input setting for a nominal 100 lb-ft output. Do not apply that adjustment to every adapter. Follow the exact tool manufacturer's torque guidance.
If I were buying just one, I would choose an aluminum 1/4-inch or 3/8-inch Pro model rather than the plastic DIY version. The narrower models are useful in tight spaces, and buying one avoids the expense of the whole set.
Stocking stuffer: A 230-piece drill bit set
The 230-piece titanium-coated drill bit set offers a lot of practical value. Sizes range from 3/64 inch to 1/2 inch, and the set includes plenty of duplicates in the smaller sizes that are easiest to break.
The sizes are engraved on the bit bases, and everything stores in a fitted case. I checked several bits for straight running and demonstrated drilling through:
- 1/8-inch steel.
- 3/16-inch aluminum.
- 3/16-inch PVC.
- 1 1/2-inch wood.
For somebody who regularly drills brackets, panels, or other project materials, spare small bits are a lot more useful than an impressive piece count by itself.
Stocking stuffer: Magnetic spark plug sockets
A magnetic spark plug socket set solves an annoyance that anyone with deep spark plug wells may recognize: pulling the extension out and leaving the socket stuck on the plug.
Traditional spark plug sockets often use a rubber insert to grip the plug. That works, but the insert can hold tightly enough that the extension separates first. Then you have to retrieve the socket from the well.
The four-piece set I used combines magnetic retention with sockets attached to their extensions. For the four-cylinder demonstration, I chose the 10-inch-long, 5/8-inch socket. Its textured grip made it easier to spin by hand after breaking the plug loose.
The magnet holds the plug securely during removal, while the attached extension keeps the socket from being left behind after installation.
Check fit before buying. These long tools are particularly useful on engines with accessible, deep plug wells, such as many inline-fours and inline-sixes. They are not a universal solution for tight sideways access, such as the boxer-engine layout discussed here.
5. An E85 Ethanol Conversion Kit for a Compatible Car
An ethanol conversion kit is the most vehicle-specific gift on this list. It is interesting for someone who has a compatible car, convenient access to E85, and a reason to make the conversion.
The attraction in my 2021 examples was the price difference at the pump. One station listed premium at about $3.69 per gallon and E85 at $1.85. Another showed premium at $4.29 and E85 at $2.29.
Those are historical examples, not current prices or a promise of lower running costs. The kit adds more fuel when ethanol content increases, so a lower price per gallon is only part of the calculation. The U.S. Department of Energy's E85 overview provides useful background on ethanol blends and their lower energy content.
What the conversion kit does
The eFlexFuel kit uses three main components:
- A controller that adjusts injector operation to supply the additional fuel required.
- An ethanol-content sensor installed inline in the fuel supply.
- A wiring harness that connects the controller to the injectors.
The sensor reports the fuel's ethanol content, and the controller adjusts accordingly. The intended setup accommodates gasoline through E85 and blends in between, provided the vehicle is compatible.
On the Mustang, I mounted the controller out of the way in a relatively cool area of the engine bay. The harness connects at each injector, and the ethanol sensor sits inline with the fuel feed to the rail.
That is an overview, not a complete installation procedure. Before buying, use the manufacturer's year, make, and model compatibility check and review the installation requirements. Working on a fuel system is not something to improvise.
What it was like to use
I tested this setup for about two years in the drift Mustang and Del Sol, including street and track use, before recommending it. Starting and driving were generally familiar, although cold starts sometimes needed a little extra cranking.
The companion app displays ethanol content, injector duty cycle, and injector-operation information. That gives you a way to check what the system is doing rather than guessing about the fuel blend.
The appeal is the combination of installation convenience on a suitable vehicle, potential fuel savings, and potential performance benefits. None of those makes it the right gift for everybody. Compatibility and local fuel availability come first.
Stocking stuffer: Spill-proof coolant funnel
A spill-proof coolant funnel might look simple, but it makes cooling-system filling much easier. After using one, I do not want to go back to balancing a regular funnel in the filler neck.
The kit includes adapters, caps, extensions, and a stopper. Choose the correct fitting, secure it to the appropriate fill point, and install the funnel. On my Mazda B3000, the matching green adapter and cap held it in the radiator neck.
The truck had lost coolant from a leaking T-fitting, so it provided a useful demonstration of topping up and bleeding. A funnel does not repair the leak itself; that problem still needs to be addressed.
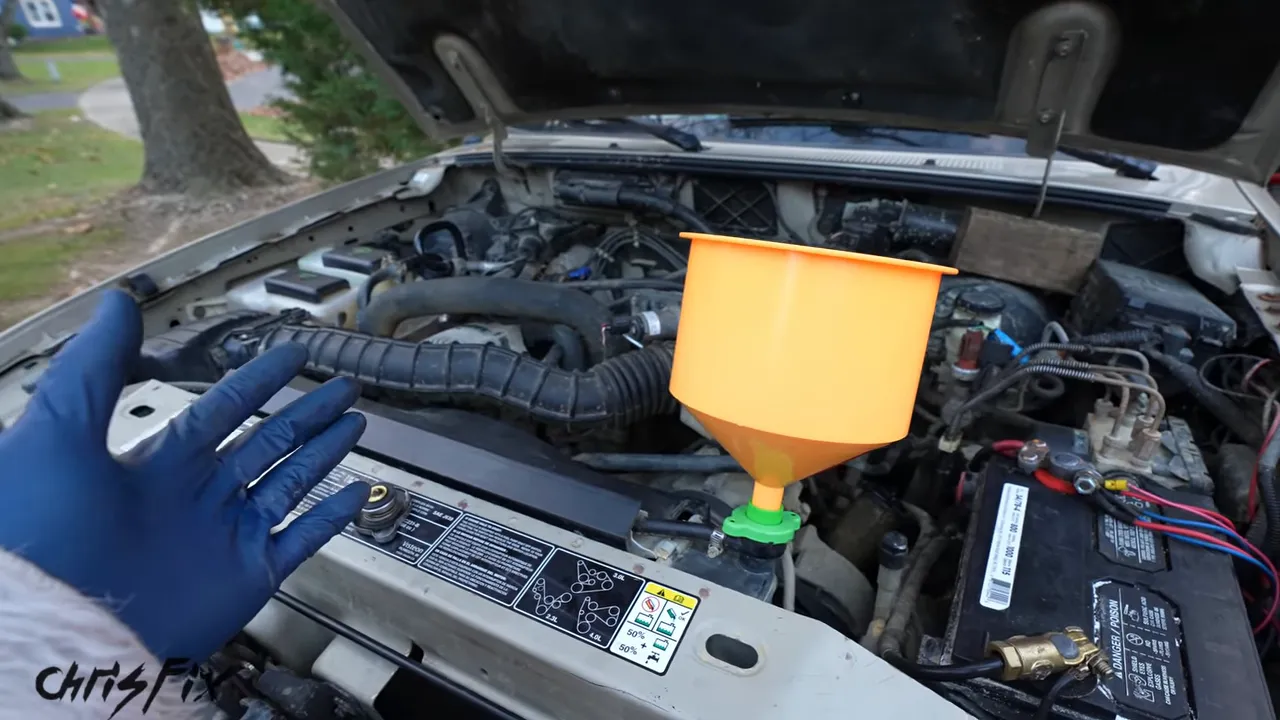
For the demonstrated setup, I added the correct coolant to the funnel, started the engine, and allowed it to reach operating temperature. Bubbles rising through the coolant showed air leaving the system. The elevated funnel provided a high point for that air to escape.
The stopper is the clever finishing touch. Insert it before lifting the funnel away, and the remaining coolant stays contained. Then position the funnel over the coolant bottle and remove the stopper to return the excess.
Begin with a cool engine and follow the vehicle's bleeding procedure. Never remove a pressure cap from a hot cooling system, keep clear of fans and belts, and do not assume every vehicle is fully bled simply because it has reached operating temperature. Handle the funnel and coolant cautiously as they warm up.
Choose the Gift That Solves Their Most Annoying Job
You do not have to buy the biggest kit or the most expensive tool to give a great car-related gift. Think about what the person actually does in the garage.
- Routine maintenance: Suitable ramps, an Oil Udder, magnetic spark plug sockets, or a spill-proof funnel.
- Cleaning and detailing: A cordless DA polisher or drill brushes.
- Diagnostics and awkward repairs: A smoke machine or ratchet extender.
- General projects: A scraper utility knife or a drill bit set with useful spare sizes.
- A compatible enthusiast build: An ethanol conversion kit, after checking the car and local E85 availability.
The common thread is usefulness. A tool that prevents a mess, finds a hidden problem, or finally reaches that stubborn bolt is the kind of gift somebody will appreciate long after the holidays. Whatever you celebrate, enjoy the time with your friends and family, and have a happy new year!


