A connecting rod punching holes through an engine block is the dramatic part. The failure that starts it can happen in a space so small that only a thin film of oil separates two pieces of metal.
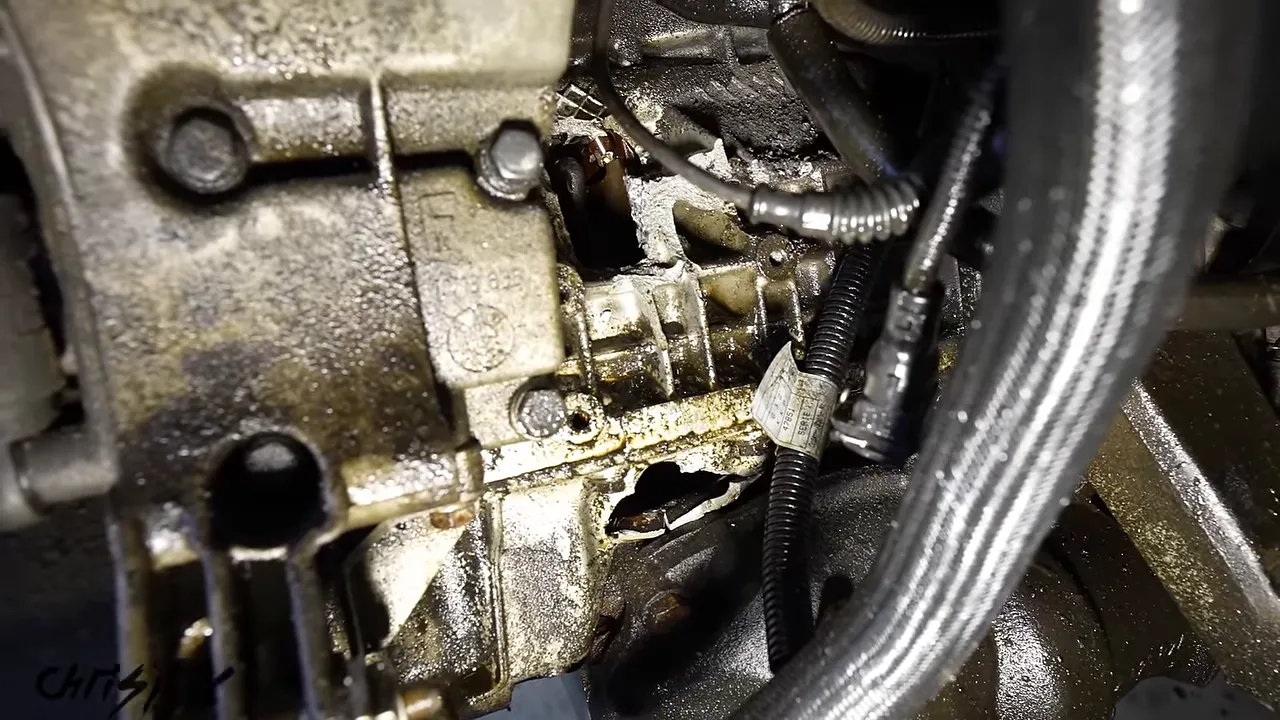
That is what happened to our Lemons BMW at its first endurance race. Cylinder number two spun a rod bearing, and the damage eventually destroyed the connecting rod, piston, valves, and engine block.
But finding the broken parts was only the beginning. We wanted to know why the bearing failed, so we completely disassembled the engine and compared the physical evidence with our race data and oil analysis. Here is how a spun bearing works, what causes one, and what we learned getting this BMW ready for another race.
Key Takeaways
- A spun rod bearing rotates inside the connecting rod after its protective oil film fails.
- Dirty, contaminated, degraded, aerated, or insufficient oil can compromise bearing lubrication.
- Our teardown confirmed a spun bearing, while low oil pressure remained the most likely underlying cause.
- An oil-pressure warning light does not confirm adequate lubrication for sustained high-RPM racing.
Table of Contents
- How Our BMW Engine Failed on Track
- What Is a Spun Rod Bearing?
- How a Spun Bearing Can Destroy an Engine
- Six Oil-Related Causes of a Spun Bearing
- Diagnosing Our Failure: What We Ruled Out
- What the Oil Analysis Told Us
- Our Most Likely Cause: Low Oil Pressure in a Worn Engine
- Getting the Junkyard M54 Back Into the Car
- Making the BMW Better Prepared for Endurance Racing
- What Still Needed Work Before the Next Race
How Our BMW Engine Failed on Track
Our race had barely gotten started. I finished my first few laps, and Aaron took over. He was doing an awesome job, moving up nine positions in just seven laps.
Then, at the end of a half-mile straight, he braked hard from about 100 mph for a tight turn. That is when the engine let loose. Another team’s onboard footage caught a huge cloud of smoke at the end of the straight.
The engine ran rough, there was no oil pressure, and Aaron pulled off the track. Once the car came back to our pit, we found a piece of connecting rod. That is never a good sign.
We located another engine at a local junkyard and tried to swap it at the race. We got the failed engine out, exposing multiple holes in the block, but ran out of time to install the replacement. Our first endurance race ended with us pushing the BMW into the trailer.
What Is a Spun Rod Bearing?
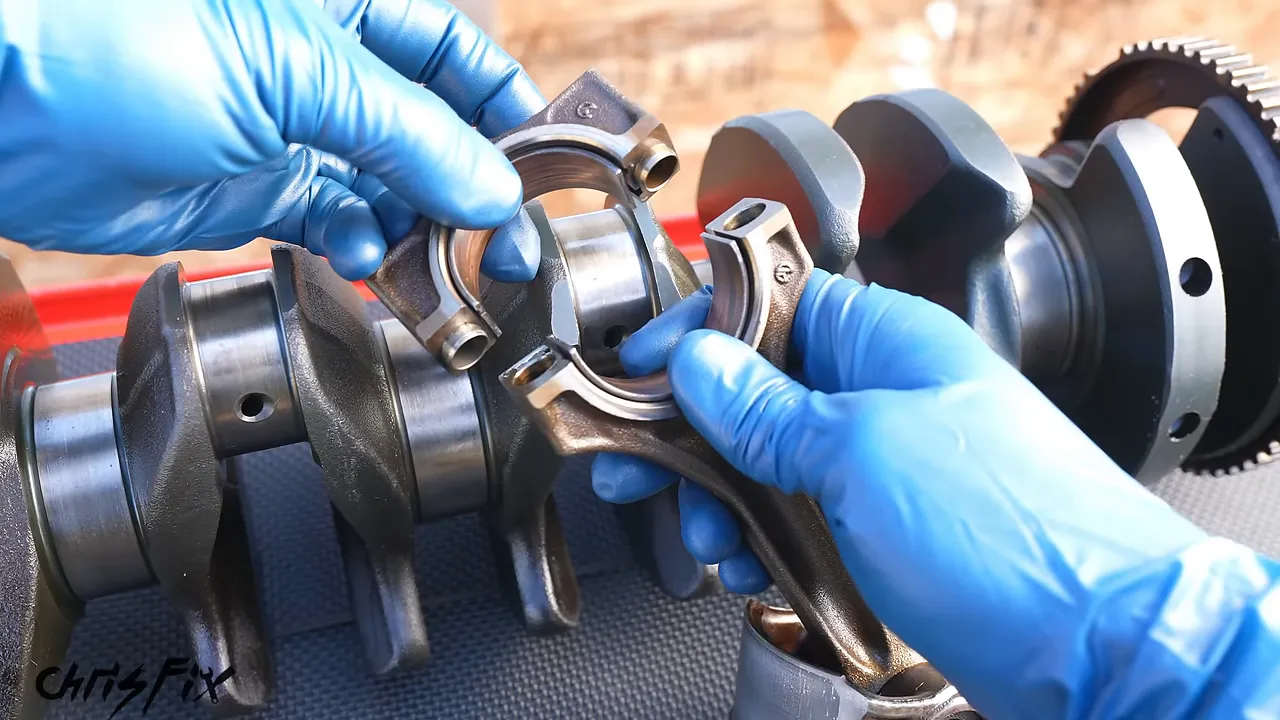
A rod bearing is not a ball bearing. It consists of two curved bearing shells fitted into the large end of a connecting rod and its matching cap. With the cap bolts tightened correctly, the shells stay fixed in the rod while the crankshaft journal rotates inside them.
The bearing shells are supposed to stay with the connecting rod, not rotate inside it.
The thin oil film doing all the work
Oil reaches the rod journal through passages in the crankshaft. During normal lubricated operation, a thin film of oil separates the bearing surface from the journal. The rod bearing rides on that film rather than rubbing directly against the crankshaft.
That tiny separation is incredibly important. If the oil film fails, the bearing can contact and grab the rotating journal. The crankshaft then drags the bearing shell around inside the connecting rod.
That is a spun bearing: the shell rotates in a housing where it should remain stationary.
The outside of the bearing and the inside of the rod are not intended to act as lubricated running surfaces. Once the shell starts moving there, friction generates tremendous heat, and the damage can escalate quickly at high engine speed.
What bearing wear looks like
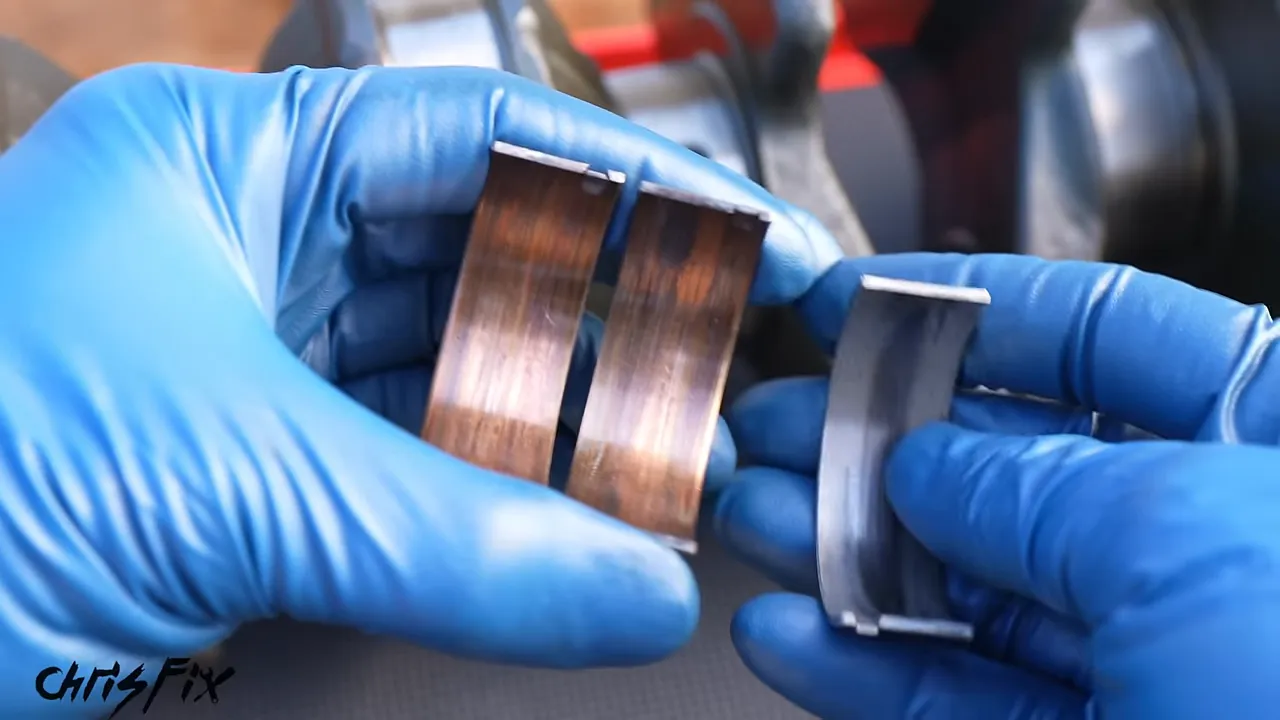
The bearings from our engine showed extensive wear. Several had worn through their gray or silver-colored surface layer and exposed the copper-colored material underneath.
On the bearing construction shown here, the layers serve different purposes:
- Surface layer: A low-friction metal layer, described as the Babbitt layer.
- Copper-containing layer: Material underneath that helps carry the engine’s loads.
- Steel backing: The structural backing of the bearing shell.
Exposed copper and heavy scoring are signs that the bearing is badly damaged. Even the shells that still looked mostly silver had visible wear marks. These were not healthy bearings ready to go back into an engine.
How a Spun Bearing Can Destroy an Engine
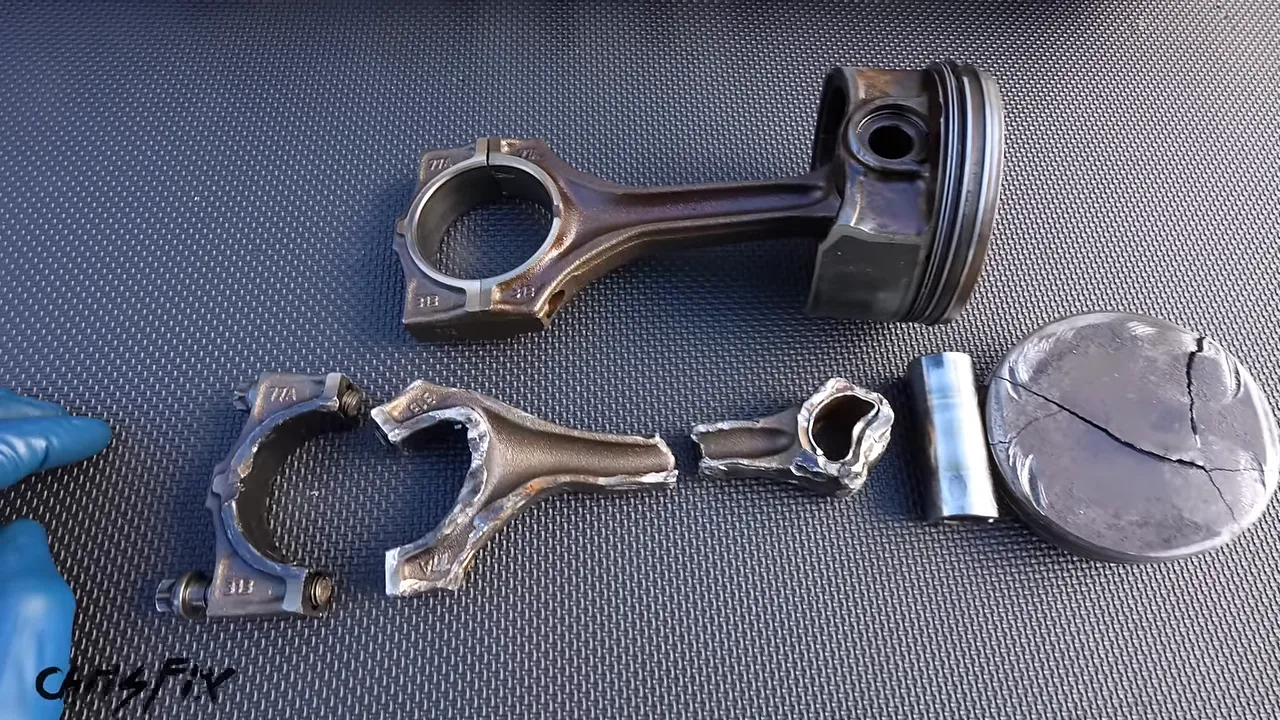
Our number-two crankshaft journal had dark heat discoloration. The damaged connecting rod and cap also showed blackened areas and rainbow-like discoloration from excessive heat.
That heat does more than change the color. It can affect the strength of the parts while they are still being subjected to enormous loads.
Our teardown supported this likely failure sequence:
- The number-two rod bearing lost its protective oil film and made contact with the crankshaft journal.
- The bearing grabbed the journal and spun inside the connecting rod.
- Friction overheated the bearing area and damaged the rod assembly.
- The rod and cap connection failed, allowing the connecting rod to break apart and move uncontrolled inside the engine.
- The broken rod punched through the block, while the piston contacted the valves.
The piston crown was cracked, and the exhaust valves were bent and stuck open. The other piston and rod assemblies remained intact by comparison, making number two the clear center of the catastrophic damage.
Finding a broken rod tells you what finally came apart. The heat damage at the bearing interface helps explain what happened before that.
Six Oil-Related Causes of a Spun Bearing
The common thread is losing the oil film that keeps the bearing and crankshaft separated. There are several ways that can happen.
1. Dirty oil
Dirt and abrasive particles can damage the bearing surface and increase friction. With such a thin oil film between the bearing and journal, contamination can become a serious problem, especially at high RPM.
The air filter and oil filter both matter. Keeping contamination out of the engine and removing particles from circulating oil helps protect those bearing surfaces.
2. Oil contaminated with fuel, coolant, or water
Oil can look present and still fail to provide the protection it should. Fuel dilution or contamination with coolant or water can compromise its lubricating properties.
If that protective film can no longer support the load, the bearing may contact the crankshaft journal and begin to fail.
3. Oil that has broken down
Oil that has stayed in service too long can deteriorate and no longer provide the required protection. Viscosity, or resistance to flow, is part of that picture.
Regular oil changes are not just about keeping an engine clean. They help maintain the lubrication that highly loaded parts depend on.
4. Too much oil
More oil is not automatically better. If the rotating assembly strikes an excessively high oil level, it can whip air into the oil.
Those bubbles compromise the continuous oil film the bearing needs. The result can again be metal-to-metal contact between the bearing and journal.
5. Oil starvation
During hard cornering, oil can move to one side of the pan. If the pickup becomes uncovered, it draws air instead of oil, interrupting the supply to the engine.
This is why oil-pan design and oil control become so important on a racetrack. Having oil somewhere in the pan does not help if it is not covering the pickup.
6. Low oil pressure associated with engine wear
A worn, high-mileage engine may struggle to maintain adequate oil pressure. Bearing wear and excessive clearances can contribute to that problem.
An engine might still start and run, yet have insufficient lubrication margin for sustained high-RPM racing. That distinction became central to our investigation.
Diagnosing Our Failure: What We Ruled Out
We did not want to blame the first familiar problem we found online. We laid out every bearing, piston, bolt, and broken piece, then checked the likely explanations against the evidence.
The famous BMW M54 oil-pump nut problem
One known M54 issue is the oil-pump sprocket nut backing off at high RPM. Vibration can loosen the nut, allowing the sprocket to come off. Without the chain driving the pump shaft, oil pressure disappears.
That sounded like an obvious explanation because our car came off track with no oil pressure.
But the failed engine’s sprocket nut was still installed and tight. The pump inspection did not support that failure mode. Also, our oil-pressure warning did not appear until after the engine threw the rod.
That timing matters. Losing oil pressure after an engine breaks apart does not prove that the oil pump caused the original failure.
A bad downshift or engine over-rev
Aaron was braking from high speed and downshifting for a tight corner. A mistaken downshift, often called a money shift, could have mechanically over-revved the engine.
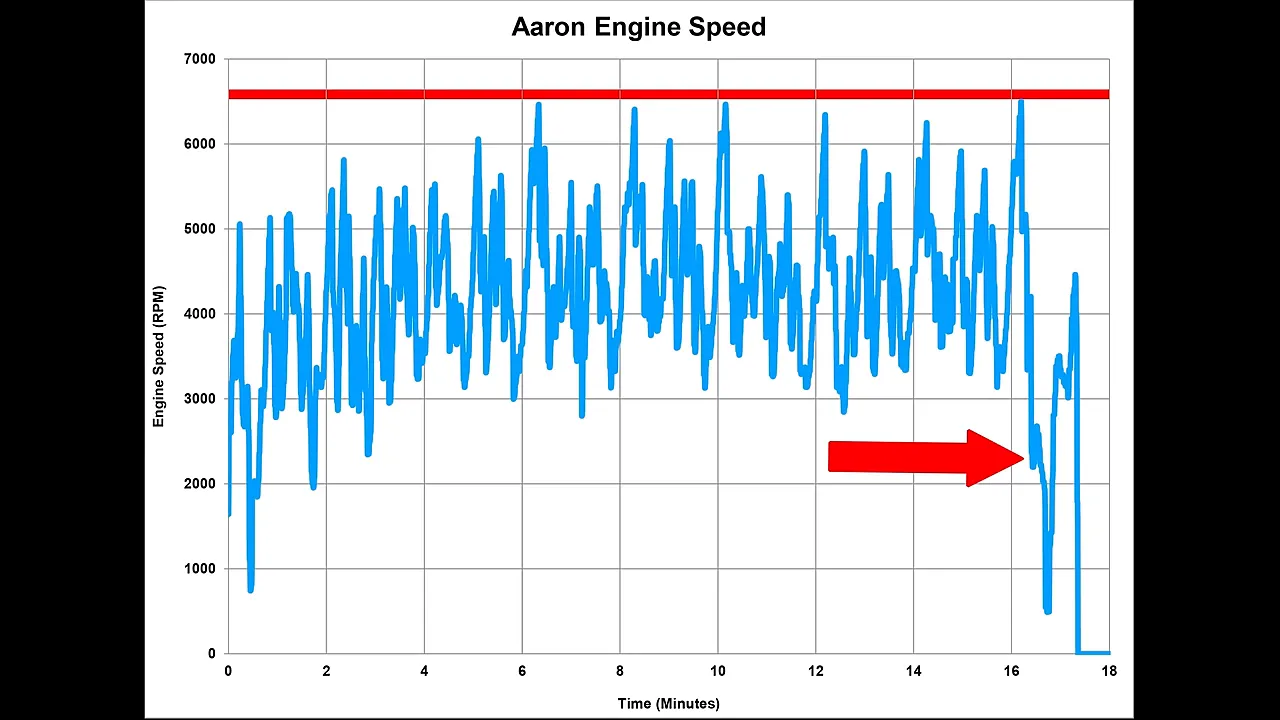
Fortunately, we were logging engine speed. The data showed that the engine never exceeded its 6,500 RPM redline. The failure occurred at approximately the 16-minute, 30-second point in that log.
There was no logged over-rev to support blaming Aaron’s shifting. In fact, his driving was impressively consistent, much more consistent than mine.
Overheating before the failure
We also logged coolant temperature. Aaron pushed the BMW harder than I did, and his temperatures were higher, but the data did not show overheating as the event that triggered the rod failure.
After the engine broke, the recorded temperature briefly dropped. Aaron then pulled off the track roughly half a mile later and shut the engine down.
The big temperature spike, above 245°F, happened afterward. With coolant no longer circulating and heat remaining in the damaged engine, the sensor recorded heat soak.
A high temperature after shutdown is not the same thing as overheating before the engine failed. Looking at the order of events kept us from drawing the wrong conclusion.
What the Oil Analysis Told Us
When we removed the failed engine at the track, we saved an oil sample. That gave us another way to check our theories instead of guessing.
The laboratory report showed:
- High iron, copper, lead, and tin: Evidence consistent with substantial internal wear, including bearing damage.
- No detected fuel, water, or coolant contamination: The sample did not support contaminated oil as the explanation.
- Viscosity consistent with our 5W-40 oil: The oil had not obviously thinned out of its expected grade.
- Low insolubles: The report did not point to excessive dirt or ineffective filtration as the cause.
The wear metals were especially striking because our oil had only about 40 miles of track use. The report’s comparison averages represented roughly 6,000 miles of oil use.
That is a lot of wear material for such a short run, even considering how hard we used the engine.
The sample supported the bearing-damage diagnosis, but it did not show that the oil itself had failed through contamination or incorrect viscosity. If you want more background on what these reports measure, Blackstone Laboratories provides information about used-oil analysis.
Our Most Likely Cause: Low Oil Pressure in a Worn Engine
With the oil-pump nut, over-rev, overheating, and oil contamination unsupported by the evidence, we looked more closely at oil supply and engine condition.
Was oil moving away from the pickup?
Our BMW uses the all-wheel-drive oil-pan arrangement. The axle passage through the pan and the space occupied by the front differential create internal restrictions that help limit how far the oil can slosh.
Compared with a more open pan, that layout gave us reason to consider cornering-related starvation less likely. It was not a direct measurement of oil supply during the failure, but it influenced our diagnosis.
Oil-level strategies are application-specific. A track setup that works for one E46 configuration should not become a blanket instruction to overfill every engine.
The warning light left a big information gap
The original engine was old, worn, and showed signs of poor previous care. The dashboard did not have an oil-pressure gauge. It only had a warning light that, on this car, came on below approximately 7 psi.
That meant we knew the pressure had not crossed an extremely low warning threshold before the failure. We did not know whether it was adequate for sustained operation near 6,500 RPM.
For this engine, we expected roughly 40 to 60 psi at higher RPM in healthy condition. Our theory was that wear might have left it running much lower, perhaps around 15 to 20 psi under the conditions on the straight.
Those lower numbers are a hypothesis, not recorded readings. We were not logging oil pressure.
The best-supported conclusion is that number two spun a rod bearing. Our most likely explanation for the initial oil-film failure is inadequate oil pressure associated with the engine’s worn condition. The teardown established the damage much more firmly than it established the exact pressure immediately before the failure.
Getting the Junkyard M54 Back Into the Car
Back home, teammate Pierce asked to lead the replacement-engine project. He and his dad took on the work and did an awesome job freshening up the 140,000-mile engine from a BMW X3.
Rather than simply dropping it into the car, they addressed several known trouble spots:
- Oil-pump chain tensioner: Pierce installed an aftermarket tensioner, marking, drilling, and threading the required mounting holes in the block.
- Oil-pump sprocket nut: He secured the nut with safety wire to help prevent it from backing off.
- VANOS: He disassembled and rebuilt BMW’s variable valve-timing assembly.
- Seals: He replaced engine and differential seals to address leaks.
- Cleaning: He cleaned the engine and surrounding components thoroughly.
A clean engine is easier to work on, and fresh leaks are easier to spot. We were aiming for the rare BMW that does not mark its territory with fluids.
With everything assembled and installed, the replacement started on the first try, idled smoothly, and drove great.
Making the BMW Better Prepared for Endurance Racing
Seat time comes before race time
One major lesson was that everyone needed more time in the car before another endurance race. That includes learning the corners, feeling how the car behaves, and practicing driver changes and fueling.
Testing also gives the car a chance to reveal problems before an event. I would much rather find a weak component during preparation than discover it halfway through a race.
A louder, lighter exhaust on a tight budget
The stock exhaust was so quiet that hearing the engine’s RPM on track was difficult. We found stainless steel long-tube headers for about $100, an important detail when working with a $500-budget Lemons build.
The difference in construction was easy to see. The original manifolds used narrow passages, sharp turns, and closely mounted catalytic converters. The aftermarket headers used smooth, mandrel-bent runners leading into collectors.
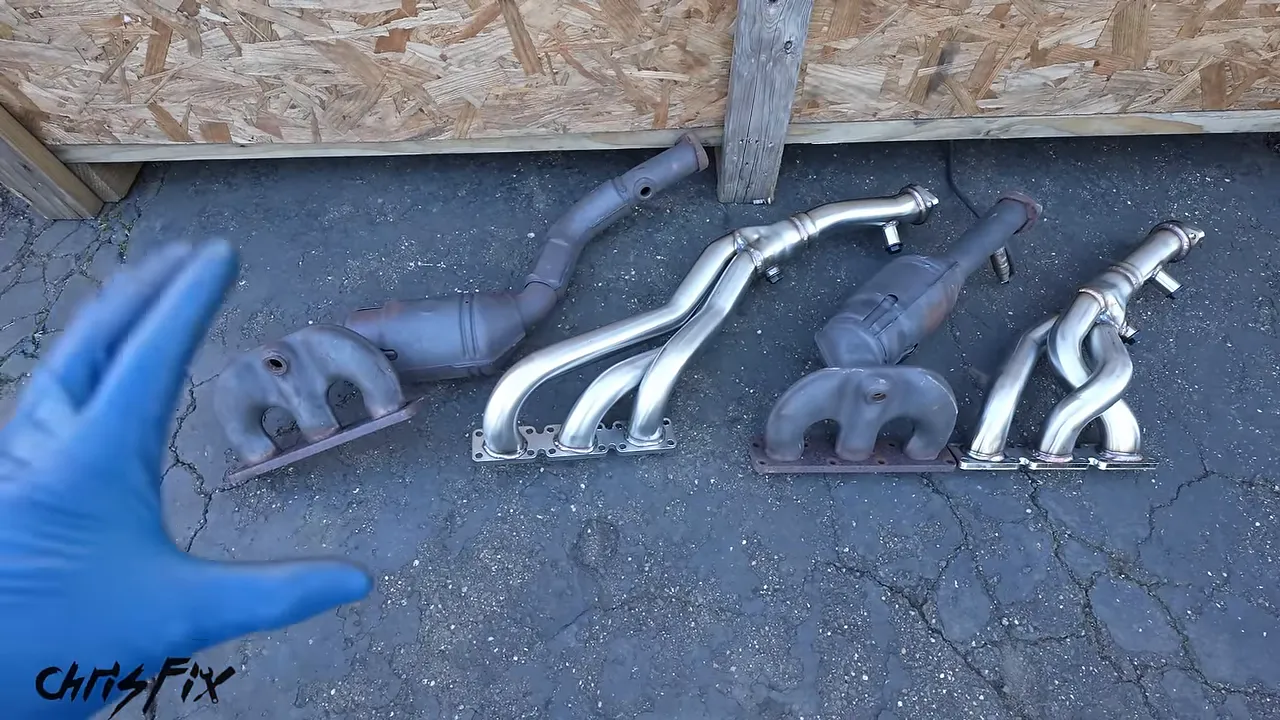
The pair of original manifold assemblies weighed about 30 pounds, compared with roughly 8 pounds for the headers. We had also removed the rear muffler at the track, saving approximately another 20 to 30 pounds, while retaining the rest of the stock exhaust.
The result was less weight and an engine note we could hear. We expected airflow benefits, too, although we did not present a measured horsepower gain. This was a race-car configuration, not a recommendation to remove emissions equipment from a street vehicle.
A backup engine built for reliability
We also learned the value of having a spare engine ready. The team now knew how to remove the BMW’s engine quickly, but that knowledge only helps if a replacement is available.
Jamie at Elite Motorworks began building a second M54 as our backup. The plan was a complete teardown, machine-shop work, and reassembly with upgraded components selected for reliability rather than additional horsepower.
The backup M54 engine build covers that process and the engine’s common weak points in more detail.
What Still Needed Work Before the Next Race
The engine was back in, but the rest of the car still had a few jobs on the list.
First was the livery. I wanted something instantly recognizable among all the BMWs out there, without making the design too busy. A weathered, rat-rod-inspired look felt right for a Lemons car, but none of the submitted concepts had completely nailed the balance yet.
More importantly, we planned to revisit three safety-related installations using what we learned at the race:
- Quick-release steering wheel: Keep a functioning horn and move the radio communication button onto a bracket behind the wheel, so the driver can communicate without taking a hand off.
- Fire suppression: Install both a manually activated system and an automatic system that can respond if the driver is unconscious.
- Electrical cutoff: Properly shut down the engine and isolate power from both the battery and alternator to reduce electrical ignition risks after a crash.
The original steering wheel had temporarily gone back in, and the previous fire-suppression and cutoff components had been removed so those installations could be revisited. A running engine alone did not mean the race preparation was finished.
Our first endurance race definitely did not go the way we wanted. But the failure taught us something useful: do not stop at identifying the broken part. Understand how it failed, separate the evidence from the theory, and use what you learn to improve the whole car.
In our case, one spun rod bearing ended the race. A complete teardown, engine data, and an oil sample helped us understand why, and gave us a much better starting point for the next one.


